You finish a screen tutorial, watch the playback, and the software part looks fine. Then your webcam bubble appears. Your face is dim, the image is noisy, and the whole recording suddenly feels less credible than the information you’re explaining.
That’s a common problem for subject-matter experts. The product knowledge is solid. The workflow is clear. But weak lighting makes the presenter look like an afterthought.
For screen tutorials, you don’t need a full studio. You need a portable video light that makes your face look clean, consistent, and easy to read next to the interface you’re demonstrating. That matters for customer onboarding, help-center videos, internal training, sales enablement walkthroughs, and feature releases. Viewers judge clarity fast, and lighting is one of the quickest upgrades you can make.
Why Your Screen Recordings Need Better Lighting
A bad webcam image does more damage in tutorial content than in casual video. In a vlog, viewers may tolerate a moody room. In a product demo or SOP, poor lighting makes the presenter look unprepared, even when the explanation is excellent.
That mismatch shows up all the time. Someone records a sharp walkthrough of a new feature, nails the narration, and still ends up with a video that feels homemade because their face is lit by a monitor and a ceiling bulb. The UI looks crisp. The human part looks muddy.
If you’re still sorting out your recording stack, this guide to choosing screen recorders is useful for comparing the software side of the workflow. But even the best recorder can’t fix a face that was underlit at capture.
Screen tutorials are judged on trust
When you appear on camera, you’re part of the documentation. Viewers read your expression, eye contact, and confidence while they try to follow steps on screen. If your image is grainy or shadowed, they feel friction even if they can’t explain why.
That’s especially true for:
- Customer onboarding videos where the presenter stands in for the company
- Knowledge-base walkthroughs where clarity matters more than style
- Internal training where teams need to trust the instruction fast
- Sales demos where polish affects perceived competence
A portable video light solves this without turning your desk into a set. It gives you a reliable source of light you can place where it helps, instead of relying on overhead fixtures or daylight that changes throughout the day.
Practical rule: If your face is darker than your screen, your recording feels backwards. The person explaining the software should be as clear as the software itself.
Good lighting also makes your source material more useful across formats. If you’re building repeatable walkthroughs, this screen recording for tutorials guide is a helpful companion because it treats recording quality as part of documentation quality, not a separate production problem.
Understanding the Modern Portable Video Light
A modern portable video light sits between a desk lamp and a studio fixture. It’s small enough to live on a desk, in a laptop bag, or on a compact stand, but it gives you control that household lighting doesn’t.
The easiest way to think about it is this. A portable video light acts like a small, controllable window. You point it where you want light, adjust the intensity, and often adjust the color so it matches the room. That’s why it works so well for tutorials. You’re not trying to light a film set. You’re trying to make one person look clear and consistent on camera.
What makes it different from a desk lamp
A desk lamp throws light where the lamp happens to point. It usually isn’t designed for skin tones, webcam framing, or repeatability. A portable video light is built for those jobs.
Useful differences include:
- Control over brightness so you can avoid blown-out foreheads or dim eyes
- Adjustable color so your face doesn’t look orange under warm room lights or blue beside a window
- Compact mounting options for desks, tripods, monitors, and small stands
- Battery power for flexible placement without hunting for outlets
Why these lights became practical
Portable video lighting became much more useful once LED hardware matured. By the early 2010s, LED technology had reached 28 to 150 lumens per watt and lamp lives of 25,000 to 100,000 hours, which made battery-powered lights more viable for real field use, as outlined in The Broadcast Bridge’s look at small LED lighting.
That shift mattered because creators no longer had to choose between weak pocket lights and bulky powered setups. Compact LED units became bright enough, efficient enough, and reliable enough to fit everyday production.
One milestone from that period was the rise of compact units like the Lume Cube, marketed in the mid-2010s as a 1,500-lumen external flash and video light in a 1.5-inch body with app control, USB rechargeability, and about 2 hours of battery life with a 1-hour USB recharge, as described in the same Broadcast Bridge report. That combination of size, brightness, and control set the pattern for the portable lights many creators use now.
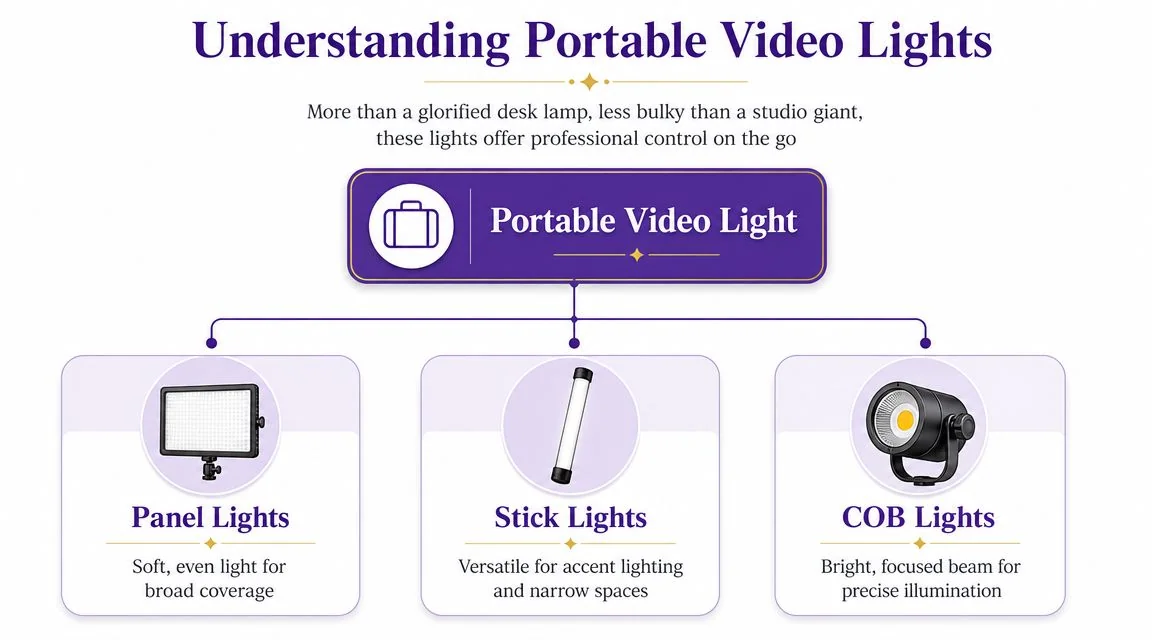
The common form factors
For tutorial work, most portable video lights fall into three broad categories:
- Panel lights for soft, even light across your face
- Stick lights when you need narrow placement or want to edge light a small setup
- COB lights when you want stronger, more focused output and don’t mind a slightly bigger fixture
For most SMEs at a desk, a small panel is the easiest starting point. It’s the least fussy option and usually the most forgiving on a webcam.
Decoding Key Specs for Your Portable Video Light
A portable light looks good on a product page because every model lists the same few specs. Lux. Kelvin. CRI. Battery life. What matters for tutorial work is simpler. You need a light that helps your webcam or camera produce a clean, consistent face shot at a desk, without wasting time on setup tweaks before every recording.
For SMEs recording with screen capture tools, good lighting is not a creative extra. It cuts retakes, reduces the muddy look that makes product demos feel homemade, and gives software-generated tutorials a more polished on-camera segment. If you want a broader comparison of desk-friendly options, this guide to the best videography lights for creators and trainers is a useful next step.
Brightness means light on your face, not wattage on the box
Start with lux. Lux tells you how much light reaches the subject at a specific distance. That is the number that affects whether your face looks clear or noisy on camera.
Analysts at Business Research Insights note that portable lights for video are commonly evaluated around 500 lux as a practical baseline and 1,000 lux as a stronger target, with color ranges around 3,500K to 6,500K and CRI 96+ often associated with better video performance in this category, according to their portable lights market report.
Distance changes everything. A light that looks strong in a handheld demo can fall apart once you place it far enough away to sit outside your webcam frame. For desk tutorials, a usable light should still give you enough output when it is mounted near monitor height or slightly off to one side.
A reviewed portable LED light tested by Fstoppers delivered 1480 lux at 0.5 m, along with 2500K to 8500K color adjustment and CRI 96 / TLCI 97, which makes it a good example of the trade-off with compact fixtures. They can work well for close talking-head shots, but they are not built to light a whole office or fight strong window light from across the room, as shown in this Fstoppers portable LED light review.
Color temperature decides whether you match the room
Color temperature is measured in Kelvin. Lower numbers look warmer. Higher numbers look cooler.
This matters fast in tutorial videos because your face and your background usually share the same frame. If the room is warm and the light on your face is very cool, the mismatch reads as cheap even when the image is technically bright enough. If daylight is coming from a side window, a cooler setting often blends better.
Bi-color lights are usually the safer buy for SMEs. Office lighting changes through the day, and fixed-color lights remove one of the easiest correction tools you have.
Color accuracy affects trust
Poor color accuracy shows up in ways viewers notice even if they cannot name the problem. Skin can look gray. A blue shirt can drift toward cyan. Product packaging, whiteboards, or branded backgrounds can look slightly off.
For tutorial content, that hurts more than it does in casual vlogging. You are often asking viewers to trust instructions, product details, and on-screen guidance. A light with high CRI and TLCI helps the frame look natural before you touch any editing controls.
Battery and mounting are workflow specs
Specs on output and color get attention. Mounting and power determine whether you will keep using the light next month.
For recurring screen tutorials, look for practical fit:
- A mount that works at desk height, such as a mini tripod, clamp, or small stand
- Physical brightness and color controls you can adjust in seconds
- USB-C charging or dependable battery performance if you record away from your main desk
- A body size that stays out of frame when placed near your monitor or webcam
A light that takes two minutes to position often gets used. A light that needs a full rebuild every time often stays in a drawer.
| Specification | What It Measures | What to Look For in Tutorial Recording |
|---|---|---|
| Brightness | Light reaching the subject at a set distance | Enough lux to light your face cleanly from a realistic desk position |
| Color temperature | Warm or cool appearance of the light | Adjustable output that can match office bulbs or daylight |
| Color accuracy | How naturally colors render on camera | High CRI, and strong TLCI if listed |
| TLCI | Video-focused color fidelity | Higher scores are better for camera-friendly color |
| Battery behavior | How flexibly you can place and reuse the light | Rechargeable power that fits mobile or shared-desk recording |
| Mounting | How the light fits your workspace | Stable placement near webcam level or slightly off-axis |
Choosing the Right Light for Your Tutorial Workflow
The right portable video light depends less on abstract quality tiers and more on the way you record. A trainer with a fixed desk setup should buy differently from a consultant who records wherever a laptop fits.

If you record at the same desk every week
Go slightly bigger and softer. A compact panel light on a small desk stand is usually the safest choice. It gives broader coverage across the face and is easier to position consistently.
This setup works well for:
- Help-center video production
- Internal training libraries
- Recurring product updates
- Support walkthroughs recorded by the same expert
The main benefit is repeatability. You can mark the stand position, leave your camera framing alone, and get similar results every time. That lowers friction. The easier your setup is to turn on, the more likely you are to record.
If you work from a laptop in different locations
Prioritize weight, speed, and mounting flexibility. A tiny panel or puck-style light can make sense if it fits in your bag and sets up in seconds.
That’s especially useful for:
- Sales enablement walkthroughs from home and office
- Customer demos from hotel desks or temporary spaces
- Consultants recording short explainers between meetings
The trade-off is softness. Very small lights are convenient, but they can create sharper shadows and more glare on skin or glasses. For mobile recording, convenience often wins, but it’s worth knowing what you’re giving up.
Buying test: If you can’t mount it near webcam height in under a minute, it’s probably too awkward for a real tutorial workflow.
If you want the cleanest talking-head look
Choose a light that gives some surface area, not just raw punch. A broader front surface usually creates a more forgiving result than a tiny intense source.
A larger compact panel works better than an overly focused unit when your job is to explain software calmly and clearly. You’re not trying to create drama. You’re trying to remove distractions.
A good rule is to match the light to the most common recording pattern:
- Permanent desk means desk stand or small arm-mounted panel.
- Shared office or flexible workspace means compact, battery-friendly light with quick repositioning.
- Travel-heavy recording means smallest light you’ll reliably carry.
If you want examples of desk-friendly options and room-size trade-offs, this roundup of best videography lights for practical setups is a useful starting point.
Simple Lighting Setups for Professional Results
The fastest improvement comes from using one light well. Most tutorial creators don’t need a complex rig. They need a reliable key light in the right place.
A good baseline is simple. Put the light slightly to one side of your camera and a bit above eye level, angled down toward your face. That usually gives shape without creating harsh under-eye shadows.
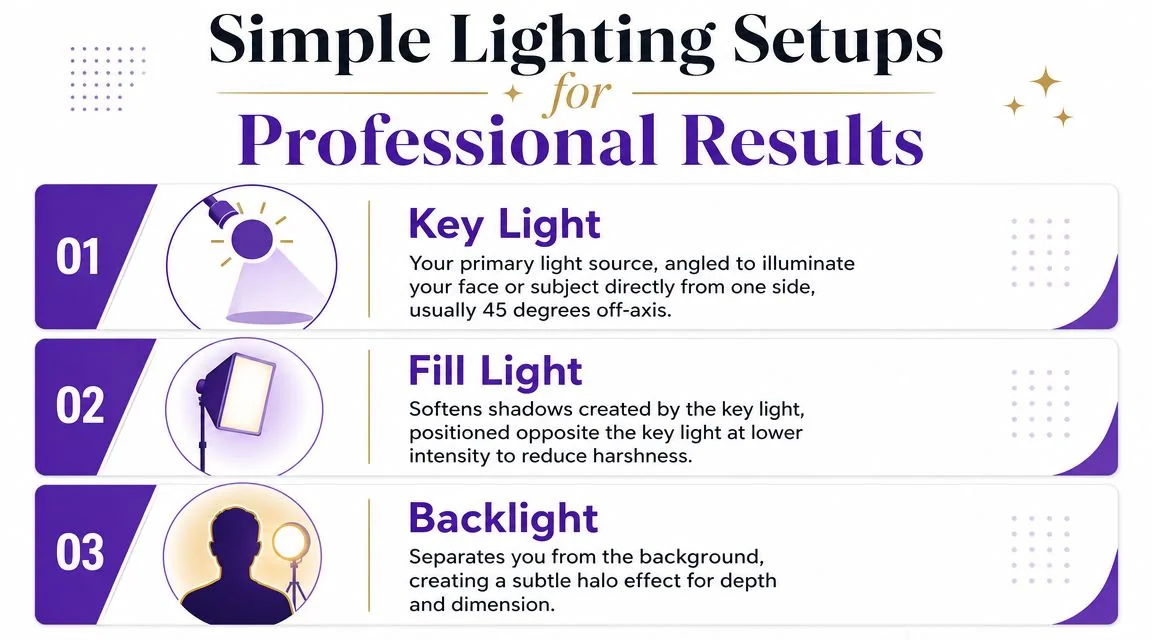
The one-light desk setup
This is the default setup for most product demos and knowledge-base videos.
- Place the key light around 45 degrees to the left or right of the camera
- Raise it slightly so it points down toward your face
- Keep it close enough to stay soft, but not so close that it shows in reflections or feels uncomfortable
- Turn off competing overhead light if it creates odd shadows on your forehead or glasses
This arrangement does two things. It lights your face clearly, and it adds a little dimension so you don’t look pasted onto the screen recording.
For a visual walkthrough of desk lighting choices and placement, this guide on lighting for video recording complements the setup rules below.
A two-light setup when shadows feel too strong
If one side of your face goes too dark, add a weaker fill light on the opposite side. This second light should be softer or dimmer than the key.
That prevents the common mistake of flattening the entire face. You still want shape. You just don’t want a dramatic shadow line in a training video.
Here’s a useful video overview before you start rearranging your desk:
A backlight when the background looks dead
If you record against a plain wall or bookshelf, a small light behind you can help separate you from the background. It doesn’t need to be bright. Its job is subtle separation, not attention.
This works well when your webcam crop is small and your shoulder line blends into a dark chair or background.
A clean tutorial frame usually looks better with one well-placed key light than with three badly balanced lights.
What not to do
A few placements almost always cause trouble:
- Light directly behind the camera. This tends to flatten your face and remove depth.
- Light from below. It creates the classic horror-story look and exaggerates nostrils and chin shadows.
- Bare harsh light too close. This can produce shiny skin, hard wall shadows, and obvious glasses reflections.
- Mixing random room lights. If one lamp is very warm and another is cooler, your skin can look inconsistent across the frame.
If you also want to improve still images for course thumbnails, profile photos, or help-center banners, this article on how to learn pro photo techniques has useful crossover advice on light placement and visual polish.
Budgeting and Troubleshooting Your Lighting Setup
You notice lighting problems fastest after recording. The intro looks flat, your face is darker than the screen capture, or the webcam box has more noise than the rest of the tutorial. At that point, every fix costs time. For SMEs recording product demos, walkthroughs, and help content, a portable video light pays for itself by reducing retakes and cleanup.
As noted earlier, portable LED lights are now standard gear rather than niche gear. That matters because you can buy something practical without building a studio. The goal is simple. Get a setup you can leave in place, turn on in seconds, and trust across repeated recordings in tools like Tutorial AI.
Where to spend and where not to
Spend where it improves consistency from one recording session to the next:
- Reliable color and brightness control, so your face matches across videos
- A mount that fits your desk and stays put, so you are not rebuilding the setup every time
- A light shape that works in your real space, especially if you record beside monitors, shelves, or a wall
- Simple power options, particularly USB-C or battery support if you move between rooms
Save money on features that do not help tutorial production much:
- Extreme output if you only record at arm’s length from a desk
- RGB effects if your job is clear training content, not stylized social video
- Complex multi-light kits if one good key light already solves the problem
A basic light that is easy to position will outperform a more expensive light that stays in a drawer.
Quick fixes for common problems
A few issues show up over and over in screen tutorials, and the fix is usually mechanical, not technical.
- Glasses reflections. Raise the light slightly above eye level and move it farther off to one side.
- Hard shadow on the wall. Increase your distance from the wall, or use a softer light source.
- Shiny forehead or cheeks. Lower the brightness and shift the light a little off-center.
- Webcam image still looks noisy. Move the light closer to you instead of adding random room lamps.
- Skin tone looks off. Match the light’s color temperature to the room, or turn the room lights off and use one consistent source.
- One side of the face disappears. Bring in a small fill from the opposite side, or bounce light off a pale wall.
These are small adjustments, but they have a direct effect on the finished tutorial. Better lighting makes your webcam feed easier to trust, helps your documentation look more polished, and gives repurposed outputs a cleaner starting point.
A strong recording starts before editing. Tutorial AI helps teams turn one screen recording into a polished tutorial video and a matching written article, so the effort you put into clear narration, clean visuals, and a well-lit camera feed carries through to both outputs. If your team creates product demos, onboarding guides, support content, or internal training, it’s a practical way to ship documentation faster without needing Adobe Premiere Pro skills.