A direct answer to how to embed video on a website is simple: 1) copy the embed code from your video host, 2) paste it into your CMS HTML or embed block, 3) publish the page, and 4) test the live result on mobile, with captions enabled, and with keyboard controls. If you need more control, self-host the file and embed it with the HTML5 <video> element instead of a third-party iframe. The method you choose still affects responsiveness, loading behavior, accessibility, and maintenance, so it is worth treating the embed as a publishing decision, not just a paste task.
Choosing the Right Video Embed Method for Your Website
Most embed failures start with the same shortcut. Someone copies code from a video host, pastes it into a visual editor, and assumes the published page will behave like the preview. The result may work on desktop but overflow on mobile, lose its captions, or load a player that the site owner can’t fully control.
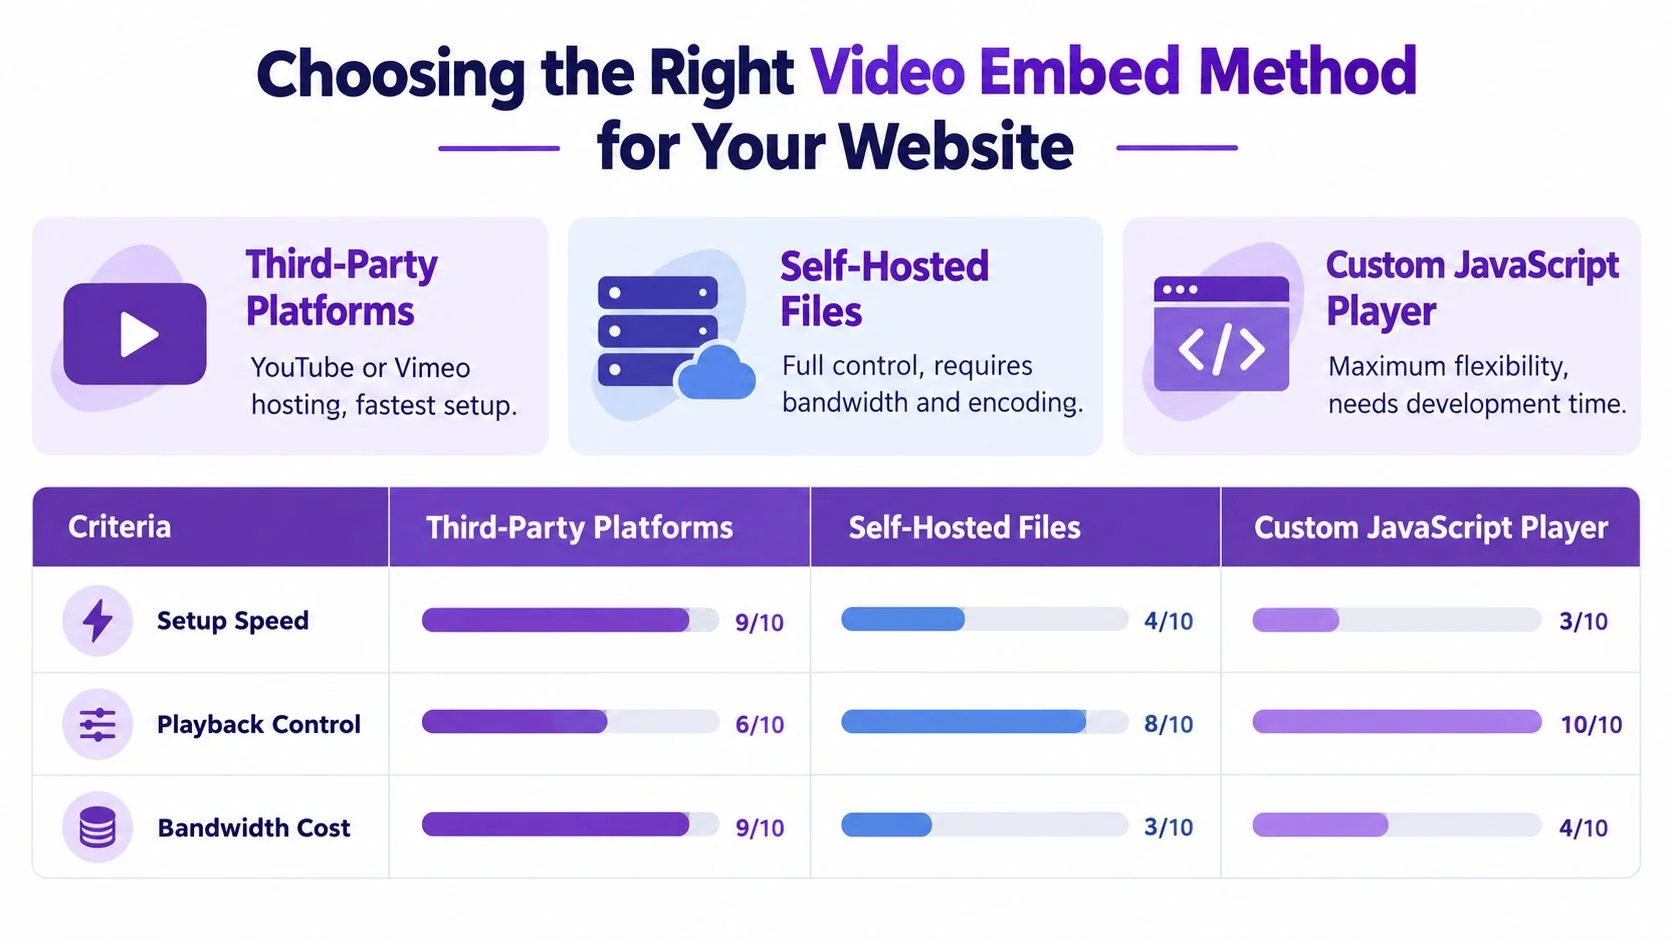
Start by choosing among three approaches:
- Third-party platforms such as YouTube or Vimeo host the video and provide an iframe or player embed. They’re usually the quickest option for public tutorials and reduce the burden of video delivery.
- Self-hosted files use the native HTML5
<video>element. Your team controls the markup, sources, poster image, and surrounding experience, but your infrastructure must deliver the media reliably. - CMS-specific solutions use the blocks, media fields, or embed components built into WordPress, Drupal, Squarespace, or another publishing system. They can be efficient, but each CMS has its own rules for responsive sizing, sanitization, and media handling.
Match the method to the job
Use a hosted platform when fast publication, broad playback compatibility, and low delivery overhead matter more than complete brand control. Use self-hosting when privacy, custom controls, or a tightly integrated product experience justify the extra engineering. Use a CMS-native method when your editors need a repeatable workflow and the platform already handles the surrounding layout well.
For software training, also consider how often the content changes. A hosted player or dedicated embed system can make replacement easier than manually updating every page. A tutorial that documents a sensitive internal workflow may need a controlled host rather than a public video platform.
Practical rule: Choose the hosting and player model before you write the page layout. Changing it later can affect accessibility, analytics, caching, and every responsive breakpoint.
If you want a purpose-built option for placing training videos inside documentation or product pages, review this embeddable video player alongside the capabilities of your existing host. The decision should follow the audience, the sensitivity of the content, and the level of maintenance your team can support.
Embedding Video with YouTube or Vimeo for Tutorials
Third-party hosting is often the fastest route for a tutorial page. You upload the video once, copy the platform’s embed code, and place it in an HTML, embed, or custom-code block. The trade-off is that the platform controls part of the playback experience, and your page depends on an external service for delivery.
YouTube suits reach and convenience
YouTube is a practical choice for public product walkthroughs, discoverable help content, and tutorials that benefit from an established video ecosystem. Its embed settings let you configure features such as controls, fullscreen playback, and related viewing behavior, but the surrounding experience still belongs partly to YouTube.
A typical iframe looks like this:
<iframe src="https://www.youtube.com/embed/VIDEO_ID" title="How to create a customer segment" loading="lazy" allow="accelerometer; autoplay; clipboard-write; encrypted-media; gyroscope; picture-in-picture" allowfullscreen></iframe>
Replace VIDEO_ID with the identifier supplied by YouTube. Keep the title specific to the lesson rather than using a generic label such as “video.” Add a responsive wrapper in your site’s CSS so the iframe preserves its proportions instead of receiving a fixed desktop width.
YouTube is less suitable for confidential internal procedures or pages where a distraction-free, fully branded player is essential. Confirm the platform’s current privacy and embedding settings before publication, because available controls and policies can change.
Vimeo suits controlled presentation
Vimeo is often considered when a team wants a more polished, brand-conscious presentation and stronger control over where a video appears. The exact privacy, customization, analytics, and language options depend on the account and current plan, so verify them in the platform dashboard rather than assuming every account has the same controls.
The implementation pattern is similar:
<iframe src="https://player.vimeo.com/video/VIDEO_ID" title="How to configure the product workspace" loading="lazy" allow="autoplay; fullscreen; picture-in-picture" allowfullscreen></iframe>
For either platform, test the published page rather than relying on the editor preview. Check keyboard access, captions, fullscreen behavior, mobile orientation, cookie or consent behavior, and whether the video remains usable when third-party scripts load slowly.
A hosted player also doesn’t remove your accessibility responsibility. You still need accurate captions, a useful title, and a text alternative for important visual actions. If your tutorial shows a cursor selecting a menu that the narration never names, captions alone won’t communicate the entire lesson.
Self-Hosting Video with HTML5 Players
A self-hosted player gives your team direct control over the markup, files, and surrounding page experience. The modern way to place video directly in a webpage is the HTML5 <video> element, which replaced proprietary plug-ins such as Adobe Flash. The browser handles playback, while your site controls the CSS, JavaScript, captions, fallback content, and loading behavior. See the HTML5 video overview for background on compatibility and implementation.
Start with one responsive wrapper. It reserves the video’s shape before the file loads, which prevents the tutorial page from jumping when playback becomes available:
<div class="video-frame"><videocontrolswidth="1280"height="720"poster="/media/product-demo-poster.jpg"preload="metadata"playsinline><source src="/media/product-demo.webm" type="video/webm"><source src="/media/product-demo.mp4" type="video/mp4"><p>Your browser can't play this video. Read the <a href="/guides/product-demo-transcript">text version of the product demo</a>.</p></video></div>The snippet uses a single video-frame wrapper. Keep the explicit width and height, or apply CSS aspect-ratio, so the browser can reserve space before playback begins. A representative poster gives learners context while the player waits and provides a useful visual fallback.
Select sources and loading behavior deliberately
Place WebM before MP4 when both are available, then test the result on the browsers and devices used by your audience. Early HTML5 video implementations did not settle on one mandatory codec, so multiple compatible sources remain a practical production pattern.
Use preload="metadata" as the usual starting point. Metadata gives the player basic file information, while preload="none" avoids the initial media download. preload="auto" may fetch the entire file even if nobody watches it. For a tutorial below the fold, pair a poster with preload="none" or use a lazy-loading approach.
Do not expect preload to control downloading when autoplay is present. If a silent product demo must start automatically, use autoplay muted loop playsinline, keep visible pause controls, and test mobile behavior.
Your server should support byte-range requests and return correct MIME types. Measure the poster and video separately, because an oversized poster can create the same perceived delay as an unnecessarily heavy video. For attribute details and browser behavior, consult MDN’s video element reference. CMS editors may strip attributes or rewrite markup, so inspect the published HTML rather than trusting the editor preview.
Making Embedded Video Accessible for All Users
An embedded video can play successfully and still exclude part of its audience. Accessibility belongs in the media workflow, the markup, and the release checklist. It isn’t something a player can reliably add after the page goes live.
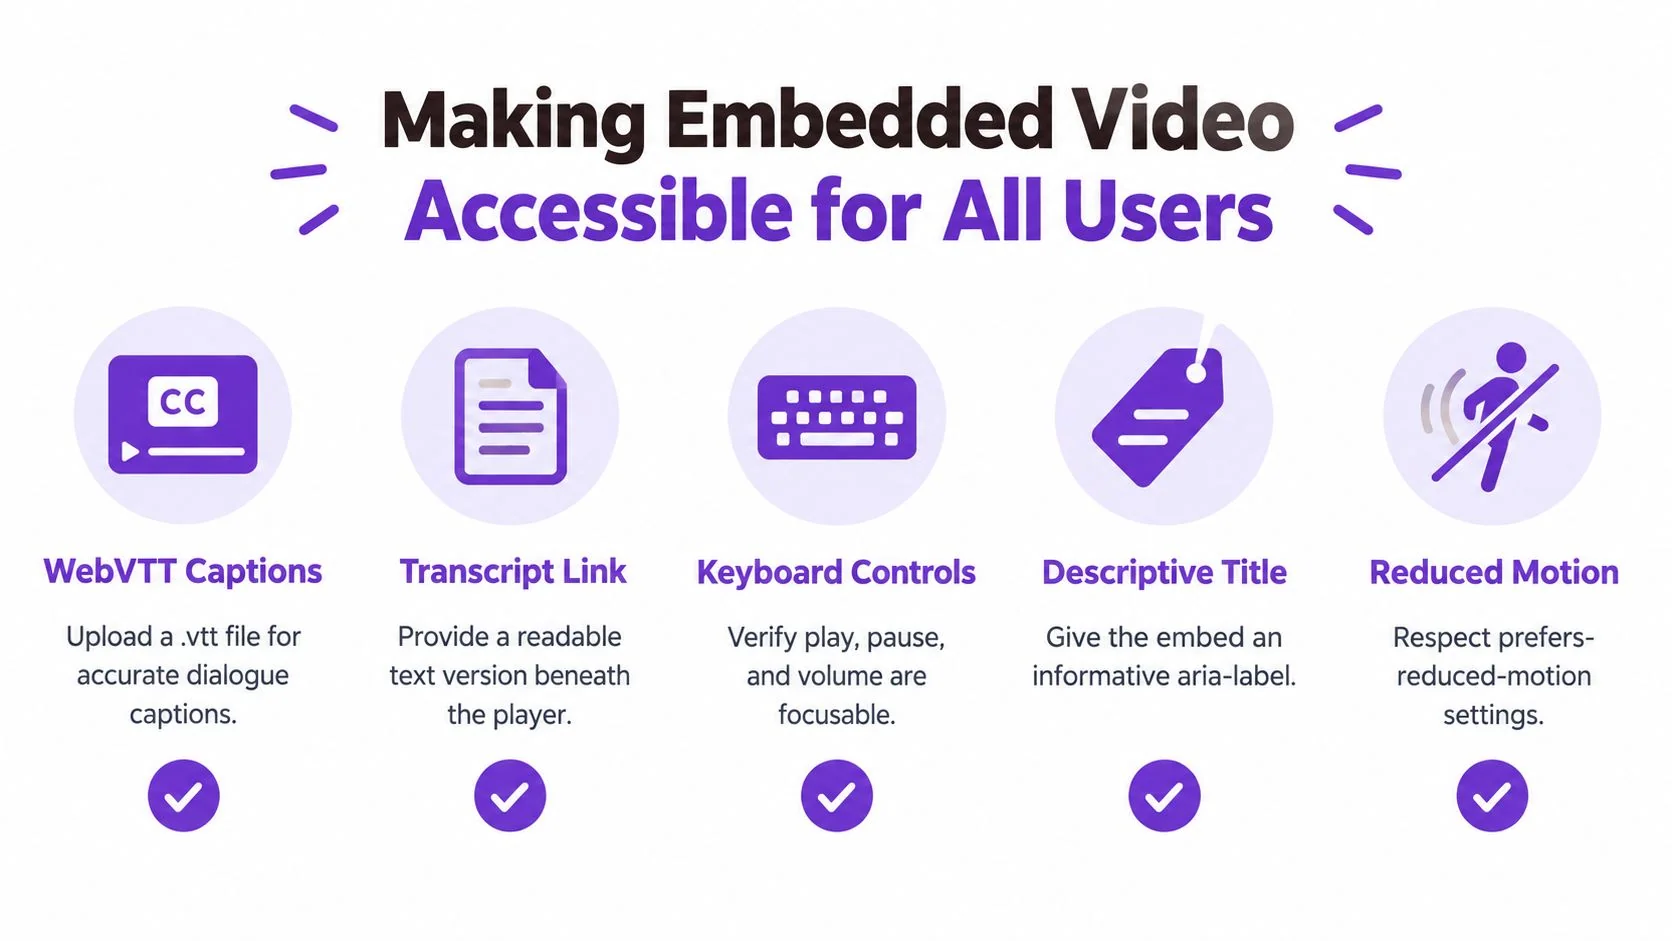
For prerecorded instructional video with synchronized audio, WCAG 2.1 Success Criterion 1.2.2 requires captions unless the video is clearly labeled as an alternative presentation of equivalent text already available on the page. Captions need to convey spoken dialogue, identify speakers when that matters, and include meaningful non-speech sounds such as an alarm, applause, or an interface cue. See the WCAG guidance on captions for prerecorded media.
Add captions in the player
With a native player, place the WebVTT track after the source elements:
<track kind="captions" srclang="en" label="English" src="/media/captions-en.vtt" default>
Review the file manually. Automated transcription can miss product names, keyboard commands, speaker changes, and short interface sounds. For translated training, provide a separate track for each supported language instead of burning text into the video. Selectable tracks can be resized and controlled by the viewer.
Captions don’t replace a transcript. A transcript lets someone search, review, or follow the content at their own pace, and it can describe important screen activity that isn’t present in the audio. If a cursor opens a settings menu without narration, include that action in the transcript or explain it through audio description. WCAG also addresses equivalent alternatives for video-only material and descriptions of visual information in synchronized media through its broader media requirements.
Test the complete interaction
Treat the player as an interactive component, not a decorative rectangle. Check each of these before publication:
- Keyboard operation: Confirm that play, pause, volume, captions, seek, and fullscreen controls can receive focus and be activated without a mouse.
- Focus visibility: Make sure the active control remains visually obvious against the player background.
- Transcript equivalence: Compare the transcript with the recording, including visual steps and meaningful sounds.
- Reduced motion: Check whether animated zooms, cursor effects, and autoplay behavior remain comfortable for people who prefer reduced motion.
- Failure states: Disable the media or caption request and verify that the poster, fallback message, and transcript remain usable.
For a focused implementation reference, use these video accessibility guidelines while reviewing your player and content process.
CMS-Specific Video Embedding Instructions
A CMS can simplify publishing, but it can also rewrite markup, strip attributes, or impose a fixed width. Use the platform’s native media feature first, then inspect the published HTML and mobile layout.
WordPress
In the block editor, add a Video block for a self-hosted file or an Embed block for a supported third-party host. Upload or select the video, add a poster, enable controls, and enter captions when the block supports a track. For a hosted player, use a Custom HTML block only when the provider requires iframe markup.
After saving, inspect the page on a narrow viewport. Remove conflicting fixed width and height rules from custom CSS, and check that the wrapper, rather than the iframe itself, controls the responsive width. A responsive embed plugin can help on older themes, but don’t install one blindly. First confirm whether the theme already applies responsive behavior, because overlapping rules can create distortion.
Drupal
Create or select a media entity and attach it to the content type through a media field. Configure the display formatter for the intended player, supply a poster where the field supports one, and add caption tracks or a transcript through the media workflow rather than hiding them in a separate editorial note.
Drupal installations vary significantly, so test the rendered field after every theme or module change. If a custom player is used, confirm that sanitization hasn’t removed required attributes or the <track> element. Keep the media record separate from the article body when editors need to reuse the same training asset.
Squarespace
Add a Video block for hosted content or an Embed block when you need to insert provider code. Set the block width through the page editor, then check the result in mobile preview and on an actual phone. Avoid placing a fixed pixel width in custom code, since the block may already be responsible for sizing.
If the video is stretched, look for a mismatch between the source dimensions and the wrapper’s aspect ratio. If mobile playback fails, check the provider’s mobile policy, autoplay settings, consent tools, and whether the player is being hidden by an overflow rule. Publish a draft and test the actual URL, not only the editor canvas.
Optimizing Video Performance and User Experience
Video delivery is a bandwidth problem as much as a markup problem. In practice, performance usually improves when you keep the source file as small as possible for the lesson, use a poster image so the page does not fetch the full video immediately, choose a deliberate preload value, and rely on adaptive delivery when viewers may watch across different devices and connection speeds. The goal is not to send the highest possible quality to everyone. It is to make playback start predictably without slowing down the rest of the page.
Reduce work before playback
For below-the-fold content, use a poster and preload="none" where appropriate. You can also delay player initialization with Intersection Observer so the media approaches the viewport before the browser requests it. This is especially useful on documentation pages containing several tutorials.
Autoplay deserves a separate decision. Browsers generally allow autoplay for a video with no audio track or with muted audio, while audible autoplay may be blocked. A compatible silent-demo configuration commonly uses autoplay muted playsinline, but it should still include controls and a clear pause path. Don’t use autoplay for narrated training content unless there’s a compelling reason and the experience has been tested with keyboard and assistive technology users.
Measure the user experience
Track Largest Contentful Paint, initial transfer size, play-start delay, buffering, and abandonment by device and connection type. These measures help distinguish a poster problem from a video delivery problem. A page may have a fast player but a slow start because the host is distant, the file lacks useful segmentation, or the browser is waiting for a consent decision.
Use adaptive delivery when the audience watches longer or higher-resolution material across variable connections. For short software clips, efficient encoding and deferred loading may be enough. The practical target isn’t maximum resolution. It’s a clear demonstration that starts predictably without making the surrounding page wait.
When the source file itself is too heavy, use this guide to reducing video file size before changing the entire hosting architecture.
Building Your Video Embed Strategy
Choose the simplest method that meets the content’s actual requirements.
| Situation | Suitable approach | Main trade-off |
|---|---|---|
| Public tutorial that needs quick publication | YouTube or Vimeo | Less control over the complete player experience |
| Branded help center with controlled delivery | Self-hosted HTML5 or a dedicated embed service | More responsibility for delivery and QA |
| Editorial team publishing recurring lessons | CMS-native media workflow | Platform-specific limitations |
| Sensitive internal process | Controlled host or self-hosted player | Requires careful access and maintenance planning |
Before publishing, verify the source formats, responsive wrapper, poster, preload behavior, captions, transcript, keyboard controls, mobile orientation, and fallback message. Open the page on a slow connection and with captions enabled. Then update the video from the source workflow and confirm that the page doesn’t retain an outdated file or broken track.
For a software team, a practical workflow is to record the task once, generate the tutorial video and written guide, review the steps and captions, then share or embed the final version where your audience needs it. Tutorial AI supports turning one screen recording into tutorial videos and written documentation in one workflow, with options to share, embed, or export the finished result through its platform features.
Tutorial AI helps teams record a software task, turn it into a tutorial video and written guide, review both before publishing, and then share or embed the finished tutorial. Use Tutorial AI to document a new feature, convert an employee walkthrough into training content, and prepare an embeddable tutorial with the supporting steps your audience needs.