You’ve probably done this already. You record a strong product demo, explain the workflow clearly, and then notice the background. A cluttered shelf. A dim meeting room. People moving behind you in an open office. Nothing about the explanation changed, but the video suddenly feels less usable.
That matters more than many realize. Backgrounds affect trust, focus, and how easy the video is to follow. In help-center videos, onboarding lessons, SOPs, and sales walkthroughs, the background shouldn’t compete with the product or the speaker. It should support the message.
For subject-matter experts, the question isn’t just how to add backgrounds to videos. It’s which method makes sense for the kind of video you’re making. A one-off keynote intro can justify a heavier production setup. A weekly release note video can’t. A support team publishing fast screen-and-face explainers needs a workflow that stays consistent even when the person recording isn’t a trained editor.
Why Your Video Background Matters More Than You Think
A distracting background isn’t just a style problem. It can reduce comprehension.
A 2024 controlled study of educational videos found that background choice and working-memory capacity explained 13.76% of the variance in posttest scores, and the study concluded that neutral backgrounds were the least distracting. That’s the useful takeaway for tutorial creators. If the goal is understanding, a calm background is the safest default.
Clean beats interesting for most tutorial formats
Product experts often overestimate how much atmosphere helps. In practice, most business videos benefit from backgrounds that are quiet, predictable, and visually restrained.
That applies especially well to:
- Help-center videos where the viewer is already task-focused and wants the answer fast
- Customer onboarding where clarity matters more than personality
- Internal training where consistency across many videos makes the library easier to trust
- Sales enablement walkthroughs where the product interface should stay central
If you’re explaining a feature release, a support fix, or a setup flow, the background’s job is simple. Keep attention on the screen and the speaker.
Practical rule: If the viewer needs to remember steps, choose a background that disappears.
The wrong background creates friction fast
The most common mistakes aren’t dramatic. They’re small visual frictions that keep pulling attention away from the lesson.
A few examples show up repeatedly:
- Busy home offices with books, cables, or movement behind the speaker
- Open-plan workplaces where people pass through frame
- Novelty virtual backgrounds that look synthetic and pull focus
- High-contrast scenes that make the speaker look cut out from the frame
None of those problems make a video unwatchable. They just make it harder to process.
For tutorial content, that’s enough reason to treat background choice as part of the instructional design, not as cosmetic cleanup at the end. The best background often feels almost invisible. It gives the video structure without asking for attention.
Match the background to the job
Different tutorial formats need different levels of polish, but they all benefit from intention.
A quick support answer can work with a subtle blur or a simple neutral replacement. A formal onboarding series may call for a branded studio-style backdrop that looks consistent across every module. A product marketing walkthrough may benefit from a more designed environment, but only if the foreground still reads clearly.
The mistake is using the same background approach for every video. The better move is to choose a method that matches the publishing cadence, the stakes, and who will maintain the workflow after the first few videos.
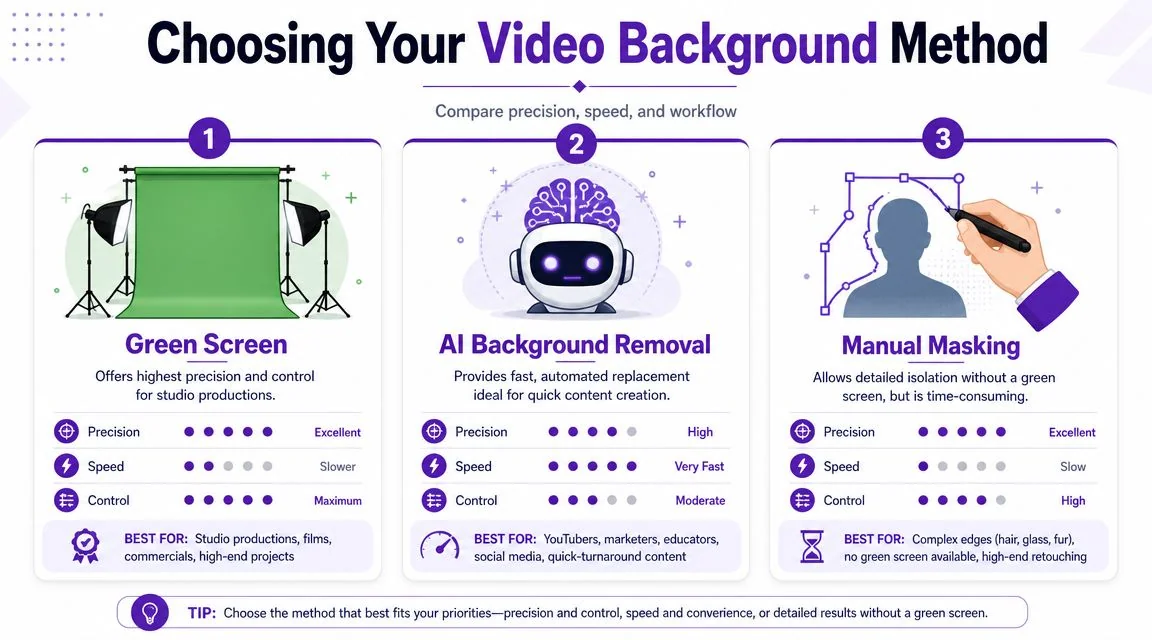
Choosing Your Background Replacement Method
There are three practical ways to add backgrounds to videos. Green screen, manual masking, and automated background replacement. None is universally best. The right one depends on workflow.
A useful way to think about it comes from guidance on background workflows for live and recorded production. The key distinction is whether you need fast live production, reusable branded templates, or precise post-production control. That decision matters more than the editing trick itself.
Start with the video type, not the tool
If you’re recording one executive announcement in a controlled room, green screen can make sense. If your support team publishes new videos every week, a setup that depends on lights, backdrop placement, and editor cleanup will usually break down.
If you’re creating:
- Formal onboarding series, consistency usually matters most
- Help article videos, speed matters most
- Internal SOPs, repeatability matters most
- Sales demos, you need polish without a heavy production loop
That’s why the decision should start with the output and publishing volume.
Here’s a practical comparison.
| Method | Best For | Time/Effort | Primary Challenge |
|---|---|---|---|
| Green Screen | Studio-style onboarding, formal launches, controlled shoots | Higher setup and editing effort | Lighting and cleanup have to be right |
| AI Background Removal | Help-center videos, demos, internal training, recurring content | Fastest for most teams | Less manual control over every edge case |
| Manual Masking | One-off edits without green screen, special corrections | Slow and detail-heavy | Motion around hands, hair, and edges |
What works in real team environments
Green screen gives the most control, but it asks for discipline. Someone has to manage the space, the lighting, and the edit.
Manual masking works when you need to salvage a clip or isolate a subject without reshooting. But it doesn’t scale well across a content program. It’s too dependent on careful frame judgment and cleanup.
Automated replacement is usually the default choice for business teams because it fits how tutorial production is conducted. Product managers, support leads, and trainers don’t want to become compositing specialists. They want a dependable result that looks professional enough, quickly, across many recordings.
Most teams don’t need the most cinematic method. They need the method they’ll still use next month.
If you’re also evaluating visual style options, gifPaper’s guide to video backgrounds is a useful reference for thinking through background mood and motion. It’s especially helpful when you’re deciding whether a static image, subtle motion, or a simple blur will support the foreground instead of competing with it.
For teams that decide a full replacement is too much, a middle path often works well. A soft blur keeps privacy and focus without inviting compositing artifacts. Consequently, a workflow dedicated to background blur in tutorial videos can be more practical than a full cutout.
The Green Screen Workflow for Total Control
Green screen is still the cleanest option when you need maximum control over the final frame. It works well for polished onboarding, executive education content, and any video series where you’ll keep the same set and visual style over time.
But green screen only works when the capture setup is disciplined. The biggest failure point isn’t the editor. It’s the shoot.
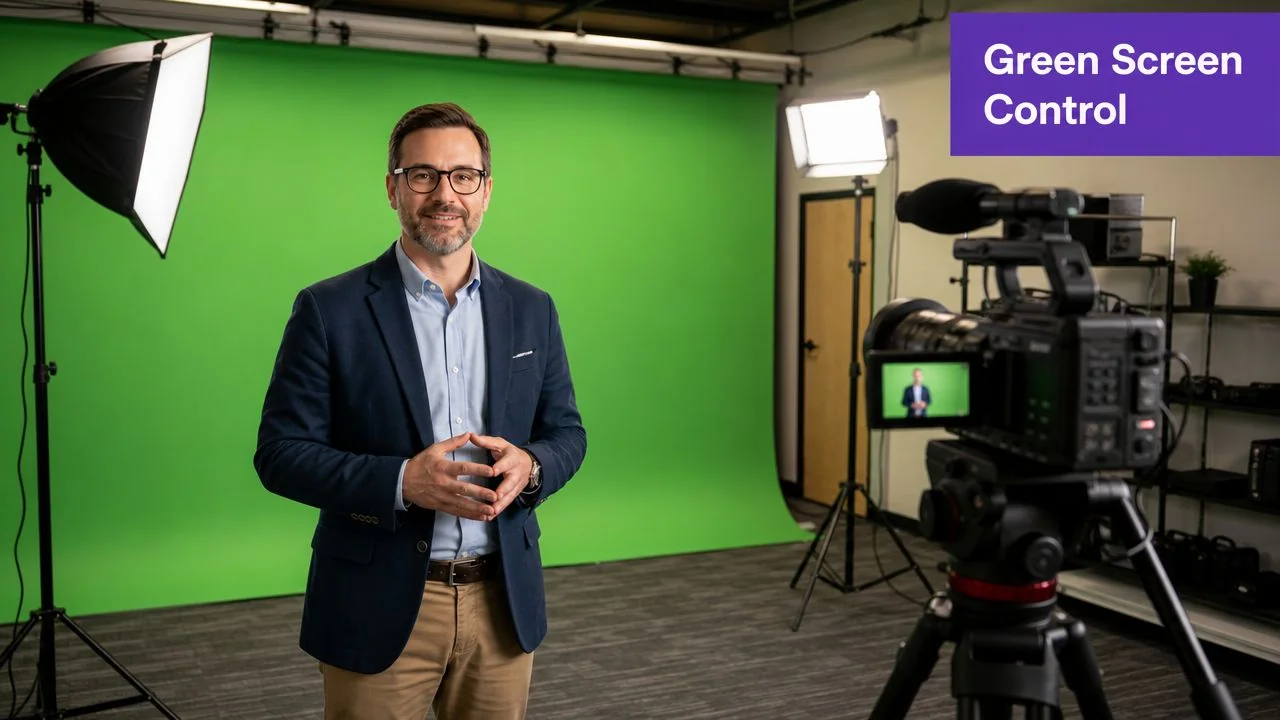
Get the capture right before you edit
A standard green-screen editing workflow places the subject clip on the top track, applies a color key, and places the background clip underneath. But according to this green-screen editing walkthrough, the major pitfall is uneven screen illumination, which causes imperfect keying around hair and shoulders.
That’s why setup matters more than people expect.
Use this checklist before recording:
- Light the screen evenly: The green backdrop should read consistently across the frame. Hot spots and shadows make keying harder.
- Light the face separately: The speaker needs distinct lighting from the backdrop so the editor can separate subject from background more cleanly.
- Keep distance from the screen: If the subject stands too close, green spill can show up along skin, hair, and clothing edges.
- Avoid edge-confusing wardrobe: Fine patterns, reflective materials, and colors close to the screen can complicate cleanup.
Edit with restraint
Once the footage is in Adobe Premiere Pro, Final Cut, Camtasia, or another timeline editor, the basic sequence is straightforward. Put the speaker on top, apply the key effect, then drop the replacement background on the lower track.
The trouble starts when editors chase a “perfect” key too aggressively. Strong settings can remove the green, but they can also chew into hair, shoulders, and soft contours near the face.
A better approach is to refine in small moves:
- Remove the obvious green first
- Check edges around hair and shoulders
- Adjust spill suppression carefully
- Preview motion, not just still frames
Watch the edge in motion: A key that looks clean on a paused frame can fall apart the moment the speaker turns or gestures.
When green screen is worth it
Green screen earns its keep when you can control the recording conditions and reuse the setup across many videos. That usually means a dedicated room, consistent lights, and someone who knows how to fix edge problems without overprocessing the shot.
It’s a weaker choice when:
- multiple teammates record from different locations
- you publish fast-turn support or release videos
- the person recording is also the person editing
- you need a flexible process that works across desktop, browser, and mobile capture
For those cases, green screen often creates more operational drag than visual value. It can still produce the best-looking cut, but only if your team can support the setup every time.
AI Backgrounds The Fast Path to a Polished Look
Most tutorial teams don’t need studio precision. They need something they can use repeatedly without turning every recording into a post-production task.
That’s why automated background replacement has become the practical choice for product demos, onboarding explainers, support article videos, and internal training. It removes the setup burden of green screen and the frame-by-frame discipline of manual masking.
Why automation fits tutorial production better
A common no-green-screen workflow involves drawing a mask around the speaker, inverting it, and leaving extra room around the body and hands so motion doesn’t get clipped. In this masking walkthrough, that’s called out as a common failure point. Natural gestures are exactly where manual masks tend to break.
Automated tools solve the part that slows teams down most. They isolate the speaker without requiring the recorder to become an editor.
That matters because tutorial production usually has these constraints:
- The expert records the content: The person who knows the product often isn’t a video specialist.
- The turnaround is short: Release notes, support fixes, and onboarding updates can’t wait for a long edit queue.
- The format repeats: Once a team finds a look that works, they want to reuse it across many videos.
- The content changes often: The workflow needs to keep up with product changes, not fight them.
What this looks like in practice
For a help-center team, the ideal process is simple. Record the screen and voice, apply a clean background treatment, tighten pacing, publish, and move on.
For an onboarding team, the same core workflow should support branded backgrounds, repeatable layouts, and consistent presentation across a series. For sales enablement, the main requirement is speed with enough polish that the video feels intentional when shared externally.
Here’s a demo of the broader workflow in action.
The real advantage is operational, not cosmetic
The biggest win isn’t just that the background looks cleaner. It’s that the process becomes repeatable for non-editors.
Casual screen recorders are fine for quick sends, but recordings often include pauses, restarts, and extra explanation that shouldn’t make the final cut. Traditional editors like Camtasia, Adobe Premiere Pro, and Final Cut offer control, but they expect real editing skill. For most business teams, that’s the bottleneck.
A system built for tutorial production works better when it combines recording, script cleanup, pacing adjustments, branded visuals, and publishing in one path. That’s especially useful when different teams need the same output style across product education, internal training, and customer support.
If your process depends on an expert editor touching every video, it won’t scale well across a growing knowledge base.
That’s also why automated methods are usually the best answer to how to add backgrounds to videos for business use. Not because they are always visually superior, but because they’re the only approach many teams can run consistently.
Mastering the Details for a Believable Look
Most background replacements fail for one simple reason. The editor stops too early.
Getting rid of the original room is only step one. The harder part is making the new scene feel plausible. If the lighting, color, depth, and sharpness don’t match, the speaker looks pasted on.

Treat it as compositing, not decoration
That’s the key lesson from this guidance on realistic background replacement. Realism improves when editors match color and lighting and soften the background with blur, treating the job as compositing, not just placing one layer behind another.
The practical implication is clear. Don’t choose a replacement background in isolation. Choose one that fits the footage you already have.
A few adjustments usually matter most:
- Match brightness: A bright office background behind a dimly lit speaker looks wrong immediately.
- Match color temperature: Warm skin tones against a cold blue scene can create a cutout effect.
- Reduce background sharpness: A slight blur helps separate the speaker and keeps attention forward.
- Add subtle shadowing when available: This can help the subject sit inside the scene rather than float over it.
Use less style than you think you need
Teams often choose backgrounds that are too dramatic. Large city views, glossy studio renders, and highly saturated office scenes can look impressive on their own, but they often overpower the foreground.
A more believable choice is usually:
- a simple office or studio scene
- low visual contrast
- muted color range
- enough negative space around the speaker
That’s especially true in support videos and internal training, where the objective is confidence and legibility, not spectacle.
A believable background rarely calls attention to itself. That’s why it works.
Blur also solves privacy and focus problems
Background treatment isn’t only about aesthetics. It also helps with privacy and attention control.
If someone records from a real office or home workspace, blur can hide details that don’t belong in the video. In screen recordings, similar thinking applies to masking customer data, obscuring account details, or reducing visual noise in less important parts of the frame.
Good tutorial production uses these effects selectively. The viewer should notice the explanation, not the effect.
For anyone recording regularly, lighting still matters even when background replacement is available. Cleaner source footage makes every downstream choice easier, from edge detection to color matching. A practical guide to video lighting for tutorial recording is worth keeping in your standard production checklist.
Exporting and Sharing Your Finished Video
A polished background can still be undermined by a poor export. If the file is too heavy, playback suffers. If the format is inconsistent, publishing becomes messy across help centers, LMS platforms, and embedded knowledge-base pages.
Historical best practices for background video are still useful here. Viget’s guidance on background videos recommends keeping clips around 10–15 seconds, removing audio, exporting in WebM and MP4, using a target bitrate between 700 kb/s and 1200 kb/s, and treating 1280×720 as sufficient for background use. Those recommendations come from web performance constraints, but the underlying principle applies broadly. Background media should support the experience without making delivery heavier than it needs to be.
Export for the viewer, not for the editor
For tutorial videos, the smartest export choice depends on where the video will live.
- Knowledge-base embeds: Favor reliable playback and reasonable file size
- Internal training libraries: Prioritize consistency across modules and devices
- Sales shares by email: Keep delivery simple and viewer-friendly
- Global documentation hubs: Make language access and navigation part of the publishing plan
If you’re sending videos directly to customers or prospects, distribution matters almost as much as the edit. A workflow designed for sharing videos by email without breaking the experience helps keep playback, previews, and access cleaner.
Think in assets, not single videos
The strongest tutorial teams don’t stop at export. They turn one recording into multiple usable assets. The same walkthrough can become a short support video, a written help article with screenshots, an internal SOP, and localized versions for different markets.
That matters for scale. A background choice that looks good in one video should also hold up in documentation screenshots, embedded players, and translated versions. When teams build around that broader publishing model, they create a content system, not just a polished clip.
If your team needs a faster way to turn raw screen recordings into polished tutorials and matching written documentation, Tutorial AI is built for that workflow. You can record product UI with real voiceover, tighten pacing with AutoRetime, apply branded visuals, generate an article from the same recording, and publish multilingual versions through one player. It’s a practical fit for support, onboarding, training, and sales enablement teams that need speed without giving up polish.