Figuring out how to blur background isn't a one-size-fits-all process. You might use the built-in toggles in apps like Zoom, go for more control with software like OBS, or aim for a perfect finish in post-production with tools like Premiere Pro. The right choice really comes down to whether you need a quick fix for a live call or a more polished effect for a finished recording.
Why Bother With a Blurred Background?
Before we jump into the "how," let's talk about the "why." Blurring your background is more than just a neat visual trick; it's a strategic move that can seriously upgrade your video's professionalism and impact. By softening everything behind you, you’re essentially telling the viewer’s eye exactly where to look: at you and your message.

This idea isn't new. It has deep roots in classic photography and cinematography. Long before software could do it with a click, photographers were using shallow depth of field to make their subjects pop. Back in 1878, new developments allowed for short photo exposures, which gave photographers the power to naturally blur backgrounds—a fundamental technique that's still essential today. You can actually read more about the history of this visual style and how it evolved.
Focus, Professionalism, and a Bit of Privacy
In my experience, a blurred background solves three common problems for anyone who gets on camera.
- It commands focus. Let's be honest, a messy bookshelf or someone walking by in the background is distracting. A gentle blur keeps your audience’s attention locked on you, right where you want it.
- It looks professional. A blurred background creates a clean, polished look that suggests a high-quality production, even if you’re just recording from your home office. It’s a simple way to boost your credibility.
- It protects your space. For those of us working from home, a blur is a lifesaver. It hides personal items, keeps family members out of the frame, and ensures no sensitive documents are accidentally visible.
Think about it: a consultant delivering a high-stakes pitch from their living room uses a blur to look authoritative. A gamer streaming online uses it to make their gameplay the star of the show. A customer support agent uses it to present a consistent, professional face on every single call.
Knowing why you're blurring your background helps you pick the right tool for the job. A quick, built-in blur is perfect for an internal team meeting. But for that polished marketing video? You’ll probably want the control that comes with post-production editing to make sure it looks just right.
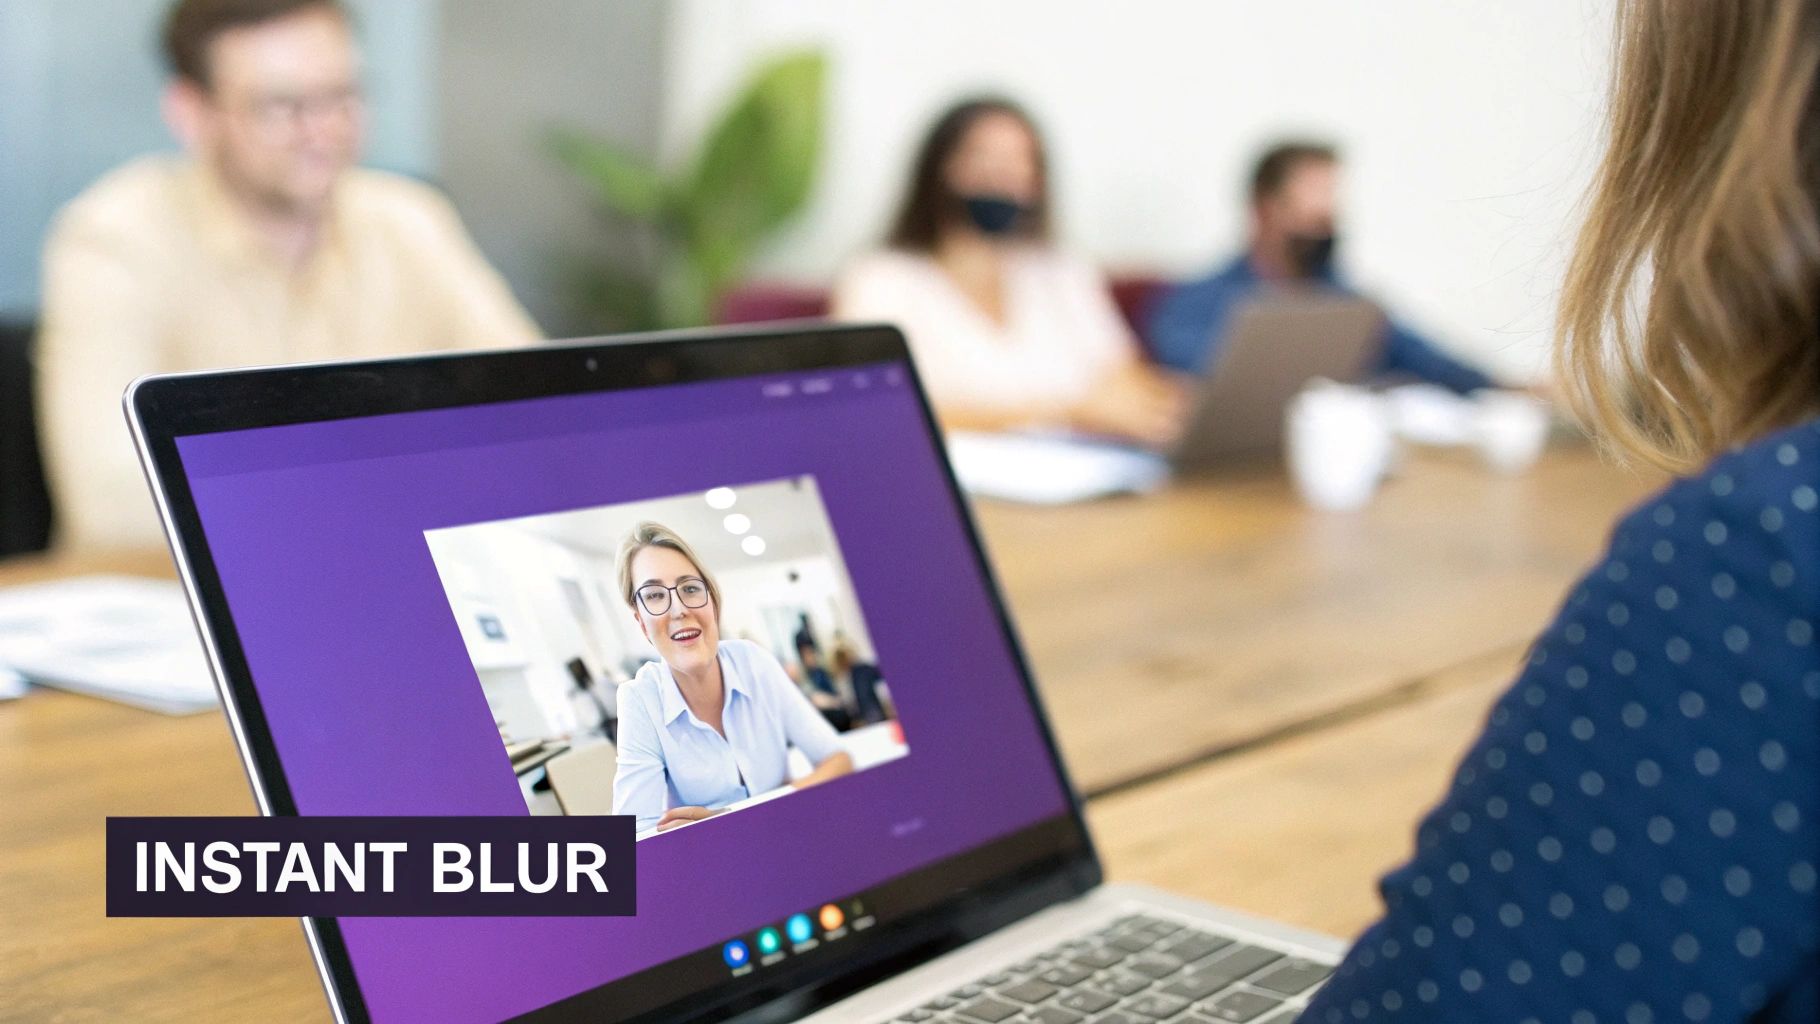
1. Blur Your Background Instantly in Live Meetings
You’ve got a video call in five minutes, and your background is… less than professional. We've all been there. This is exactly when the built-in features on platforms like Zoom, Microsoft Teams, and Google Meet are a lifesaver. Learning how to blur background in these apps is the quickest way to look polished without any extra software or hassle.
These tools use their own software to digitally separate you from your surroundings, instantly hiding a messy room or a distracting environment. It’s an incredibly handy feature for anyone working remotely. Best of all, you don't need any special gear—just your webcam and the app.
Where to Find the Blur Setting
Activating the blur is usually simple, though each platform tucks the setting away in a slightly different spot. My go-to move is to check the video settings right before I join a call. If I forget, I look for the little arrow or menu next to the camera icon once I'm in the meeting.
Here’s a quick rundown:
- Zoom: Head to
Settings > Backgrounds & Effects. You'll see "Blur" right next to the virtual background options. - Microsoft Teams: Before joining, click the background effects icon on the pre-join screen. Already in the call? Click the
More actions (...)menu and hitApply background effects. - Google Meet: In your self-view window (either before or during a call), click the three dots and choose
Apply visual effects. The blur option is one of the first you'll see.
The process is designed to be a one-click fix, getting you meeting-ready in seconds.
Live Background Blur Feature Comparison
While all these platforms offer a quick blur, the results can vary. I've found that some handle motion better, while others are lighter on my computer's resources. Here's a quick comparison based on my experience.
Ultimately, the "best" option often comes down to your specific computer and what you're doing. I recommend testing them out to see which one works most smoothly for you.
Getting a Cleaner Blur (Troubleshooting Tips)
As handy as these features are, they're not flawless. You’ve probably seen it before—the blur flickers, or it awkwardly cuts off someone's hair or headphones. This usually happens when the software gets confused about where you end and your background begins.
Pro Tip: The most common culprit for a glitchy blur is poor contrast. If your shirt is the same color as the wall behind you, the algorithm will struggle to tell you apart.
The fix is surprisingly simple. Try to sit in front of a plain, solid-colored wall that contrasts with what you're wearing. Good lighting from the front also makes a huge difference. If you can, put a little distance between your chair and the wall—that extra depth helps the software isolate you much more accurately for a clean, professional-looking effect.
Get a Professional Blur with OBS and Camera Apps
When you're ready to move beyond the basic blur in your meeting software, it's time to step up your game. For serious streamers, content creators, and corporate trainers, the goal isn't just to hide a messy room—it's to replicate that beautiful, natural depth of field you see with a professional camera. This is where tools like Open Broadcaster Software (OBS) and dedicated camera apps really shine.
These more advanced methods give you a huge leap in quality. We're moving away from the simple digital cutouts that can look a bit glitchy and into a much smoother, more convincing effect. You get the power to fine-tune the blur, manage performance, and create a truly professional look that elevates your entire production.
Using OBS for a Customizable Live Blur
Think of OBS as a virtual control room for all your video sources. It's an incredibly powerful—and free—tool that lets you add a high-quality background blur to any webcam or camera feed by using a plugin. A popular choice that gets the job done well is the "StreamFX" plugin, which includes a sophisticated blur filter.
Once you have OBS and the plugin installed, you just add your camera as a video source and apply the blur filter. The real magic is in the details:
- Granular Control: You can dial in the blur intensity with real precision. Want just a subtle softness or a completely diffused background? You’re in control.
- Performance Tuning: Most plugins offer different blur algorithms. Some are lightweight and fast, while others are more resource-heavy but deliver a flawless, creamy result.
- Layering Effects: This is where OBS really excels. You can combine your background blur with other effects like color correction or add graphic overlays for a completely custom-branded look.
This kind of setup is perfect when you're creating high-stakes material, like the kind of polished videos you see in guides on screen recording for training. It gives you that broadcast-level quality needed to really hold an audience's attention.
Leveraging Your Camera’s Native Software
An even more direct route is to use the software that came with your high-quality webcam or DSLR. Apps from major brands like Logitech G Hub, Razer Synapse, or Canon’s EOS Webcam Utility often come with their own background blur features built right in.
Because this software is designed by the manufacturer to work with your specific hardware, the results can be incredibly clean and efficient.
The real advantage here is that the blurring is handled by the camera's software before the video feed ever gets to Zoom, Teams, or OBS. This usually means a more natural-looking effect with less strain on your computer’s CPU.
We've come a long way to get to this point. Digital background manipulation has its roots in rudimentary scanners from the 1950s and evolved with digital camera tech in the late 60s. Today's algorithms can apply a blur with stunning accuracy, a direct result of decades of innovation in computational photography. If you're curious, you can read more about the fascinating history of photography technology and how we got here.
Ultimately, using your camera's native software is the modern peak of that progress for live video, giving you a beautiful bokeh that makes you and your subject pop right off the screen.
Blurring Your Background After Recording
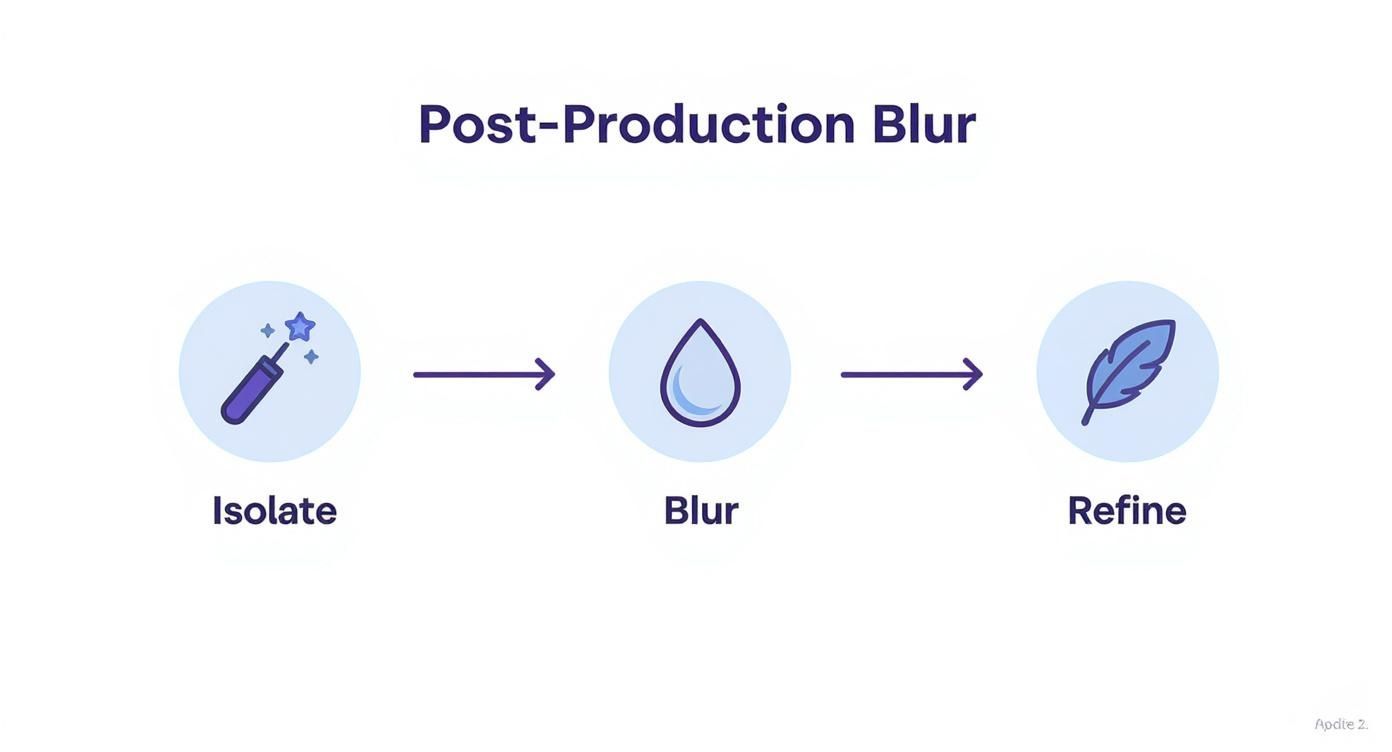
Sometimes, blurring your background live just isn't an option, or maybe you need a much cleaner, more polished look for a final video. When that's the case, post-production is where the magic happens. This approach gives you complete control, letting you create a perfect blur that looks deliberate and professional.
If you're putting together polished marketing videos, online courses, or detailed tutorials, this is the way to go. It takes a bit more elbow grease than flipping a switch in Zoom, but the quality speaks for itself. The process involves using a video editor to isolate your subject from the background and then applying a blur effect just to that background layer. Let's look at how this is done in two of the most popular editing suites.
Getting it Done in Adobe Premiere Pro
In Adobe Premiere Pro, the trick is to pair a blur effect with a mask. A mask is just a shape you draw to tell Premiere which part of the video you want an effect to apply to.
Here's the basic workflow:
- First, drag your video clip onto the timeline. Duplicate it so you have an identical clip stacked directly on top of the original.
- Next, select the clip on the bottom layer. Head over to the Effects panel and apply the Gaussian Blur effect. Crank up the blurriness until the whole shot is nicely out of focus.
- Now, click on the top clip (the one that's still sharp). In the Effect Controls panel, under Opacity, you'll find a pen tool. Use this to carefully draw a mask around your subject.
What you've just done is create a clean cutout of yourself that sits on top of the blurred background layer. The real work, of course, starts when you move. That mask won't follow you on its own.
A Quick Tip from Experience: To avoid a harsh, "cutout" look, play with the "Mask Feather" setting. Increasing it just a little softens the edges, making the transition between you and the blurred background look much more natural.
Using Power Windows in DaVinci Resolve
My personal preference for this kind of work is DaVinci Resolve, which has an incredibly powerful set of tools on its Color page. Here, you'll use something called Power Windows to get the same result, but with a bit more precision. You create a new node, draw a Power Window around your subject, and then simply invert the selection. This tells Resolve to apply your blur effect to everything outside the shape you drew.
The big challenge, whether you're in Premiere or Resolve, is dealing with movement. As you talk and move, your mask or Power Window will need to follow you. This is where you either use the software's motion tracking features or, for more complex shots, manually adjust the mask frame by frame. That manual process is called rotoscoping, and while it can be tedious, the professional finish is often worth the time investment.
If you're doing a lot of post-production, it's worth exploring the best video editing software to see which tools feel most intuitive for your projects.
Interestingly, this kind of detailed editing is a world away from simple timeline cuts. It highlights a shift in how we handle video, with some newer tools letting you edit your recordings like a document by simply changing the text in your script. For content that relies heavily on narration, that's a massive time-saver.
The Easiest Way to Blur Your Video with AI
Let’s be honest: manually masking a video frame by frame is a soul-crushing task that can eat up an entire afternoon. It's the kind of tedious work that makes you question your life choices. This is where AI tools have completely flipped the script for post-production.
Modern editing platforms now have intelligent algorithms that can automatically tell the difference between you and your background. With literally one click, they can separate the two and apply a perfect blur. It feels like magic, but it’s just smart tech saving you a ton of time.
For anyone creating training content, marketing demos, or support videos, this is a massive win. You get to spend less time on monotonous editing and more time making sure your actual content is top-notch.
This simple three-step workflow is really all it takes with the right tool.
As you can see, the AI does the heavy lifting: it isolates you, applies the effect, and cleans up the edges for a natural look.
Beyond Backgrounds: Using Selective Blurring for Data Protection
AI’s real power isn’t just in blurring backgrounds. The truly essential feature for a lot of us is selective blurring—the ability to hide specific parts of a recording. This is non-negotiable for protecting sensitive information that might pop up on your screen.
Think about it. If you're a software trainer walking a team through a new system, your screen might show private customer data like names, email addresses, or account numbers. Going back and manually blurring every single instance of that data is a recipe for a headache.
With a good AI tool, you just draw a box over the sensitive area once. The software is smart enough to lock onto that spot and keep it blurred throughout the entire clip, even if the screen moves or scrolls. This is how you create secure and compliant videos without sacrificing clarity.
There are some great online editors out there that use AI for all sorts of video tasks, and many of them, like Veed.io, offer powerful blur effects.
The ability to quickly redact on-screen information isn't just a "nice-to-have"—it's a must for anyone creating content in a corporate or educational setting. It turns screen recording from a potential security risk into a safe and effective communication tool.
A Practical AI Workflow: What This Looks Like for a Software Trainer
Let's put this into a real-world context. Imagine a sales enablement manager needs to create a training video on a new CRM feature, but their demo environment is full of real client names.
Here’s how they could tackle it using an AI-powered platform:
- Just hit record. First, they record the demo just like they normally would, without worrying about the sensitive data on the screen.
- Blur the background. After the recording is done, they use a one-click function to blur their office or home in the background, which instantly makes the video look more polished.
- Redact the data. Next, they find the areas on the screen with client names and apply a selective blur just to those spots.
- Finalize and share. The AI handles the rest, keeping that data hidden for the entire video. The final product is secure, professional, and ready to share with the team.
This kind of automated process removes the old technical hurdles, making it fast and painless to create high-quality, secure training materials. You no longer need to be a video editing wizard to get it done.
Simple Tricks for a Flawless Background Blur
Getting a clean background blur isn't just about clicking a button in your software—your physical setup is half the battle. If you've ever dealt with that weird, shimmering halo effect around your head, you know what I'm talking about. A few simple adjustments to your environment can make a world of difference.
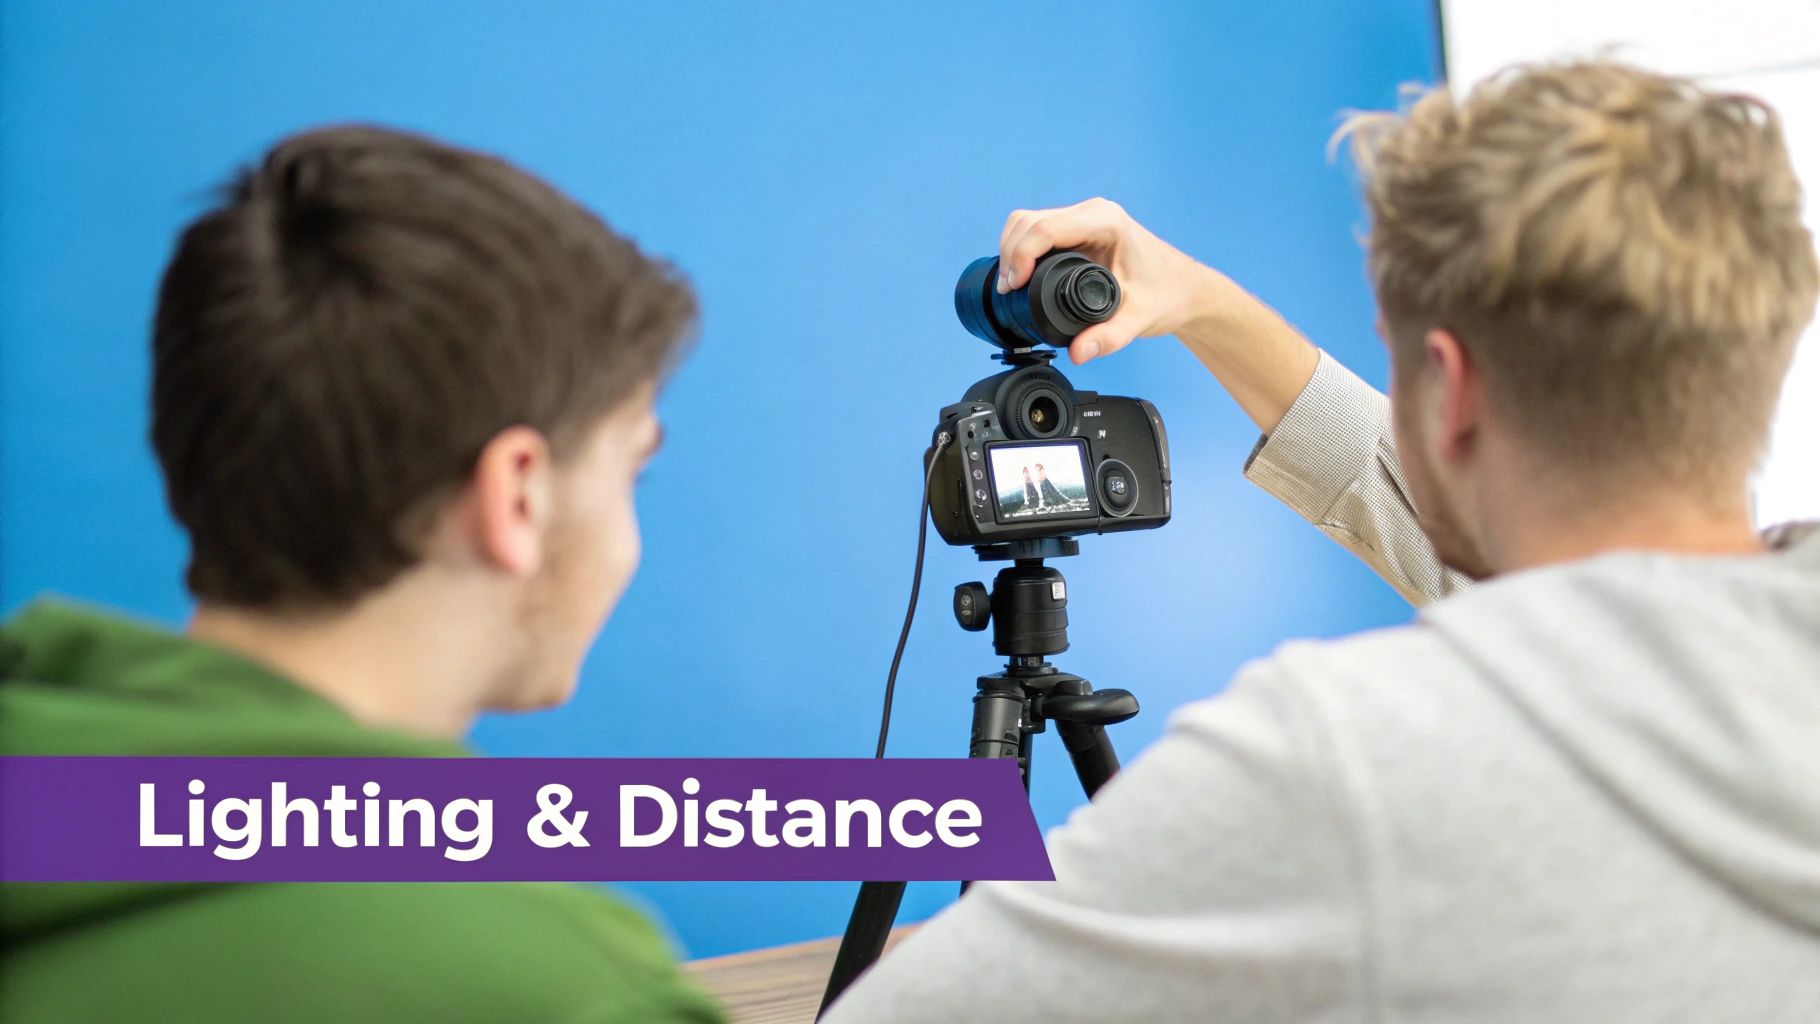
First and foremost, let's talk about good lighting. This is non-negotiable. You need to be well-lit from the front. This creates a sharp, defined silhouette that the software can easily lock onto, which is the key to preventing that distracting flicker at your edges.
Another simple but incredibly effective trick is to create more physical distance between yourself and whatever is behind you. It’s a simple concept that pays huge dividends.
Pro Tip: The more space you put between yourself and the background, the more depth you create. This separation gives the software a much easier time distinguishing you from your surroundings, resulting in a more natural and convincing blur.
Finally, think about contrast. If you're wearing a white shirt against a white wall, you're essentially asking the software to solve a puzzle. Try to wear clothing that stands out from your background. The more you pop, the cleaner the blur will be.
Taking these small steps doesn't just improve your blur effect; it's a foundational part of developing a polished and professional video style for all your content.
Common Questions About Blurring Video Backgrounds
As you start blurring backgrounds in your videos, a few questions almost always pop up. I've seen these trip people up time and again, but getting the details right is what separates a clean, professional look from a distracting, glitchy effect. Let's tackle the most common issues I run into.
Why Does My Blurred Background Flicker Around My Head?
This is easily the most common frustration. That shimmering, flickering halo around your head or shoulders happens because the software is struggling to draw a clean line between you and whatever is behind you.
Most of the time, the problem isn't the software itself, but your environment. The main culprits are usually:
- Bad Lighting: If your face is poorly lit from the front, the software simply can't see your silhouette clearly enough to make a clean cut.
- Low Contrast: Wearing a blue shirt against a blue wall? You're essentially asking the algorithm to solve a camouflage puzzle in real-time. It’s going to fail.
- A Busy Background: Cluttered shelves, complex patterns, or lots of movement behind you give the software way too much information to process, which leads to those glitchy edges.
The fix is usually pretty simple. Get a good light source in front of you (a desk lamp or ring light works wonders), wear clothing that stands out from your background, and sit in front of the plainest wall you can find. I've also found that keeping your hand gestures closer to your body helps the software maintain a stable lock.
Does Blurring My Background Slow Down My Computer?
Yes, it absolutely can. Applying a real-time blur is a heavy lift for your computer's processor. If you've ever been on a video call and suddenly heard your computer's fan spin up like a jet engine, the blur effect is a likely suspect. It’s analyzing every single frame of video, in real-time, to separate you from the background.
Post-production blurring, on the other hand, is a different story. It won’t affect your computer's performance during the recording, but it will add to the final video rendering time. If your machine struggles with live blurring, an AI tool that processes the video after you record is a great way to get the polished look without the performance hit.
Can I Blur Just One Part of My Video?
You certainly can. While the basic tools in Zoom or Microsoft Teams are all-or-nothing, more advanced software gives you incredibly precise control with selective blurring. In a video editor like Adobe Premiere Pro, you’d use masking to draw a shape around a specific object or area and apply a blur just to that spot.
For screen recordings, though, that process is tedious. This is where specialized AI tools really shine. They're built to automatically find and obscure sensitive information—things like names, email addresses, or account numbers on screen—making data protection almost effortless.
If you're looking for a tool that handles both background and selective blurring for screen recordings without the hassle, Tutorial AI uses AI to turn raw captures into polished, secure demos in minutes. Learn more about Tutorial AI and start creating professional videos today.