You already have the raw material for Reels. It’s sitting in product demos, support walkthroughs, onboarding recordings, release videos, and internal training clips that someone captured to explain a feature once.
The problem usually isn’t access to footage. It’s that the footage was made to explain, not to publish. The recording runs long, the presenter restarts a sentence, the cursor wanders, and the pacing fits a help-center video better than a vertical social clip. Then the team faces a bad choice: ship something rough, or hand it to someone who knows Adobe Premiere Pro and wait.
A good AI video editor for Reels changes that constraint. It gives the subject-matter expert a workflow that cuts the recording into publishable short-form pieces, tightens the script, and adapts the visual layout for vertical viewing without turning every request into a mini production project.
Why Your Team Needs an AI Workflow for Reels
Most product teams don’t need a cinematic editor. They need a repeatable way to turn what they already record into short, clean videos that can ship this week.
That matters because the category itself has moved well past experimentation. The AI in video editing market was estimated at US$0.9 billion in 2023 and is projected to reach US$4.4 billion by 2033, with a 17.2% CAGR over the 2024 to 2033 period, according to Market.us research on AI in video editing. The same source says the market was 70.5% software-led in 2023 and 72.8% cloud-deployed, which lines up with how teams work now: browser-based, collaborative, and fast enough for marketing, support, and enablement.
The real bottleneck isn’t creativity
The bottleneck is workflow design.
A product marketer records a feature walkthrough in Loom. A support lead captures a bug workaround. A sales engineer demos a new flow for prospects. All of those can become Reels, but raw recordings usually have the same problems:
- They’re too long: Spoken explanations include pauses, retakes, and side comments.
- They aren’t framed for mobile: A desktop screen capture in a wide format rarely survives a straight vertical crop.
- They don’t start strong enough: Helpful explanations often bury the point instead of leading with it.
- They depend on editing skills the team doesn’t have: Camtasia and Adobe Premiere Pro are strong tools, but they assume someone will spend time shaping the timeline.
Practical rule: If your team records product knowledge every week, you already have a short-form video pipeline. You just haven’t operationalized it yet.
That’s why the right system matters more than any single feature. The process should let a product expert record once, shape the message quickly, and output multiple short clips that feel intentional rather than clipped out of a webinar.
Reels now sit inside a larger content motion
This isn’t only about Instagram. The same short-form editing discipline supports LinkedIn video snippets, customer education clips, release highlights, and internal enablement moments. If you track where creator and brand formats are heading, REACH’s future influencer trends is a useful read because it shows how short-form expectations keep pushing teams toward faster publishing cycles and more platform-native content.
For teams building that system, it helps to start with software designed for automation rather than manual assembly. That’s why tools in the automatic video editing software category are increasingly relevant for product-led teams that need throughput without hiring a full video bench.
Transform Raw Recordings with a Script-First Editor
The fastest way to improve a Reel is to stop thinking like a timeline editor first.
Most raw demos become better the moment you turn the spoken track into text and edit the wording before you touch transitions, overlays, or zooms. That’s where a script-first workflow outperforms the old model of scrubbing through a timeline and slicing clips one by one.
Start with the transcript, not the timeline
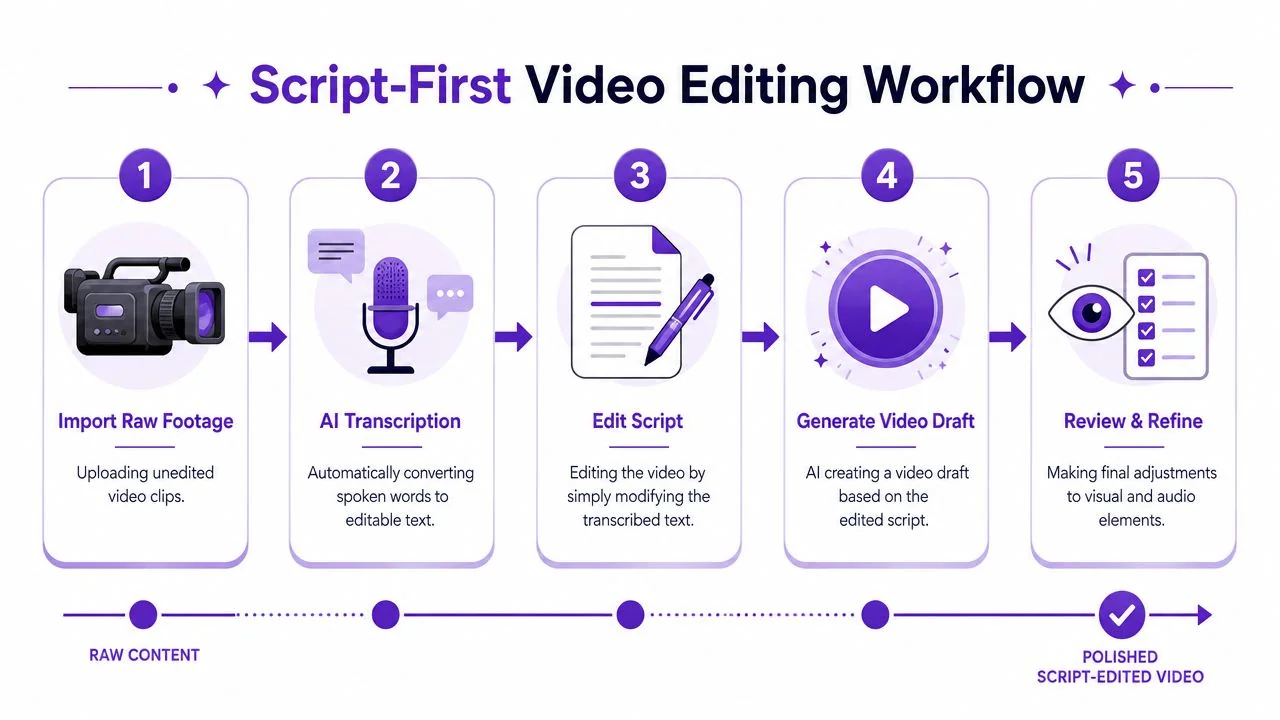
The technical advantage here is real. AI editors can analyze footage for scenes, motion, objects, and spoken language, then map those signals into cuts and captions. That’s why text-based and scene-aware editing has become so useful for high-volume social content that depends on transcription, smart reframing, and vertical optimization, as described in Rask’s overview of AI video editor workflows.
Here’s the practical sequence that works for product demos and support recordings:
- Upload the raw screen recording
Don’t wait until you have a “perfect” take. A decent walkthrough with real voice narration is enough. - Generate the transcript
Once the spoken content becomes editable text, the video becomes easier to shape. - Cut the waste in writing
Remove filler, repeated phrasing, throat-clearing intros, and any sentence that explains the setup before showing the payoff. - Rewrite unclear lines
If a sentence is technically accurate but sounds clumsy, rewrite it. In a script-first editor, the voiceover, captions, and timing should update with the script. - Review the new draft
Watch for pacing, visual alignment, and whether the spoken line still lands on the right moment in the UI.
What to cut first
Most subject-matter experts don’t need help explaining the product. They need help trimming themselves.
A raw demo often includes four kinds of waste:
| Recording issue | What to do in the script |
|---|---|
| Rambling setup | Replace with a direct first sentence that names the problem or outcome |
| Repeated phrases | Keep the clearest version and delete the rest |
| Verbal fillers | Remove “okay,” “so,” “basically,” and similar padding where it affects pacing |
| Minor mistakes and retakes | Delete the bad line and keep the clean take |
A tool like an AI video script generator helps here because it aligns the editing process with the actual communication job. You’re shaping a message, not operating a complex timeline.
This short demo shows the difference between manual editing logic and a script-led approach:
Treat the first draft like a rough transcript of product expertise, not a finished video. The polish comes from rewriting the explanation into something tighter than the original recording.
Why this works better for non-editors
Camtasia and Adobe Premiere Pro reward editing skill. A script-first editor rewards clarity.
That shift is important for teams that don’t have a dedicated producer. The person who knows the feature can stay inside language and structure instead of learning keyframes, nested sequences, and timeline trimming. For Reels, that’s often the difference between “we should post more short-form video” and an actual publishing cadence.
Tutorial AI fits this model when the source material is a real screen recording. It transcribes the narration, lets you edit the video by rewriting the script, and can generate a matching written article from the same recording. That matters when one product demo needs to become both a Reel and a help-center asset.
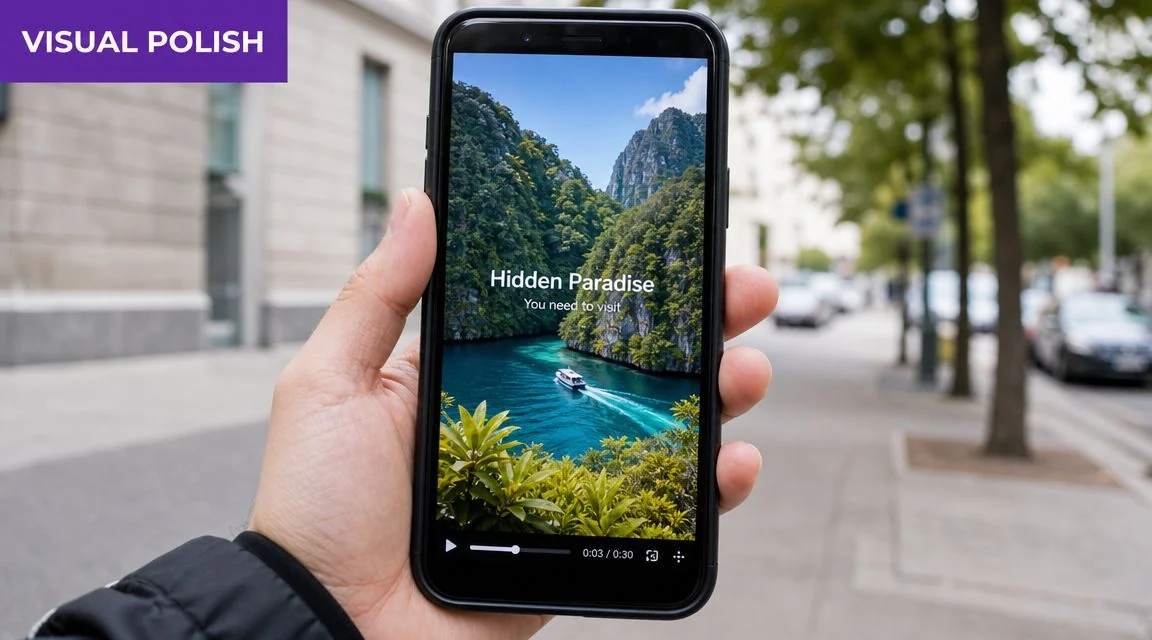
Automate Visual Polish for Vertical Formats
A tight script still won’t save a Reel that looks like a cropped webinar.
The second half of the job is visual adaptation. A desktop product demo was usually recorded in a wide frame, with small interface details spread across the screen. Reels need the opposite: a narrow canvas, immediate focal points, and motion that feels intentional on a phone.
Make the vertical crop do actual editorial work
A strong Reel workflow uses AI for the first assembly and then a human review pass for pacing and brand quality. That matters because AI-driven editing can reduce editing time by up to 50%, and broader forecasts expected about 40% of video editors to use AI tools for automation tasks by 2025, as summarized in Glean’s guide to video content creation tools.
For vertical product clips, the automation layer should handle jobs that are tedious by hand:
- Auto-cropping: Keep the active part of the UI in frame.
- Text overlays: Add context without forcing the viewer to infer what’s happening.
- Scene selection: Pull the best moments forward instead of exporting the full walk-through.
- Captions: Essential for silent autoplay and quick scanning.
- Audio syncing: Keep narration aligned with cursor movement and interface changes.
What good automation looks like
The best visual automation doesn’t call attention to itself. It fixes the problems that make screen recordings feel amateur.
Consider these common Reel conversions:
| Source recording | Weak result | Better automated treatment |
|---|---|---|
| Full-screen dashboard demo | Tiny unreadable interface | Smart zoom into the panel being discussed |
| Cursor-heavy setup flow | Viewers lose the click path | Cursor smoothing and highlights to guide attention |
| Slow product tour | Flat pacing | AutoRetime-style tightening between actions |
| Standard 16:9 export | Dead space in vertical frame | Reframing built for 9:16 composition |
A useful reference point is understanding the target frame itself. If your team is still treating aspect ratio as an export setting instead of an editing decision, this guide to video aspect ratio is worth reviewing.
Where teams over-automate
The failure mode is easy to spot. The edit is technically clean, but the Reel doesn’t feel watched by a human.
That usually happens when teams accept every automatic choice: every crop, every subtitle break, every pacing suggestion. The result is often a video that feels mechanically assembled, especially in software demos where one wrong crop can hide the exact field, toggle, or menu the viewer needed to see.
Review checkpoint: Before export, check safety zones, subtitle line length, and whether each zoom lands on the element the narration references.
Human review still matters most in three places:
- Brand fit
Does the video sound like your company, or like a generic tutorial voice? - Pacing judgment
Did the editor cut too aggressively and remove the moment a viewer needs to orient themselves? - UI accuracy
Is the crop showing the exact control the narrator describes?
The payoff is that vertical polish no longer requires someone to hand-keyframe every movement. It requires a good first pass and a sharp review pass.
Crafting High-Impact Hooks and CTAs
A polished Reel that starts slowly still loses the viewer.
For product teams, a common pitfall causes many otherwise solid videos to underperform. The recording explains the feature clearly, but the opening follows internal logic instead of audience logic. The speaker starts with context, roadmap, or version notes. A Reel needs the result first.
The hook has one job
The first seconds need to answer a simple question: why should someone keep watching?
For product, support, and onboarding clips, strong hooks usually fall into a few patterns:
- Problem-first: “Still doing this manually in your dashboard?”
- Outcome-first: “Here’s the fastest way to onboard a new user.”
- Feature reveal: “This release fixes the step that used to slow every handoff.”
- Proof-in-motion: Open on the finished workflow, then explain how it happened.
Weak hooks usually share one trait. They spend too much time introducing the topic instead of demonstrating value. In a Reel, “Today I’m going to walk you through…” is often dead air.
Start with the moment a customer would care about, not the moment a presenter would normally begin.
CTAs should match the clip’s role
Not every Reel needs a hard sell.
A feature launch clip might end with “See the full walkthrough in the help center.” A support snippet might point viewers to the article or checklist. A sales enablement clip for internal use might direct reps to a longer training module. The CTA should fit where the video sits in the journey.
A simple framework helps:
| Reel type | Best CTA style |
|---|---|
| Product teaser | Watch the full demo |
| Help snippet | Read the step-by-step article |
| Onboarding clip | Try the workflow in your account |
| Internal enablement | Use this talk track in your next call |
If your team wants an external benchmark for how social-native structure differs from standard explainer content, SleekPost’s Reels guide is a helpful reference for framing, pacing, and mobile-first creative decisions.
Brand elements should support the message
Many teams tend to over-design.
A Reel doesn’t need a heavy intro sequence, animated logo wall, or decorative motion that delays the point. Brand elements work best when they reinforce clarity: a consistent title card, clean lower-third style, readable caption treatment, and a recognizable outro frame.
Brand Kits and prebuilt title slides help when they remove repetitive formatting work. They hurt when they force every clip into the same opening regardless of context. For short-form product content, consistency matters, but relevance matters more.
A useful discipline is to review each draft with two questions:
- Would someone understand the payoff without sound?
- Does the CTA feel like the natural next step, or an add-on at the end?
If the answer to either is no, the Reel needs structural editing, not more visual effects.
Localize Reels Instantly with AI Translation
Multilingual video usually breaks at timing, not translation.
Teams often assume localization means generating subtitles or dubbing the voice track. That’s only part of the job. A Reel built around a precise sequence of clicks, cursor moves, captions, and scene cuts can fall apart when the translated voiceover runs longer or shorter than the original.
Timing is the hard part
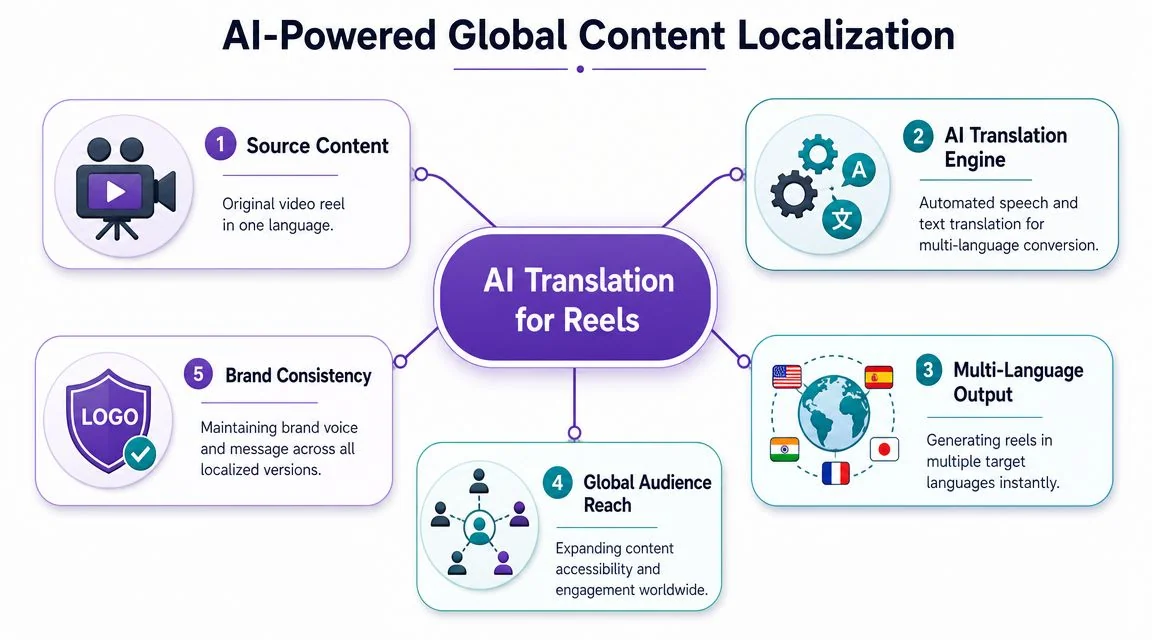
That’s why multilingual localization is still an underserved area in the Reel editing market. Product coverage has increasingly focused on tools that can re-time scenes, captions, and cuts to match each language version, because dubbing alone doesn’t solve the edit. Luma’s product coverage around reframing and video adaptation points to this broader shift toward operational localization, especially for teams that need to ship one short video in multiple languages with minimal manual rework.
For global SaaS, training, and support teams, this is a major workflow distinction.
A localized Reel has to preserve:
- Scene timing: The visual step should still appear when the narrator references it.
- Caption readability: Subtitle blocks need to fit the language naturally.
- Cut rhythm: A translated line can change the pace of the entire edit.
- Brand consistency: The clip should feel like the same message, not a separate improvised version.
Why real UI footage changes the equation
Product teams have different needs than marketing teams when using avatar tools.
If the viewer needs to see the actual interface, synthetic talking-head tools don’t solve the problem. The asset is the screen itself. The challenge is adapting that real footage across languages without manually rebuilding the edit each time.
That’s why narration generation in 74 languages is useful only when paired with timing control. If the German, Spanish, or Japanese version changes the duration of the spoken line, the visuals need to flex with it. Otherwise the result looks dubbed over rather than localized.
A multilingual Reel works when each language version feels natively edited, even though it came from the same source recording.
A practical localization workflow
For product demos, onboarding clips, and support videos, the cleanest process looks like this:
- Finalize the source script first
Don’t localize a draft that’s still changing. - Generate translated narration and captions
Keep terminology aligned with your product naming and support language. - Re-time scenes to the new voice track
This is the step many teams underestimate. - Review region-specific details
Check screenshots, UI text, and any on-screen labels that may stay in the source language. - Publish through a player that supports language switching when needed
That matters for help centers, LMS deployments, and embedded support content.
For organizations with distributed teams, this workflow is often more valuable than making one polished English Reel. It turns one source recording into a reusable global asset rather than a single-market clip.
Beyond the Reel Exporting and Repurposing Content
A Reel is often the smallest useful output from a product recording, not the only one.
Once the script is clean and the visual edit works, the smartest move is to treat the recording as a content source. One walkthrough can become a launch Reel, a shorter problem-solution clip, a support article, an onboarding asset, and an internal enablement video if the workflow is built for reuse.
Think in content units, not single exports
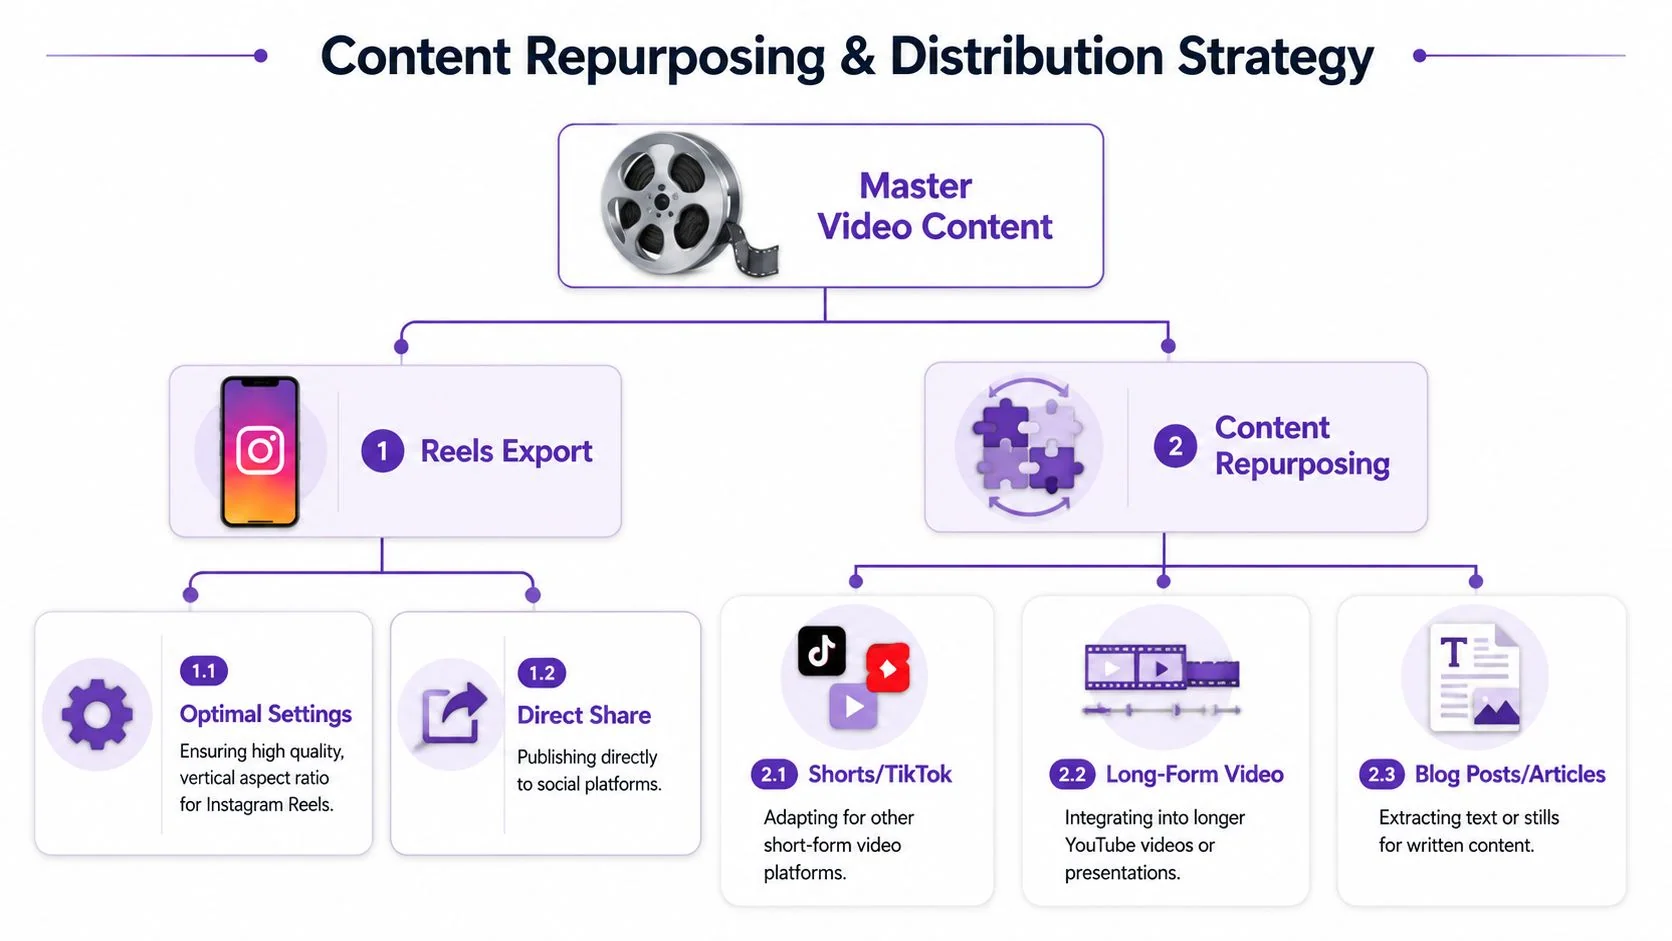
Independent workflow guidance shows the advantage clearly. A creator can produce 5 to 10 Reels from a single hour of long-form content by using AI to identify highlights, assemble clips, and auto-add captions, according to CapCut’s guidance on AI video makers for Instagram Reels. That’s useful shorthand for product teams too. A feature demo rarely contains one idea. It contains several.
A single recording might produce:
- A release highlight Reel showing what changed
- A task-based Reel showing one workflow end to end
- A support clip answering a common “how do I…” question
- A sales snippet for outbound or follow-up use
- A help-center article generated from the same walkthrough
The repurposing discipline most teams skip
They export one video and move on.
That leaves a lot of value in the raw material. A better system reviews the original recording for modular moments:
| Source segment | Best repurposed asset |
|---|---|
| Feature overview | Social Reel for launch awareness |
| Key step sequence | Help-center short video |
| Objection-handling explanation | Sales enablement clip |
| Full spoken narration | Article draft with screenshots |
| Repeated support question | Knowledge-base snippet |
The importance of document generation frequently goes underestimated. If the same screen recording can become both a short video and a written tutorial, the recording session yields far greater utility. Support, customer education, and product marketing all benefit from the same source asset rather than rebuilding the explanation in separate formats.
Export quality matters, but distribution matters more
For Instagram Reels, keep the export optimized for vertical playback, readable captions, and mobile-safe framing. Then widen the distribution plan.
A polished Reel often has a second life on TikTok, YouTube Shorts, LinkedIn, in an email launch sequence, or embedded in a help article. If you add music, use tracks with clear usage rights. Teams that need a starting point for licensed options can review this practical guide to free background music no copyright.
Operational takeaway: Record once. Edit at the script level. Publish in multiple formats. That’s the difference between “making Reels” and building a repeatable content system.
The teams that get the most from an AI video editor for Reels aren’t using it to create one flashy post. They’re using it to turn ordinary product knowledge into a steady stream of short, useful, polished assets without needing a full video team.
If your team already has demos, walkthroughs, or support recordings piling up, Tutorial AI is worth evaluating as a practical way to turn those recordings into edited tutorials, localized videos, and matching written documentation from the same source material.