You searched for Tutorial Rust because you want help with the programming language. Instead, you keep landing on content about the survival game. That mismatch is real. 78% of top search results cover gameplay rather than programming, which leaves new Rust developers piecing together scattered docs and half-explanations from forum threads and videos, as noted in this analysis of Rust tutorial search results.
That confusion gets worse once the borrow checker shows up. You can read a clean definition of ownership, nod along, and still freeze when the compiler tells you a value moved, a borrow lives too long, or two references conflict. Most beginner guides explain the rules in isolation. Fewer walk through one project where each rule shows up in code, breaks something tangible, and then gets fixed for a reason.
Introduction to Tutorial Rust
If you’re coming from C or C++, the appeal is obvious. You want the speed, but you’d like fewer late-night bugs caused by dangling pointers, accidental aliasing, and shared state gone wrong. Rust promises that kind of discipline at compile time, but a lot of learners hit a wall because the explanations stay abstract for too long.
This guide uses one cohesive project instead of disconnected snippets. You’ll build a small command-line app first, then shape it into something you can test, package, and extend. The point isn’t to memorize syntax. The point is to connect each idea to a decision you make in real code.
What the project teaches
The project starts simple. It reads input, validates it, transforms data, and prints useful output. Then it grows just enough to surface the Rust concepts that matter most in everyday work.
- Ownership in motion. You’ll see what happens when a function takes a
String, why that value can no longer be used afterward, and when borrowing is the better move. - Borrowing with constraints. You’ll write functions that read data without taking it over, then hit the classic mutable-versus-immutable reference conflict and fix it cleanly.
- Lifetimes when references outlive assumptions. Instead of treating lifetimes like scary syntax, you’ll meet them where they usually appear: when a function returns a reference and the compiler needs proof it’s valid.
Practical rule: If Rust feels hard, it’s often because the code is hiding ownership decisions instead of making them explicit.
You’ll also work with traits, Result, Option, and a small async pattern later on. That matters because beginner momentum often dies right after basic syntax. People learn println!, variables, and match, then discover that real applications need structure, error handling, and concurrency.
The thread running through this whole tutorial rust guide is simple: every concept should answer a practical question. Why did the compiler reject this? Why did this function take ownership? Why is a reference safe here but not there? Once those answers click, Rust stops feeling mysterious and starts feeling consistent.
Initial Setup Process
Rust setup is straightforward when you use the default toolchain manager. The important part isn’t just getting rustc installed. It’s making sure your editor, shell, and project workflow all agree on where Rust lives.
A widely recommended learning path starts with installing Rust via rustup, then spending 20 to 24 hours across guided exercises and project work to build confidence before tackling production-ready modules, as outlined in this Rust learning workflow.
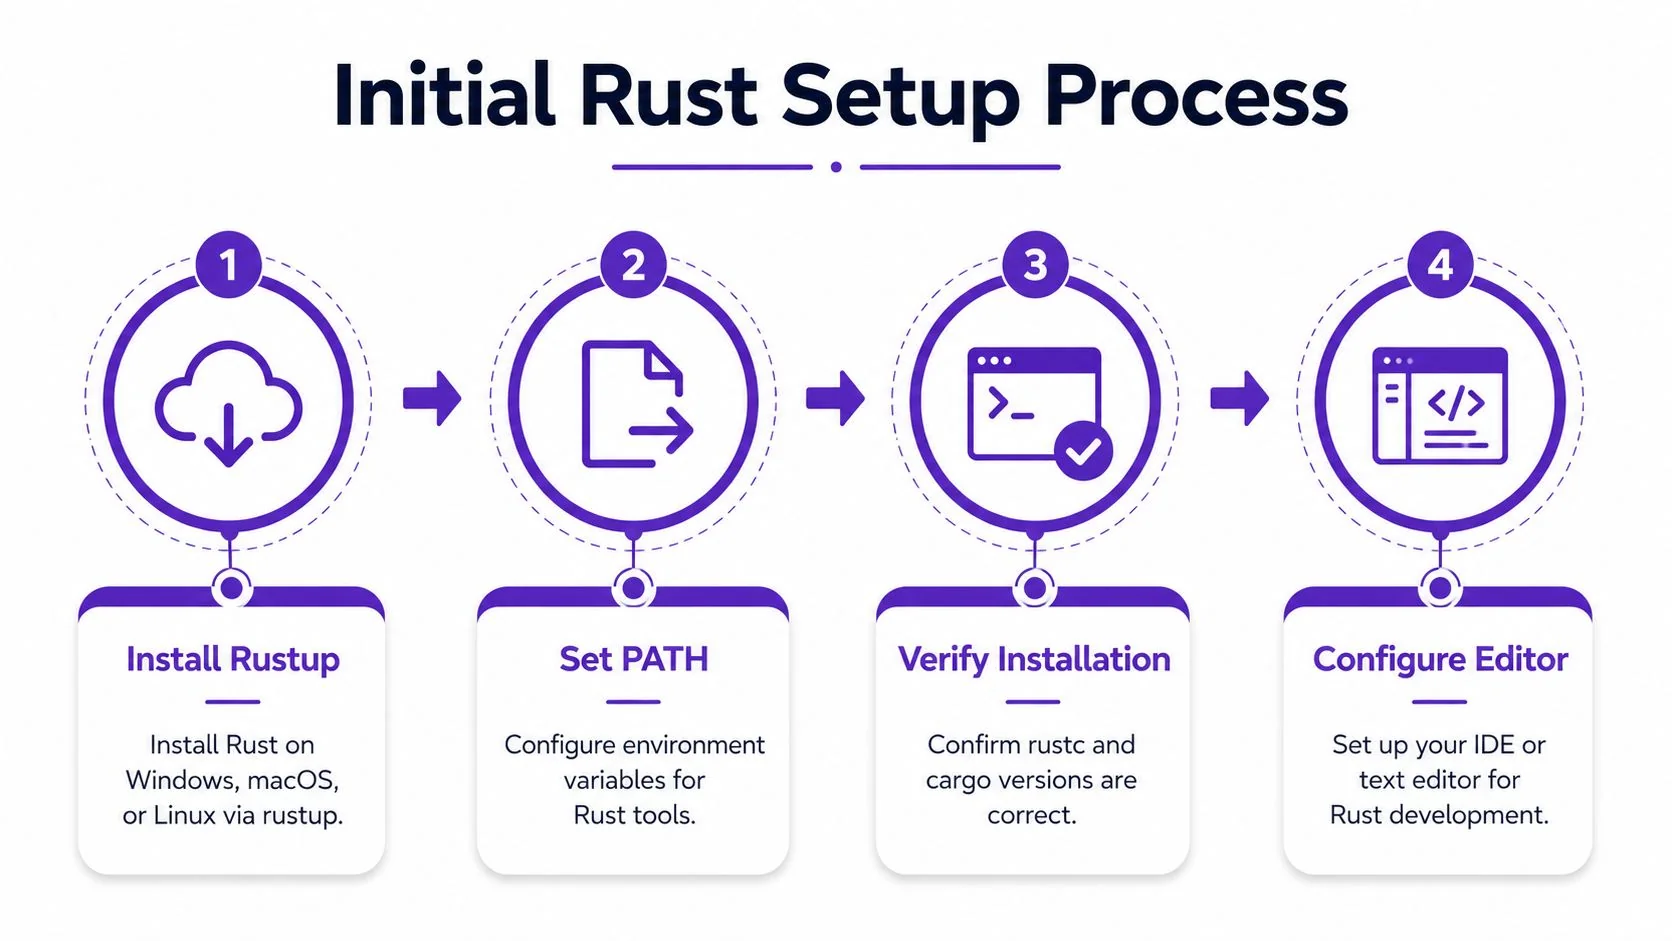
Install Rust with rustup
Use rustup. It gives you the compiler, Cargo, standard library, and an easy update path.
On macOS or Linux, the usual flow is to run the installer from your terminal and follow the prompts. On Windows, use the official installer and let it add the necessary environment settings. Once the install finishes, open a fresh terminal window so your shell picks up the updated path.
Then verify the toolchain:
rustc --versioncargo --versionIf both commands return versions, your core setup is working.
Fix the common setup snags
Most setup problems come from the environment, not Rust itself. When a command isn’t found, your shell usually doesn’t know where the Cargo binaries were installed.
Check these areas first:
- PATH issues. If
cargoorrustcisn’t recognized, restart the terminal, then confirm that Cargo’s bin directory is included in your shell path. - Corporate proxy friction. Some work machines block installer downloads or crate fetching. If you’re on a managed network, you may need to retry from a personal machine or a network with fewer restrictions.
- Old shell session. A terminal opened before installation won’t inherit the updated environment. Close it and start a new one before troubleshooting anything else.
When Rust appears broken right after install, the problem is often just the shell holding onto old environment settings.
Configure an editor that understands Cargo
You can write Rust anywhere, but you’ll learn faster if your editor shows compiler feedback, type hints, and inline diagnostics. Visual Studio Code is a common choice because it pairs well with Rust’s tooling and task flow.
If you use VS Code and want a focused setup for screen-based coding work, this guide on recording and teaching inside Visual Studio Code is useful for organizing the workspace you teach or demo from.
A practical editor setup includes:
- A Rust extension for syntax awareness and diagnostics.
- Integrated terminal access so you can run
cargo checkwithout context switching. - Format-on-save so code style stays consistent from the start.
Create a project right away
Before you customize themes, fonts, or shortcuts, create a project and run it. A working loop beats a perfect setup.
cargo new rust_cli_democd rust_cli_democargo runThat command scaffolds a small executable project, compiles it, and runs the default program. If you see the standard greeting in your terminal, you don’t just have Rust installed. You have a functioning development environment.
Writing and Running Your First Programs
The first Rust project matters because it teaches the feedback loop. You write a little code, ask Cargo to build or check it, read what the compiler says, and adjust. Once that rhythm feels normal, the language becomes much less intimidating.
By 2023, Rust reached 87% developer satisfaction and ranked as the most loved language for eight consecutive years, which says a lot about how developers feel once they get over the early learning curve, according to this Rust survey summary.
Start with Cargo, not a blank folder
Create a new project:
cargo new hello_rustcd hello_rustCargo gives you a sensible structure:
| File or folder | What it does |
|---|---|
Cargo.toml | Defines package metadata and dependencies |
src/main.rs | Entry point for a binary app |
target/ | Build output generated by Cargo |
Open src/main.rs. You’ll see:
fn main() {println!("Hello, world!");}Run it:
cargo runThat single command compiles the code and executes the result.
Build, check, and iterate faster
Rust gives you a few commands that are worth learning immediately.
cargo runcompiles and runs the project.cargo buildcompiles without running.cargo checktype-checks and validates the code quickly without producing a full binary.
Use cargo check often. It’s the fastest way to ask, “Does this make sense to the compiler yet?”
Now replace the starter code with a tiny input-processing program:
use std::io;fn main() {println!("Enter your name:");let mut name = String::new();io::stdin().read_line(&mut name).expect("Failed to read input");let cleaned = name.trim();println!("Hello, {}!", cleaned);}This introduces three useful ideas at once: mutable data, standard input, and a simple method chain.
Add one small feature
Let’s make the program greet someone differently if they didn’t type anything useful:
use std::io;fn main() {println!("Enter your name:");let mut name = String::new();io::stdin().read_line(&mut name).expect("Failed to read input");let cleaned = name.trim();if cleaned.is_empty() {eprintln!("You didn't enter a name.");} else {println!("Hello, {}!", cleaned);}}The split between println! and eprintln! matters. Standard output is for normal results. Standard error is for problems or warnings. You’ll appreciate that distinction later when your CLI gets piped into other commands.
A quick visual walkthrough helps here:
Read compiler messages like clues
When Rust shows an error, don’t skim to the bottom and panic. Start at the first highlighted line and read the notes below it. The compiler often tells you what value moved, what type it found, what type it expected, and where the conflict started.
Rust’s compiler isn’t trying to block you. It’s pointing at the contract your code currently violates.
To make that concrete, add command-line arguments:
use std::env;fn main() {let args: Vec<String> = env::args().collect();if args.len() < 2 {eprintln!("Usage: hello_rust <name>");return;}println!("Hello, {}!", args[1]);}Now run:
cargo run AliceAt this point, you’re already doing real work with Rust. You’re compiling, validating input, handling basic errors, and using the standard library the way production code does. The syntax is only the surface. The bigger shift is learning to treat the compiler as part of your development loop.
Understanding Ownership Borrowing and Lifetimes
Rust’s hardest concepts are also its core strength. If you understand ownership, borrowing, and lifetimes as rules about who controls data and how long references stay valid, the borrow checker becomes much easier to reason about.
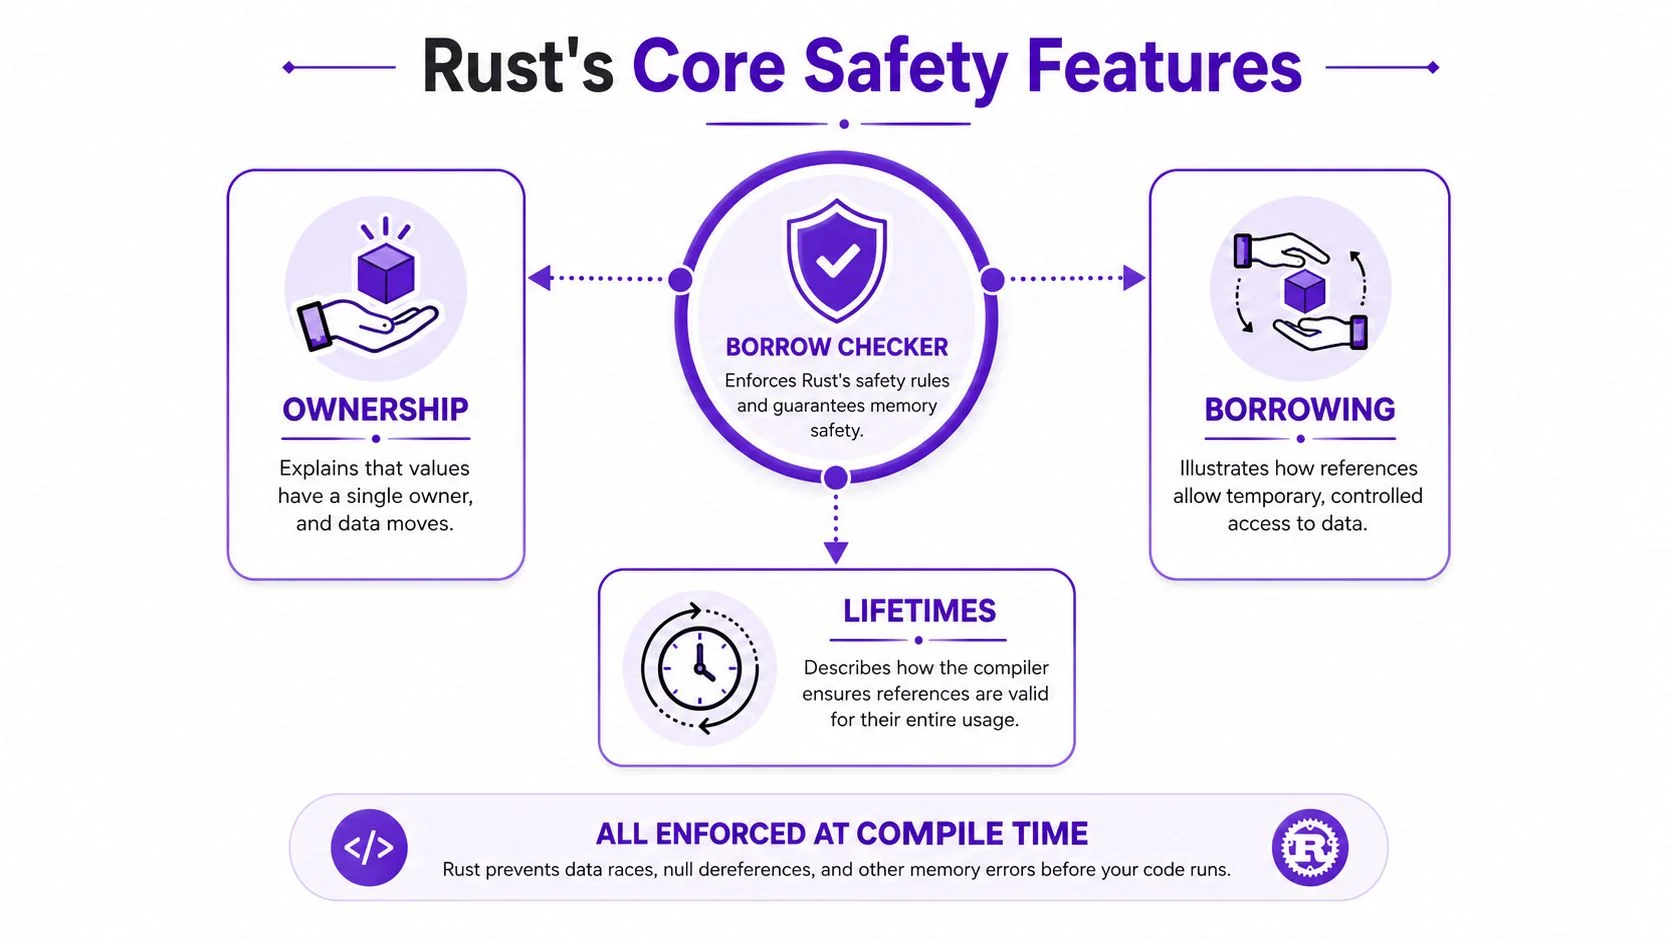
Ownership means one clear owner
Every value in Rust has an owner. When ownership moves, the previous binding can no longer use that value.
fn main() {let name = String::from("Mina");let copied_name = name;println!("{}", name);}This fails because String owns heap data. Assigning name to copied_name moves ownership.
The fix depends on intent:
- If the second variable should take over, stop using the first.
- If both places need access, borrow with
&. - If you need a separate owned value, clone deliberately.
Here’s the borrowing version:
fn main() {let name = String::from("Mina");print_name(&name);println!("{}", name);}fn print_name(value: &String) {println!("{}", value);}The function reads the string through a reference, so main keeps ownership.
Borrowing lets code access data without taking it
Rust allows either many immutable borrows or one mutable borrow at a time. That rule protects you from conflicting access patterns.
This works:
fn main() {let name = String::from("Rust");let first = &name;let second = &name;println!("{} {}", first, second);}This does not:
fn main() {let mut name = String::from("Rust");let first = &name;let second = &mut name;println!("{}", first);println!("{}", second);}The issue isn’t randomness. Rust sees an immutable borrow and a mutable borrow overlapping. One part of the code wants read-only access while another wants exclusive write access.
A cleaner version is to separate those moments:
fn main() {let mut name = String::from("Rust");println!("{}", &name);let second = &mut name;second.push_str(" Lang");println!("{}", second);}Lifetimes are about reference validity
Lifetimes sound advanced, but the practical question is simple: “How does the compiler know this reference won’t outlive the data it points to?”
Consider this function:
fn longest(a: &str, b: &str) -> &str {if a.len() > b.len() { a } else { b }}Rust rejects it because the return value could come from either input, and the compiler needs an explicit relationship between those references.
Here’s the corrected version:
fn longest<'a>(a: &'a str, b: &'a str) -> &'a str {if a.len() > b.len() { a } else { b }}That 'a doesn’t extend a value’s life. It tells the compiler that the returned reference is valid for the same shared lifetime relationship as the inputs.
Key idea: Lifetimes don’t create safety. They describe it so the compiler can verify it.
A small project example
Suppose your CLI app parses a title and returns a borrowed slice for display:
fn first_word(text: &str) -> &str {for (i, ch) in text.char_indices() {if ch == ' ' {return &text[..i];}}text}This is a very Rust-like pattern. The function doesn’t allocate a new string. It borrows a slice of the original input. That’s efficient and safe because the returned &str can’t outlive the source text.
Here are the common borrow-checker mistakes this project often triggers:
- Returning a reference to local data. Local variables are dropped at the end of the function, so references to them can’t escape.
- Mutating while borrowed. If a slice or reference is still in use, Rust won’t let you change the underlying value in a conflicting way.
- Moving when a borrow is enough. Passing owned values too eagerly often causes “value moved” errors that disappear once a function takes
&stror&Tinstead.
How to debug borrow-checker errors
When the compiler rejects your code, ask these questions in order:
- Who owns this data right now?
- Did I move it somewhere without realizing it?
- Does this function need ownership, or only read access?
- Are two references overlapping in a way Rust considers unsafe?
- Am I returning a reference tied to data that won’t live long enough?
That sequence turns a scary error into a design review. In practice, that’s why Rust becomes easier after a few real programs. The rules don’t change. Your mental model gets sharper.
Working with Traits Error Handling and Async
Once ownership stops feeling foreign, the next step is writing code that scales beyond toy examples. In Rust, that usually means three things: shared behavior through traits, recoverable failures through Result and Option, and concurrency that doesn’t collapse into confusion.
That last part matters more than many tutorials admit. 62% of new Rust users abandon projects due to concurrency complexity, yet less than 15% of popular tutorials cover modern async patterns like structured concurrency and tokio integration beyond basic examples, according to this discussion of Rust async learning gaps.

Traits define behavior cleanly
A trait says, “Any type that implements this can do these things.”
trait Summary {fn summarize(&self) -> String;}struct Article {title: String,}impl Summary for Article {fn summarize(&self) -> String {format!("Article: {}", self.title)}}Traits become powerful when functions can accept many types with the same behavior:
fn print_summary(item: &impl Summary) {println!("{}", item.summarize());}This is how Rust stays flexible without giving up type safety. You can add new structs later without rewriting the calling code.
Error handling should stay explicit
Rust doesn’t hide recoverable errors behind exceptions. That feels verbose at first, then becomes a relief in larger codebases.
Start with Option<T> when a value may or may not exist:
fn first_char(text: &str) -> Option<char> {text.chars().next()}Use Result<T, E> when something can fail and you want to know why:
use std::fs;fn read_config() -> Result<String, std::io::Error> {let contents = fs::read_to_string("config.txt")?;Ok(contents)}The ? operator matters because it keeps code readable. Instead of nesting match expressions everywhere, you propagate the error upward and keep the happy path visible.
A practical pattern for CLI tools looks like this:
- Parse user input.
- Call smaller functions that each return
Result. - Let
mainprint a clear error message if something fails.
If every function in a Rust app panics on bad input, the problem isn’t Rust. It’s the design of the program.
Async needs a use case, not just syntax
A lot of beginner material introduces async as a trick for writing async fn hello(). That’s not enough. Async makes sense when your app spends time waiting on I/O, such as network calls, file access, or multiple independent tasks.
A typical runtime choice is tokio. Conceptually, the flow looks like this:
async fn fetch_data() -> Result<String, Box<dyn std::error::Error>> {Ok(String::from("done"))}Then your entry point runs within an async runtime and awaits the result. The important mental model is this: async doesn’t make code faster by magic. It lets one task pause while the runtime works on other ready tasks.
A pattern worth using early
When junior developers struggle with async Rust, they often put too much logic inside one giant async function. A better shape is:
| Part | Role |
|---|---|
| Small sync helpers | Parse, validate, and transform local data |
| Async boundary | Handle network or I/O waits |
| Result return types | Keep failures explicit |
| Trait-based interfaces | Swap implementations without changing callers |
That shape reduces noise. It also makes testing easier because most of your logic remains synchronous and deterministic.
If you’re building services later, you’ll likely reach for tokio, task spawning, and structured async workflows. For now, the key lesson is simpler: learn traits so your code can express behavior, learn Result so failures stay honest, and treat async as an I/O coordination tool rather than a badge of complexity.
Building Testing and Packaging a Real Project
Let’s pull the pieces together into a small but realistic tool: a CLI app called slugify_title. It takes a phrase like "Rust Borrow Checker Guide" and turns it into a URL-friendly slug like "rust-borrow-checker-guide". That might sound modest, but it touches ownership, borrowing, error handling, testing, and packaging in a way that’s close to real work.
A project like this is also small enough to document well. If you want to compare how another simple app is structured from starter code to runnable output, LunaBloom’s AI video app is a helpful reference for thinking in terms of compact, shippable workflows rather than oversized demos.
Shape the crate like something you can maintain
Start with:
cargo new slugify_titlecd slugify_titleInside src/main.rs, keep main thin and move logic into functions:
use std::env;fn main() {let args: Vec<String> = env::args().collect();if args.len() < 2 {eprintln!("Usage: slugify_title <text>");return;}let input = args[1..].join(" ");let slug = slugify(&input);println!("{}", slug);}fn slugify(input: &str) -> String {input.trim().to_lowercase().split_whitespace().collect::<Vec<_>>().join("-")}This is a good first version because the ownership story is clear. main owns the argument vector. The slugify function borrows the input as &str and returns a fresh String.
Add behavior without making the code muddy
Real input is messier than a happy-path phrase. You may have punctuation, repeated spaces, or empty values. Refactor before the complexity piles up.
One cleaner version is to separate normalization rules:
fn slugify(input: &str) -> String {let cleaned: String = input.chars().map(|ch| {if ch.is_alphanumeric() || ch.is_whitespace() {ch.to_ascii_lowercase()} else {' '}}).collect();cleaned.split_whitespace().collect::<Vec<_>>().join("-")}This has a useful Rust lesson tucked inside it. chars() gives you owned character values one by one, so you avoid borrowing headaches while transforming text. When you’re early in Rust, choosing an iterator pipeline like this often keeps the design simpler than trying to mutate a string in place.
Write tests before adding more features
Rust makes testing easy enough that there’s little excuse to skip it. Put unit tests in the same file while the project is small:
#[cfg(test)]mod tests {use super::*;#[test]fn converts_spaces_to_hyphens() {assert_eq!(slugify("Rust Guide"), "rust-guide");}#[test]fn trims_outer_whitespace() {assert_eq!(slugify(" hello world "), "hello-world");}#[test]fn removes_punctuation() {assert_eq!(slugify("Hello, Rust!"), "hello-rust");}}Run them with:
cargo testThe value of these tests isn’t just correctness. They give you permission to refactor. Without tests, every cleanup feels risky. With tests, you can improve the implementation and verify behavior quickly.
Add an integration-style check
Unit tests cover internal logic. Integration tests check how the crate behaves from the outside. Create a tests/ directory and add a file such as tests/slug_tests.rs when your project grows into multiple modules.
A lightweight project structure might look like this:
src/main.rsfor argument parsing and user-facing output.src/lib.rsfor reusable logic likeslugify.tests/for integration checks that exercise public behavior.
That split matters when your binary and your library logic start evolving at different speeds.
The easiest Rust apps to maintain are the ones where
mainmostly coordinates and the library code does the real work.
Make the app fail well
A stronger version doesn’t just print usage text. It validates input and reports errors explicitly.
Move toward a Result-based shape:
use std::env;use std::error::Error;fn main() {if let Err(err) = run() {eprintln!("Error: {}", err);}}fn run() -> Result<(), Box<dyn Error>> {let args: Vec<String> = env::args().collect();if args.len() < 2 {return Err("Usage: slugify_title <text>".into());}let input = args[1..].join(" ");let slug = slugify(&input);if slug.is_empty() {return Err("Input did not contain usable characters".into());}println!("{}", slug);Ok(())}This pattern scales well. main handles presentation. run handles program logic. Deeper functions can return errors upward with ? once file I/O or configuration enters the picture.
Package it like a crate you could share
Even if you never publish this tool, package discipline teaches useful habits. Check Cargo.toml and make it readable:
[package]name = "slugify_title"version = "0.1.0"edition = "2021"description = "A small CLI tool that converts text into URL slugs"license = "MIT"Then run:
cargo packageThat command validates what would go into a distributable crate. If you eventually want to publish, you’ll use cargo publish, but packaging first is the safer checkpoint.
If you’re planning to host the project in a repository, this guide on creating folders cleanly in GitHub workflows is handy when you start organizing examples, tests, or docs into a repo structure that other people can easily understand.
Keep the lifecycle connected
A lot of fragmented tutorial rust content teaches building in one article, testing in another, and packaging in a third. Real Rust work isn’t separated that neatly. You write a function in a way the borrow checker accepts. You add tests so change feels safe. You structure files so the crate remains understandable. Then you package it in a form another person, or future you, can use.
That full loop teaches more than syntax ever will.
Best Practices Next Steps and Resources
The fastest way to keep improving in Rust is to treat every small project like a chance to sharpen habits. Good Rust code usually isn’t clever. It’s explicit about ownership, disciplined about errors, and easy to inspect.
A practical checklist helps:
- Use
cargo fmtregularly so formatting stops being a discussion. - Run Clippy and read the warnings. It often catches awkward patterns before they harden into habit.
- Write doc comments on public functions so intent stays close to the code.
- Prefer borrowing first. Only take ownership when the function needs it.
- Keep
mainlight. Put reusable logic in functions or modules you can test directly.
For continued learning, keep your resource stack balanced. Mix one reference-heavy source, one exercise-driven source, and one project-based source. That combination works better than reading theory alone.
If you plan to teach Rust to teammates, record walkthroughs, or build internal onboarding material, it’s worth using a workflow that can turn one recording into reusable documentation. Teams that publish software training often need both a video and a written guide, and software tutorial creation workflows are easier to maintain when they start from a single source of truth. That’s especially useful if your audience spans regions, because Tutorial AI supports narration in exactly 74 languages, which makes localization possible without manual re-recording, as shown on the Tutorial AI voices page.
The best Rust learning path isn’t more theory. It’s a steady cycle of build, break, inspect, and revise.
Keep your next step concrete. Add one feature to the CLI you built. Write one failing test before fixing a bug. Refactor one function to borrow instead of clone. Rust rewards that kind of deliberate practice.
If you create Rust tutorials for customers, teammates, or students, Tutorial AI is a practical way to turn a single screen recording and spoken walkthrough into both a polished tutorial video and a matching written article. It automates the editing work that usually slows subject-matter experts down, supports product demos, onboarding, help-center videos, internal training, SOPs, and sales enablement walkthroughs, and lets teams update recordings by editing the script instead of wrestling with a timeline.