You’ve probably had this moment. You see a quilt draped over a chair, notice the crisp corners and neat rows, and think, “That’s beautiful. I’d never be able to make one of those.”
That feeling is common, and it’s usually wrong.
A first quilt doesn’t begin with mastery. It begins with one cut, one seam, one square lined up against another. Tutorial quilting works best when you treat it like a sequence of small actions instead of one giant artistic test. If a seam is a little off, that’s normal. If you need to unpick stitches, that’s normal too. If your first quilt ends up more cozy than perfect, that’s still a success.
Quilting has deep roots. The practice goes back to approximately 3400 BCE, with a history stretching about 5,000 years, and early quilted objects show up across ancient cultures, as noted in the history of quilting. That long history matters because it reminds us that quilting was never only about flawless display pieces. For much of its life, it was practical work. People made useful things that lasted.
Your First Quilt Awaits
A beginner usually doesn’t need more inspiration. They need a calmer way in.
I think of the new quilter standing in a fabric store, touching a stack of cotton prints, excited for five seconds and then overwhelmed by terms like batting, binding, seam allowance, and quilt sandwich. That stack of fabric suddenly feels like homework. The project gets postponed for weeks because starting feels riskier than waiting.
That’s why process matters more than perfection at the beginning. A quilt is just fabric cut into pieces, sewn together in a repeatable way, layered, stitched, and finished at the edges. Each part is learnable. None of it requires you to be born “crafty.”
You don’t need a perfect first quilt. You need a first quilt that teaches your hands what the next quilt will do better.
A simple project gives you room to practice without panic. If you want another friendly beginner perspective before you start, learn to quilt with B-Sew Inn. Sometimes it helps to hear the same craft explained in slightly different words.
What beginners usually worry about
Most fears come down to three things:
- Cutting wrong: You worry one bad cut will ruin everything. Usually it won’t. Quilting is full of small corrections.
- Sewing crooked seams: That’s a skill issue, not a talent issue. Skill improves fast when you repeat the same seam.
- Wasting fabric: Reasonable concern. Good setup and one small test block can save a lot of frustration later.
If you keep one idea in mind, make it this one. Your first quilt isn’t an audition. It’s practice that turns into something warm and real.
Gathering Your Quilting Supplies
Walking into a quilting aisle can feel like being handed a new vocabulary test. There are rulers of different widths, cutters with replacement blades, whole shelves of thread, and presser feet that seem to assume you already know what you’re doing.
You don’t need everything. You do need the right basics.
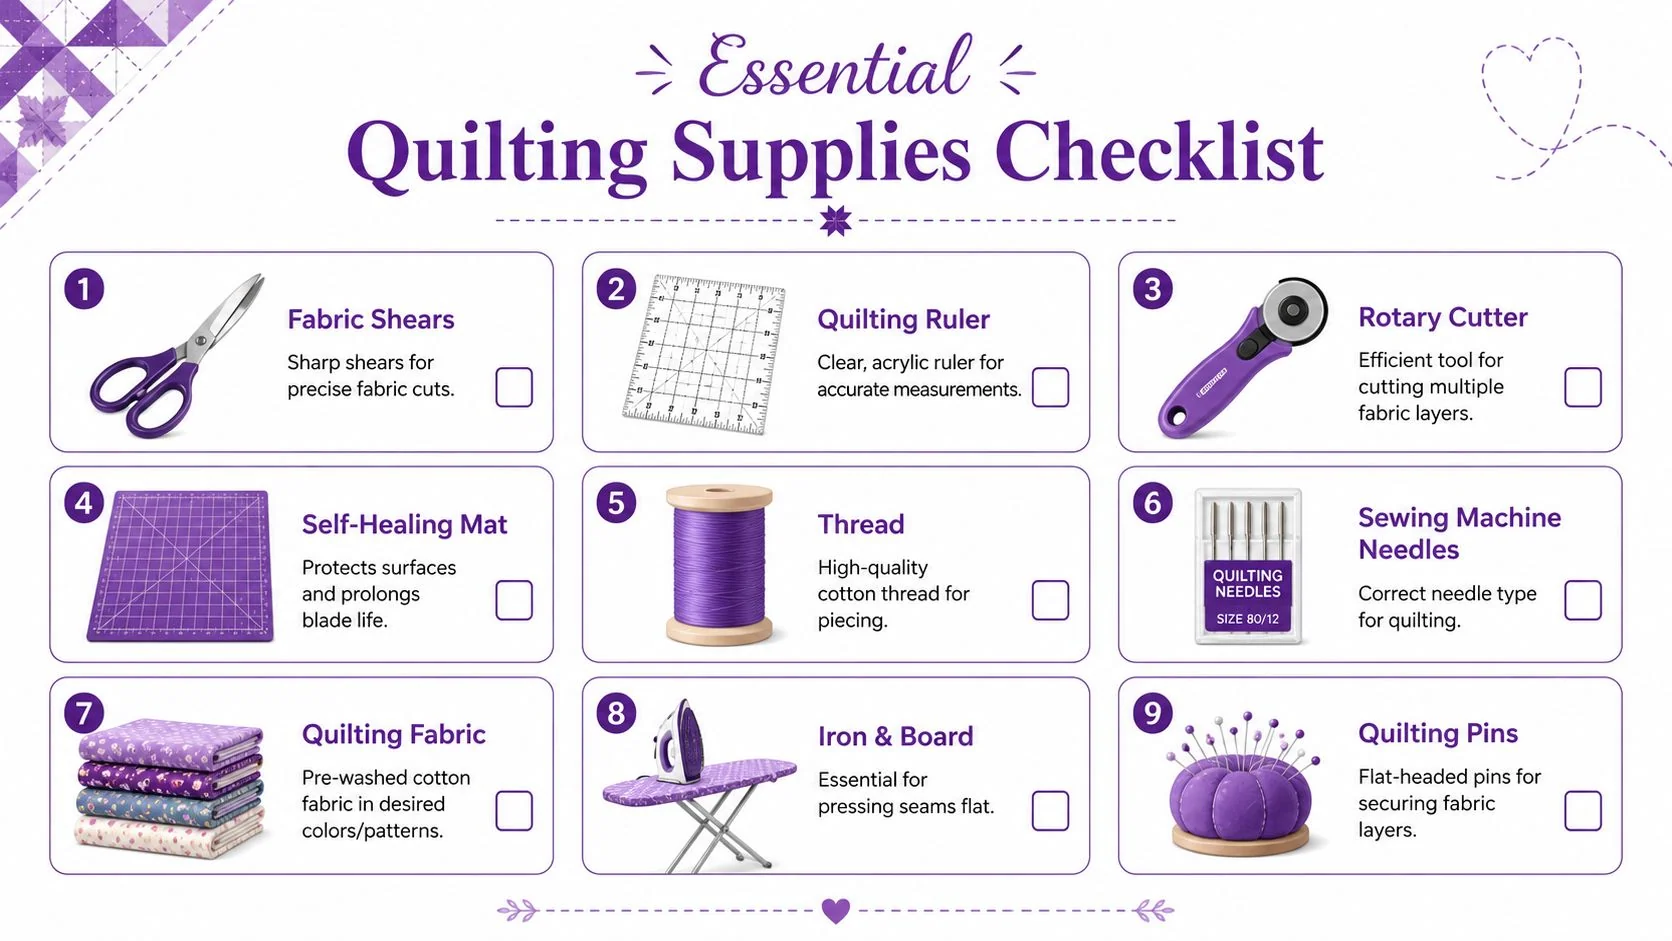
The tools worth buying first
Think in three groups: cutting, sewing, and pressing.
- For cutting: fabric shears, a rotary cutter, a self-healing mat, and a clear acrylic quilting ruler
- For sewing: a sewing machine, quilting pins, machine needles, and cotton thread
- For pressing: an iron and ironing board
A rotary cutter, ruler, and mat are the trio that makes quilting feel precise instead of guessy. Scissors work for many sewing jobs, but quilt pieces need clean, square edges. The ruler gives you a straight reference line. The mat protects your table and helps keep measurements visible.
Fabric and thread choices that make life easier
Choose quilting cotton for a first project. It’s stable, widely available, and easier to control than slippery or stretchy fabric. If you hear the term fat quarter, that usually means a pre-cut piece of fabric often used in beginner projects because it gives variety without requiring you to buy a lot of yardage.
Thread matters more than beginners expect. Cheap thread can shed lint, break, or behave unevenly. A good cotton thread is easier to sew with and gives you fewer mysterious machine problems.
Practical rule: If your machine suddenly seems difficult, don’t assume you’re the problem first. Check the needle, thread, and setup.
The one measurement that deserves your full attention
Quilting looks soft and creative, but underneath it is structured math. The Early American quilting guide from Education Possible notes that the industry standard seam allowance for piecing quilt blocks is ¼ inch (0.6 cm), and beginner quilts often use 35 blocks, each 4x4 inches. That structure is why quilts come together cleanly when they’re taught well.
Here’s what that means in plain language. If your seam is too wide, your pieces shrink. If it’s too narrow, your blocks grow. A little inconsistency repeated across a whole quilt top becomes a big mismatch later.
A quarter-inch presser foot helps because it gives your eye and your hands a repeatable guide. It’s not glamorous, but it may be the most useful small tool you buy.
Must-haves and nice-to-haves
| Category | Must-have | Nice-to-have |
|---|---|---|
| Cutting | Rotary cutter, ruler, mat | Extra ruler sizes |
| Sewing | Machine, thread, needles, pins | Quarter-inch foot if your machine doesn’t include one |
| Pressing | Iron and board | Seam roller |
| Planning | Basic pattern notes | Printed checklist or worksheet |
If you want a clean way to organize your project notes, supply list, and step order, an instruction guide template is a helpful starting point.
A good first setup doesn’t need to be fancy. It needs to reduce friction. When your tools are simple and reliable, you spend less energy troubleshooting and more energy learning how fabric behaves.
Cutting Fabric and Piecing Your Quilt Top
This is the stage where quilting starts to feel real. Fabric turns into units, units turn into rows, and rows start looking like something you’d want to spread across a bed or couch.
It’s also the stage where accuracy matters most. Not “perfect hands” accuracy. Repeatable accuracy.
Prep the fabric before you chase precision
Start by washing and drying your fabric if that fits your preferred process, then press it so it lies flat. Wrinkles can trick your ruler and distort your cut line. Even a small fold can throw off a square enough to create frustration later.
Set up your workspace so the ruler, cutter, and cut pieces each have a place. Beginners often lose accuracy not because they can’t cut, but because they keep shifting fabric around on a crowded table.
Cut slowly enough to stay square
For a simple square-based first quilt, align the fabric edge with the ruler markings and cut with steady pressure. Don’t saw at the fabric. Let the rotary blade roll through it.
Then stack or group your pieces in a way that makes sense to you. Some quilters label piles by fabric. Others label by row. The specific system matters less than keeping your pieces from turning into a shuffled deck.
A useful habit is to compare a few cut pieces against each other before cutting everything. If one looks slightly off, stop early and correct it.
Sew one test block first
This step saves beginners from a lot of disappointment. The how to make a quilt from start to finish guide notes that a prototype test block can reduce material waste by 65%, yet only 30% of beginners do it.
That’s a striking gap, and it makes sense. New quilters are eager to move. Testing feels like slowing down. In practice, it speeds you up because it exposes problems while they’re still small.
Make one block all the way through before cutting and sewing at full speed. If the size is off, your seam allowance is probably the first thing to check.
The quarter-inch seam is where quilts become quilts
A precise ¼-inch seam allowance is not optional in piecing. It’s the measurement that lets your blocks fit the pattern you intended. If your first test block comes out too small, your seam is likely too wide. If it comes out too large, your seam may be too narrow.
Try this short routine:
- Sew two scrap strips together using your normal guide.
- Press and measure the result.
- Adjust the needle position or fabric guide if needed.
- Repeat once more before starting the actual block.
This kind of repetition builds confidence fast because you stop guessing.
Piece in an order your future self can follow
Once you trust your seam allowance, sew small units first, then combine them into larger ones. If your project uses rows, build the rows separately before joining them. Keep each row in order so you don’t accidentally rotate a piece and undo your own work.
Many quilters like chain piecing, which means sewing one unit after another without cutting the thread between every pair. It saves time and keeps the rhythm steady. For a beginner, it also reduces the stop-start feeling that can make sewing seem harder than it is.
Pressing is not the same as ironing
This is a common point of confusion. Ironing often means moving the iron back and forth. In quilting, that motion can stretch fabric or distort seams. Pressing means lifting the iron and setting it down.
Press after each major joining step so the fabric stays manageable and the seams settle into place. If a block feels slightly skewed, don’t tug it into submission while it’s hot. Let the fabric relax, then check your measurements again.
If you create instructions for your own sewing classes, team tutorials, or craft demos, these step-by-step writing tips are useful because quilting is exactly the kind of process that benefits from clear sequencing.
It’s okay if your first row doesn’t look magazine-ready. What matters is whether your pieces are getting more consistent as you go. That’s how you know you’re learning.
Assembling Quilting and Binding
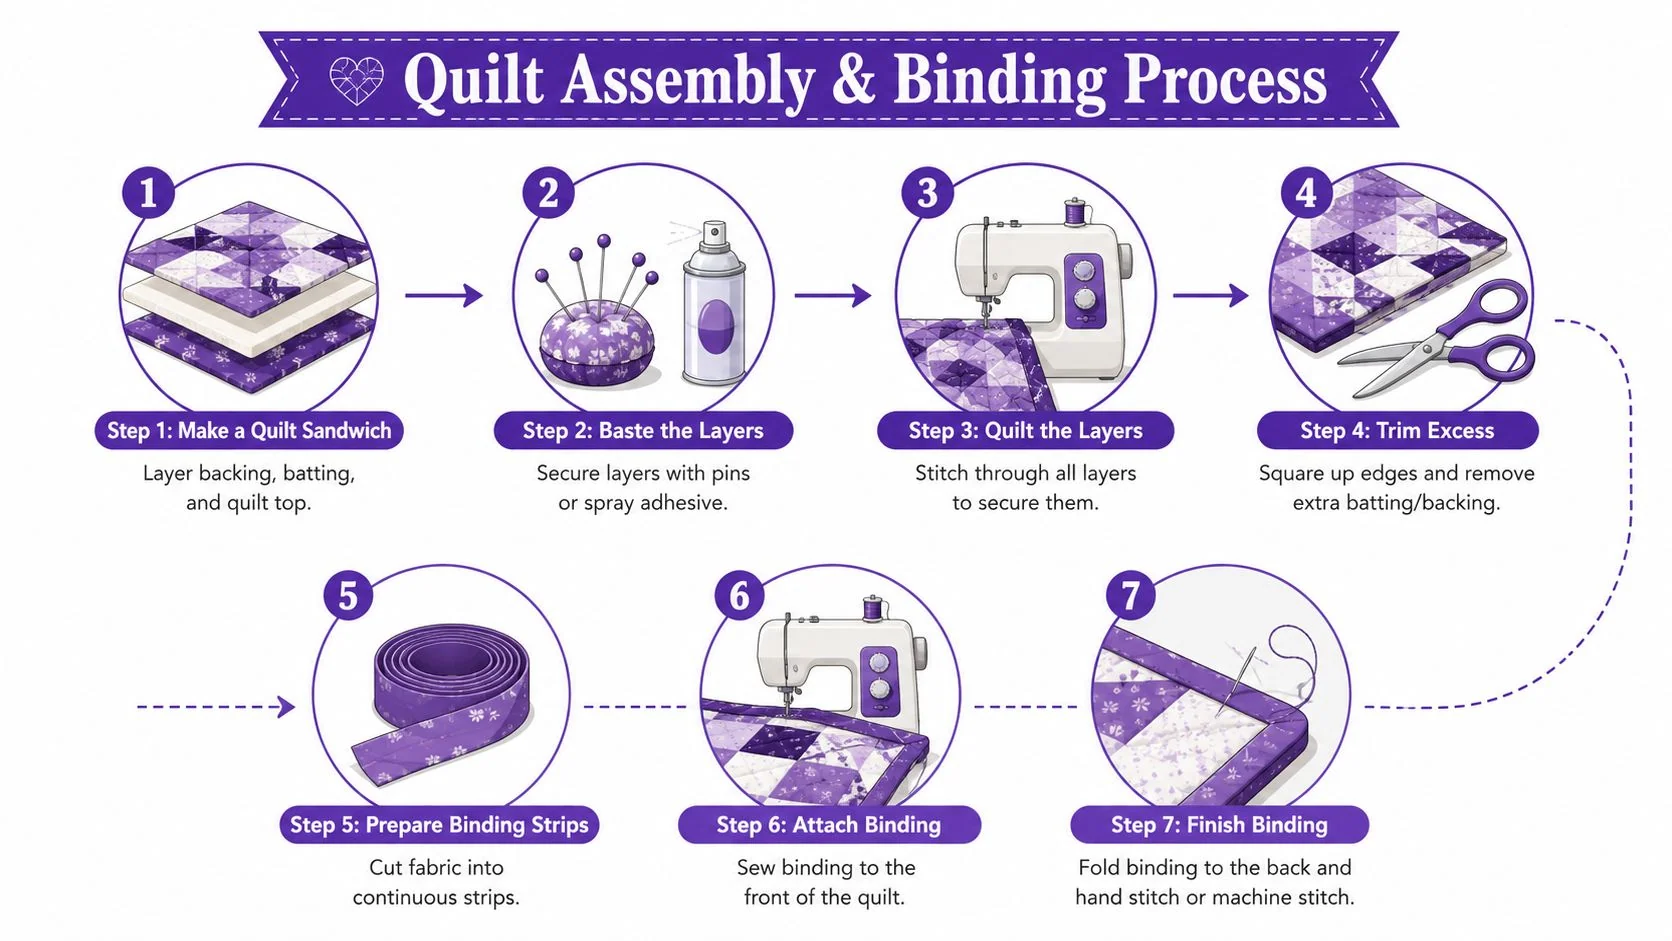
Finishing a quilt can feel like three different crafts stitched together. First you layer it. Then you quilt through those layers. Then you wrap the raw edges with binding so the whole piece looks finished and holds up over time.
That sounds like a lot, but the logic is simple. Each stage stabilizes the one before it.
Build a smooth quilt sandwich
A quilt sandwich is the stack of backing, batting, and quilt top. Backing goes on the bottom, usually wrong side up. Batting goes in the middle. Quilt top sits on top, right side up.
Lay each layer as smoothly as you can. The goal isn’t tension. It’s flatness. If one layer is wrinkled before quilting begins, stitching will lock that wrinkle in place.
Beginners do well with a slow setup:
- Start with the backing: Smooth it out first because every other layer depends on it.
- Add batting gently: Don’t stretch or pull it into place.
- Place the quilt top last: Align it visually and pat it flat rather than dragging it.
Then baste the layers together with pins or spray adhesive. More securing usually feels annoying in the moment and helpful later.
Choose simple quilting lines first
The quilting stitches are what hold all three layers together. For a first quilt, straight-line machine quilting is often the least stressful option. A walking foot helps feed the layers more evenly, especially on larger projects.
If you prefer hand quilting, start with a small area and focus on rhythm rather than tiny, perfect stitches. Machine or hand, the principle is the same. You’re securing structure, not auditioning for a competition judge.
Quilting lines don’t need to be elaborate to be beautiful. Even spacing and calm handling often look better than ambitious stitching done in a rush.
A simple grid, diagonal lines, or stitching along major seams can all work well for a first project. Choose the option that feels manageable enough that you’ll finish.
Trim before binding
Once quilting is complete, trim the extra batting and backing so the edges are square and tidy. This step gives binding a clean foundation. If the edge is uneven now, the binding will show it.
Set the quilt on a flat surface and use your ruler to check corners and sides. You’re aiming for neatness, not obsession. If a side is slightly imperfect but stable, that’s fine.
Binding is the frame of the quilt
Binding covers raw edges and gives the quilt a durable finish. Cut binding strips, join them into one long length, and sew the binding to the front of the quilt first. Then fold it over to the back and finish by hand or machine.
The first time you do binding, corners usually feel mysterious. They aren’t mysterious. They’re folded fabric managed in a consistent order.
A basic mitered corner works like this:
- Sew toward the corner and stop before the edge.
- Fold the binding up, then back down to create the angle.
- Begin sewing the next side from the top edge.
- Fold neatly to the back when finishing.
After two corners, your hands usually understand more than your brain did when reading about it.
What to do with odd angles
Most beginner instruction focuses on square corners, but modern quilt designs sometimes include unusual edge shapes. The odd-angle quilting video reference points out that finishing odd angles often requires specialized mitered binding techniques for obtuse or acute corners so the edge stays flat and avoids puckering.
If your first quilt is rectangular, you can set that issue aside for now. If your design includes unusual geometry, slow down and treat each corner as its own small problem. The fold sequence matters more there, and bulk builds quickly if you rush.
For educators or makers who want to turn a sewing process into a clearer teaching asset, a video tutorial script format is useful because quilting steps are physical and benefit from crisp, visual instruction.
The finishing stage is long, and that’s where many projects stall. Keep it manageable. One evening for layering. Another for quilting. Another for binding. Progress counts even when it’s spread out.
Common Mistakes and Pro Fixes
Every quilter has had a moment where two seams should meet and just don’t. It’s so annoying, especially when you were being careful.
That doesn’t mean you’re bad at quilting. It means fabric is flexible, machines need calibration, and hands learn through repetition.
When blocks look wonky
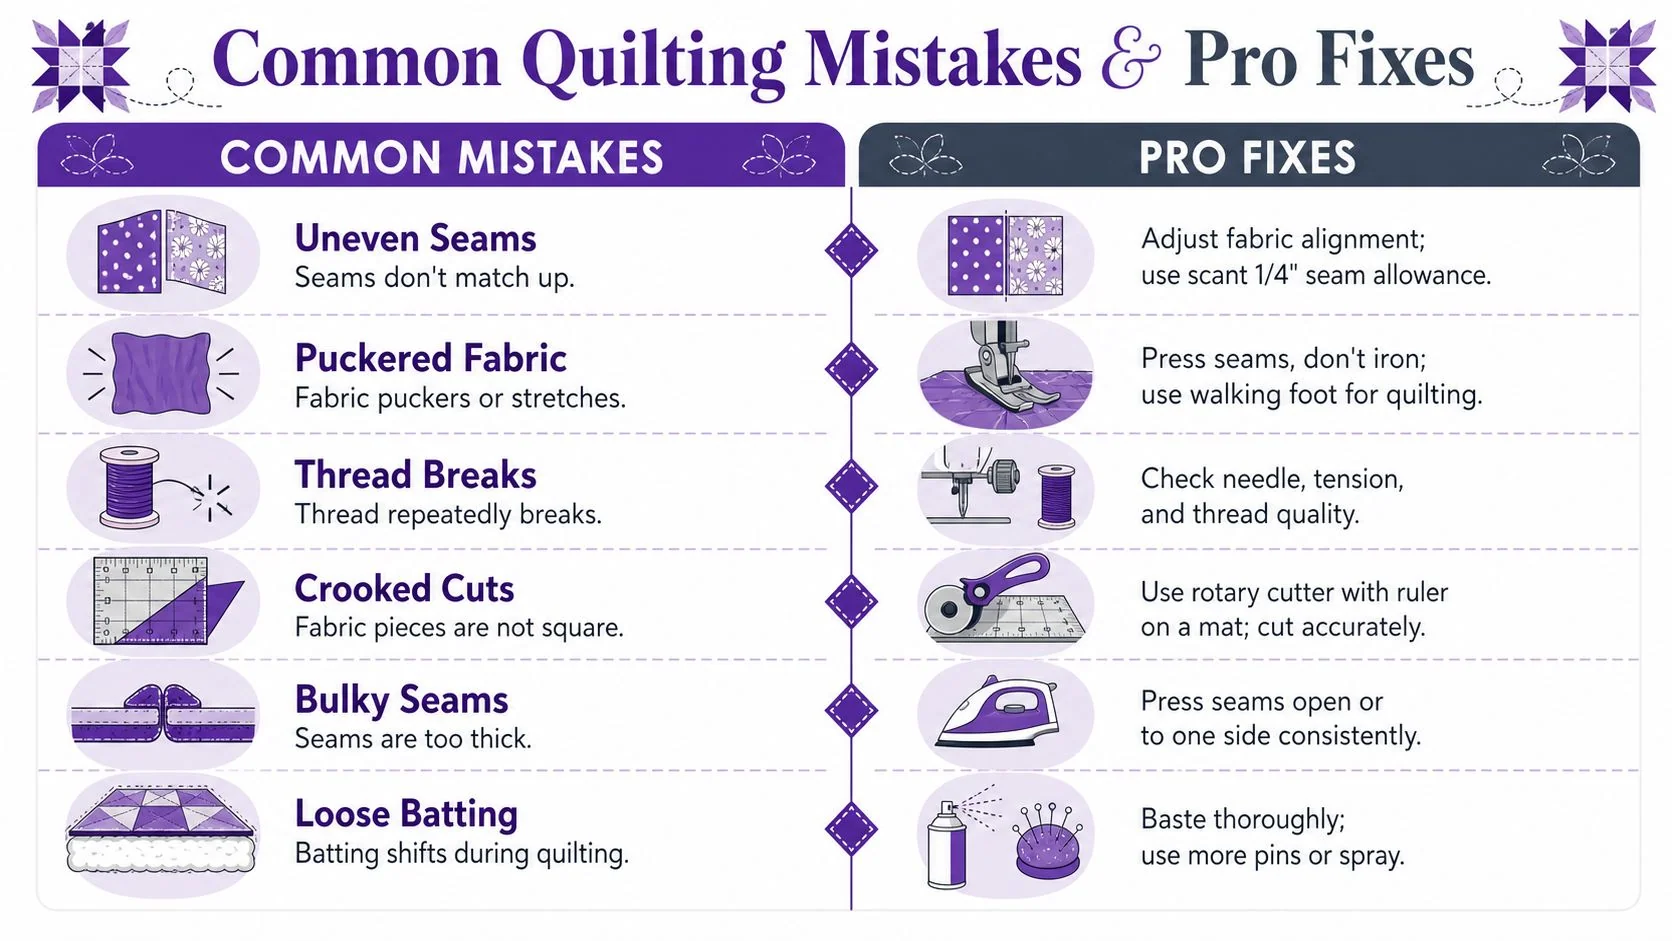
If a block twists, shrinks, or refuses to line up, don’t start by blaming your cutting. Check your seam allowance and pressing habits first. A slightly inconsistent seam can throw off the whole block.
Use a seam ripper without guilt. Experienced quilters use them all the time. The difference is that they don’t take it as proof they’ve failed.
When fabric stretches out of shape
Angled pieces can behave differently from straight-grain pieces. The guide on working with angles notes that bias seams are stretch-prone and often need special handling, including drawing pencil lines and using a throat plate guide to prevent distortion.
That’s why some blocks seem to change shape while you sew them. The fabric isn’t being dramatic. The diagonal edge has more give.
Try these fixes:
- Mark before sewing: Draw the line you intend to stitch when the angle matters.
- Guide, don’t pull: Let the machine feed the fabric. Pulling stretches the bias.
- Trim later: Keep extra fabric in place until the seam is sewn and pressed.
When the back puckers
Puckering on the quilt back often comes from uneven layer handling. If the top layer moves differently from the backing, little tucks can form underneath where you don’t notice them right away.
A few practical corrections help:
- Baste more thoroughly: Extra pins or more careful spray basting can keep layers from shifting.
- Quilt from the center outward: That gives excess fabric somewhere to go.
- Slow down around bulky seams: Fast stitching over thick joins can nudge layers off track.
If something looks off, stop early. Small quilting problems are easier to fix before they get stitched across the whole project.
The biggest mindset shift is this. A mistake is information. It tells you whether your cutting, pressing, seam allowance, or handling needs attention. Once you see it that way, quilting gets much less intimidating.
Your Quilting Journey and Beyond
By the time you finish a first quilt, you usually understand something surprising. The hardest part wasn’t the sewing. It was deciding you were allowed to begin before you felt ready.
That’s worth remembering for your next project. Choose another simple pattern. Try a new color palette. Practice straighter quilting lines or neater binding corners. Improvement in quilting tends to arrive subtly. One project later, your cuts are cleaner. Two projects later, your seams are steadier. Then one day a beginner asks how you made that quilt.
If you enjoy the teaching side of craft, there’s value in noticing what made a tutorial feel clear. Short steps. Concrete examples. Plain language. Screens that show the actual action. That approach matters just as much in quilting as it does in product demos, feature release videos, customer onboarding, help-center videos, support article videos, internal training, SOPs, and sales enablement walkthroughs.

Good instruction doesn’t need to sound grand. It needs to help someone do the thing. The Tutorial AI trimming workflow shows a transcript-based approach where users edit video by deleting unwanted words from the transcript rather than working on a traditional timeline, which gives polished results without requiring expert video editing skills.
That same practicality is why clear tutorials spread. People return to guides that respect their time, show the actual interface, and don’t bury the useful step under filler.
If you create tutorials for software, training, or documentation, Tutorial AI turns a single screen recording and spoken narration into a polished tutorial video and a matching written article in one workflow. It’s built for subject-matter experts who know the product but don’t want to spend their week editing in Adobe Premiere Pro, Camtasia, or Final Cut. You record the screen and voice, then refine the result through an editable script. That’s especially useful for product demos, onboarding, help-center content, internal training, SOPs, and sales enablement. Teams can also use features like AutoRetime, Brand Kits, narration in 74 languages, a Multilingual Player, document generation, SSO/SAML, and SOC 2 + GDPR support. Companies including Bosch, Deutsche Bahn, Intesa Sanpaolo, Microsoft, and UNICEF use it to produce clear instructional content at scale.