If you’ve ever started a screen cast on Mac, watched the cursor drift through a few awkward pauses, then ended up with a recording you’d never send to a customer or teammate, you’re in the right place. The hard part usually isn’t pressing record, it’s turning a raw capture into something people can follow without sitting through rambling, broken flow, or a second pass in a video editor.
Mac gives you a solid native starting point, and that matters. The Screenshot toolbar, QuickTime Player, AirPlay mirroring, and newer capture frameworks give you enough control to make useful tutorials, onboarding clips, and internal training videos without adding extra software just to begin.
Recording Your First Screen Cast Using Built-In Mac Tools
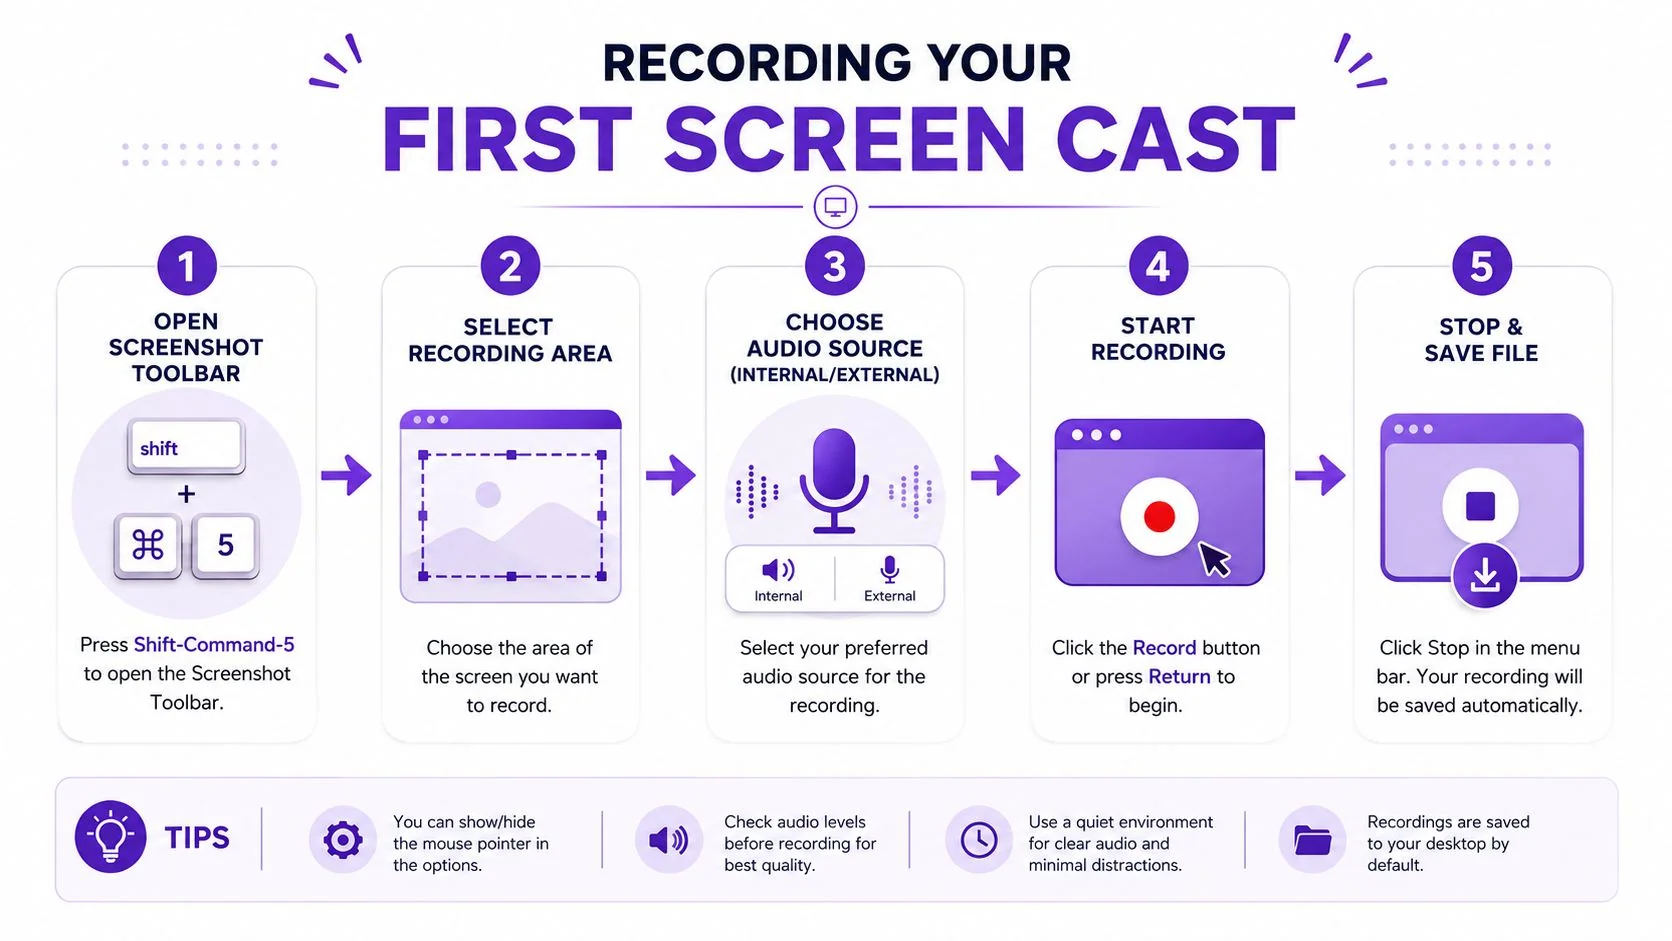
The fastest path starts with Shift-Command-5. That opens the Screenshot toolbar on macOS, where you can choose Record Entire Screen or Record Selected Portion, then start capturing without hunting through menus. Apple also documents QuickTime Player as a native route, either through File > New Screen Recording or the Control-Command-N shortcut, so you’ve got two built-in ways to get the same result depending on how you like to work. Apple’s long history with keyboard-based screen capture goes back decades, which is why the workflow still feels so direct today, from the early Command-Shift shortcuts documented in Apple Technical Note OS01 and later System 6 references to the modern toolbar model users rely on now. Apple’s historical screen-capture references
Practical rule: if you’re showing one task, record a selected portion. If you need app switching, split views, or multiple windows, use the full screen.
Start with the toolbar, not the camera roll
The native toolbar is better than many expect because it keeps the capture decision close to the action. When you’re recording a feature demo, an onboarding walkthrough, or a support clip, the difference between full screen and selected portion changes how readable the final video feels. Region-based capture usually keeps the viewer focused on the UI you’re teaching, while full-screen capture works better when context matters more than cleanliness.
Before you hit record, open Options and set the things that affect the actual take. Apple-based screencast guidance recommends choosing a microphone, setting a save location, and optionally enabling a timer before recording starts, with timer choices of 3, 5, or 10 seconds and a setting to show mouse clicks during capture. Those small controls matter because they save you from a clean video with bad audio, or a perfect explanation that nobody can hear. Mac help on the Screenshot toolbar and Apple-oriented screencast setup tips both point to the same practical truth, preflight beats cleanup.
A quick test clip is worth it every time. If the mic is wrong, the cursor is too small, or the recording region cuts off the part of the app you need, you’ll know in seconds instead of after a full take.
If you’re creating a product demo and want a compact planning reference before you record, how to make a demo video is a useful companion for structuring the story before you open the recorder.
Preparing Your Environment for Professional-Quality Captures
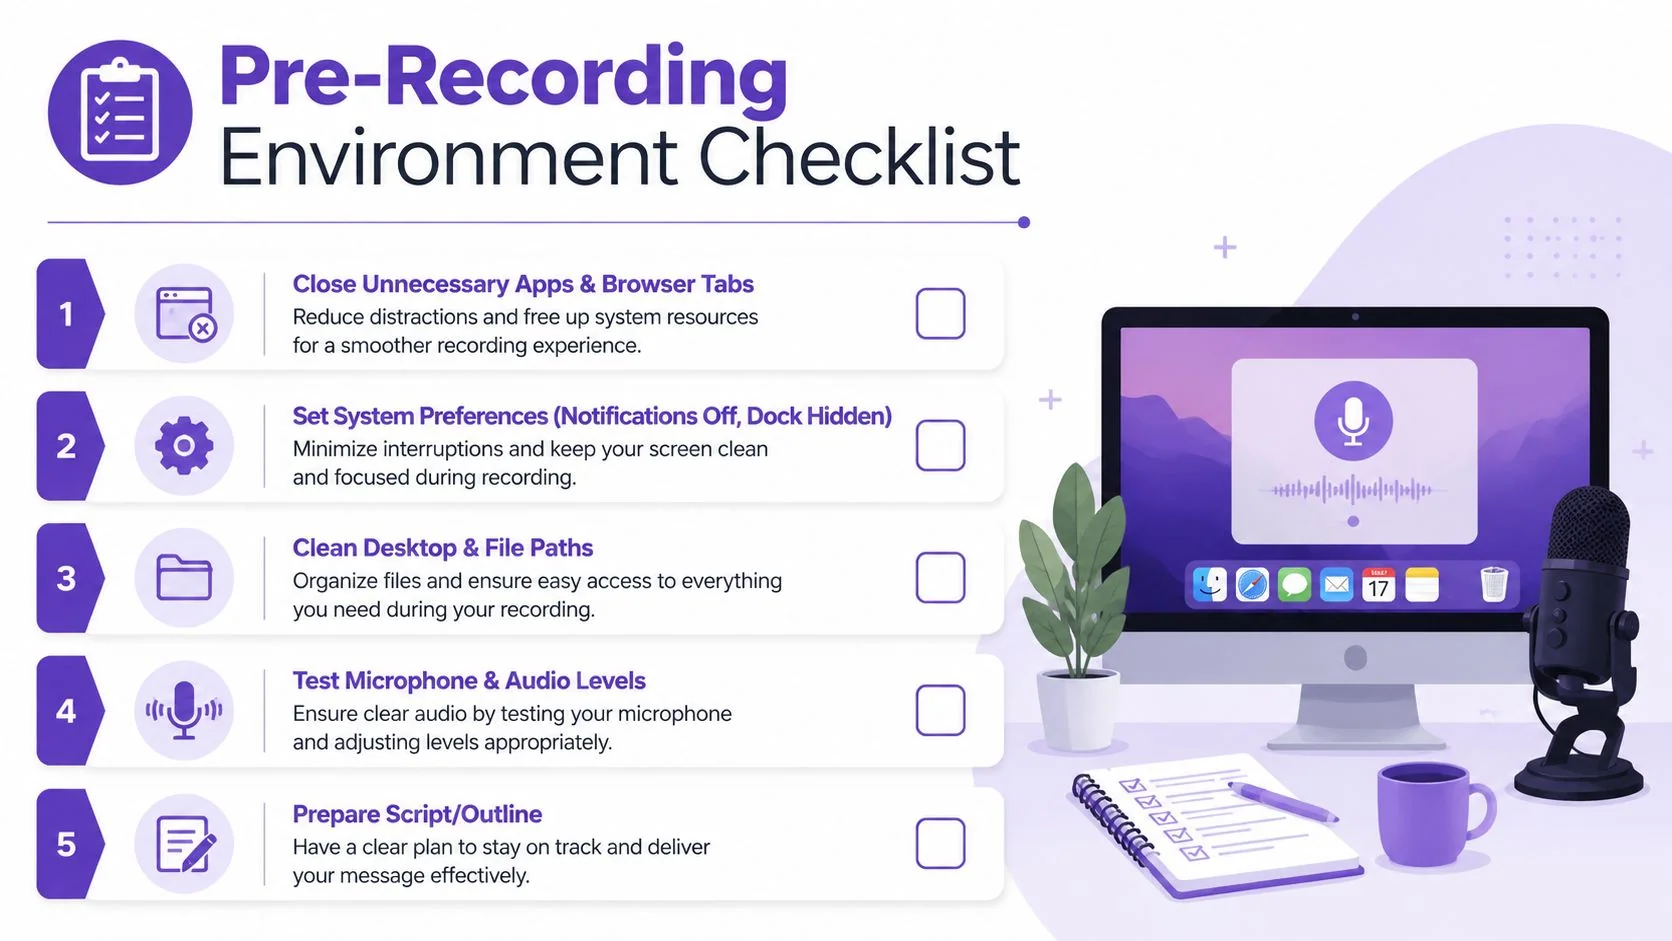
Most bad screencasts look bad before the first frame is recorded. Notifications pop up, the Dock steals attention, a browser tab flashes open, or the desktop is cluttered with files you didn’t mean to show. The recording itself only exposes the setup mistakes that were already there.
Clean the workspace before you press record
A professional capture starts with a clean system state, not fancy software. Close distracting apps, hide the Dock if it is not part of the teaching moment, enable Do Not Disturb, and clear the desktop so the viewer’s eye stays on the workflow instead of the background. The earlier section covered microphone setup, and the same logic applies here, a short test clip is the quickest way to catch errors before you commit to the full take. The native method works for teams because it is built into macOS and does not depend on extra hardware or region-specific tooling, which is why it scales well for support and training assets across locations. Apple support for macOS display mirroring and capture context
If your narration includes system audio, handle that before the recording starts. Preparing your Mac’s audio setup for professional screencasts prevents the common mismatch where the screen capture looks fine but the audio source is wrong, or where the desktop is clean and the banner still appears halfway through a sentence.
What usually goes wrong: the capture region is right, but the audio source is wrong, or the desktop is clean but the notification banner appears mid-sentence.
Choose the tightest frame that still tells the story
A selected portion is usually the better choice for tutorial-style work because it reduces visual noise. If you are teaching a settings change, a form flow, or a single step in a knowledge-base video, there is no reason to let the entire desktop compete for attention. Full-screen recording makes sense when switching between apps is part of the lesson, but for most support article videos and SOPs, a tighter frame makes the output feel more deliberate.
Multi-monitor setups need extra care. If the pointer can move off into another display, or if the app window shifts between screens, the recording can look unstable even when the software works fine. Display resolution matters too, because blurry text usually comes from a mismatch between the source display and the recording setup, not from editing later.
Cursor visibility is another small detail with outsized impact. If the audience has to guess where you clicked, the video starts doing half the teaching badly. Use the shortest practical setup checklist every time, then stick to it, because consistency is what turns a one-off recording into a repeatable content process.
Choosing the Right Screen Recording Tool for Your Workflow
The tool choice should match the audience, not your curiosity about features. A quick internal status update can live with a simple recorder, but a customer-facing product demo, onboarding video, or help-center asset usually needs tighter pacing, better polish, and easier revision.
Compare speed, editing effort, and final polish
Built-in macOS tools are free and reliable for straightforward captures. They’re enough when you need proof, a walkthrough draft, or a simple support clip, and they’re especially useful when the blocker is just getting the recording done. Their limitation is obvious, though, because once the raw recording exists, the work of tightening pacing and polishing the output still sits on your shoulders.
Casual screen recorders like Loom are fast, which is why teams reach for them first. The trade-off is that recordings often run longer than they need to, with pauses, repeats, and filler that make the finished video harder to share outside a small team. That’s fine for quick internal communication, but it gets expensive when the same rough style starts showing up in public documentation.
Professional editors such as Camtasia and Adobe Premiere Pro can produce excellent results, but they ask for editing skill. That’s the bottleneck most subject-matter experts run into, they know the product, but they don’t want to learn timelines, trimming logic, and export settings just to explain one workflow. In contrast, AI-assisted tools like Tutorial AI take the raw screen recording, narration, and script and turn them into a polished tutorial without requiring timeline editing. One useful benchmark for a screencast is whether the tool helps you communicate clearly, not whether it gives you endless knobs to turn. Movavi sponsorship examples are a reminder that plenty of screen tools compete on distribution and promotion, but the decision is still about how much hands-on editing your team can tolerate.
| Tool | Best For | Editing Required | Output Quality |
|---|---|---|---|
| Built-in macOS tools | Quick captures, internal demos, simple support clips | Low | Good for basic use |
| Loom | Fast team updates, casual sharing | Low to medium | Good, but often rough |
| Camtasia | Structured tutorials, polished training assets | High | Strong, if you can edit |
| Adobe Premiere Pro | Advanced production and full control | High | Excellent, with expertise |
| Tutorial AI | Tutorial workflows, narrated product demos, documentation | Low | Polished from a raw capture |
Pick based on the publish target
If the goal is a short internal note, speed wins. If the goal is a customer onboarding video, a help article, or sales enablement walkthrough, the gap between raw footage and publishable content becomes the issue. That’s where the workflow matters more than the recorder itself.
A native capture plus a lightweight editing layer is often enough for teams that need consistency rather than cinema. For creators who want a browser-based recorder in the same workflow, a simple online screen recorder option can sit in the middle ground between basic capture and heavier production tools.
Editing Narration and Captions Without a Video Timeline
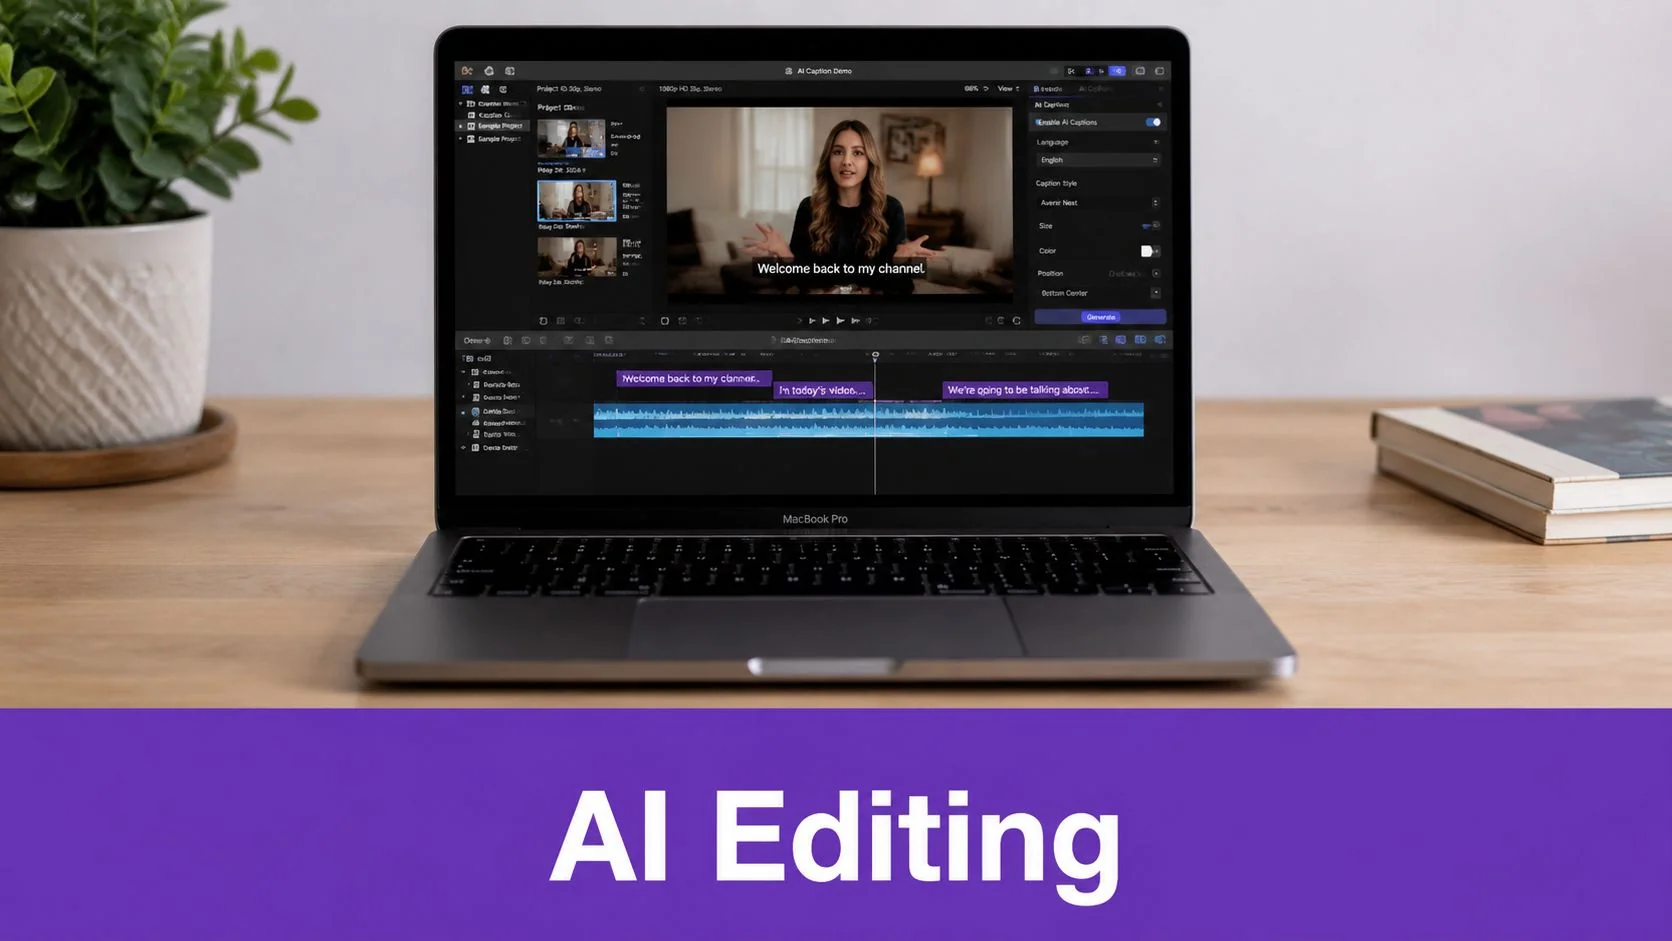
A transcript-first workflow is the easiest way to keep a screen cast useful without turning the project into a video-editing job. Instead of dragging clips around on a timeline, you shape the script, tighten the pacing, and let the narration and captions follow the text. That matters for subject-matter experts who can explain the software clearly but don’t want to become part-time editors.
Edit the message before you polish the visuals
The practical shift is simple. You record the screen once, then refine the wording and narration so the finished tutorial sounds intentional instead of improvised. That’s a better fit for product demos, feature release videos, onboarding clips, and support article videos, because the person closest to the product can stay focused on the explanation instead of on keyframes and track layers.
Tutorial AI fits that model by letting teams edit the script-like layer of the video, then regenerate narration, captions, and timing from the same source. It also supports narration in 74 languages, which matters when a single workflow needs to serve multiple regions without rebuilding every asset from scratch. AutoRetime adjusts pacing when translated narration changes length, and Brand Kits help keep the visual style consistent across videos, training sets, and support assets. Tutorial AI also generates written documentation from the same recording, so a team can publish a video and a matching article in one pass.
The best tutorial videos feel edited even when they started from a single raw take.
Keep the viewer on the right part of the screen
Cursor effects, smart zooms, and captioning do different jobs, and they shouldn’t be treated as decoration. Cursor smoothing makes fast pointer movements easier to follow, while highlights and zooms help direct attention to the UI element that matters. Those details are especially useful for support content and internal training, where the audience wants clarity, not flair.
If your team needs captioning as a standard part of the workflow, captions for video tutorials is a useful place to start because captions aren’t just accessibility polish, they’re part of how people skim, search, and review content later.
Troubleshooting Common Screen Cast Problems on Mac
Most screencast failures are boring in the worst way. The recording starts, but the microphone is silent, AirPlay lags, the wrong window gets captured, or the export looks softer than the source screen. Those problems don’t need a creative fix, they need a diagnosis.
Start with the symptom, then isolate the cause
If audio doesn’t record, check permissions and the selected input first. On macOS, the mistake is often not in the recording app itself, it’s in the system-level input choice or a missed microphone confirmation before the take. That’s why the earlier preflight step matters, because audio problems are expensive once you’ve already recorded the whole walkthrough.
AirPlay issues are usually a compatibility or mode problem. Apple’s guidance treats mirroring and extending as native display behaviors, while browser-based casting can behave differently, especially in Chrome where users can choose Cast tab or Cast desktop from the Sources dropdown. If the cast fails, lags, or lands in the wrong mode, check whether you’re trying to mirror the Mac desktop, send a browser tab, or use a compatible receiver on the same network. Chrome casting and Mac mirroring mechanics and Apple’s display guidance both point to the same practical distinction, the tool isn’t always broken, the mode is often wrong.
Match the capture method to the output you need
Blurry exports usually trace back to source resolution or capture settings that don’t match the display. If the text looked sharp on-screen but fuzzy after export, the recording pipeline probably dropped the effective detail somewhere between capture and compression. The safest habit is to keep the capture region as narrow as possible while preserving the user action, then test a short clip before recording the whole session.
Chrome casting deserves special caution because it’s easy to confuse browser casting with native macOS mirroring. One is a browser feature, the other is a system display route, and they don’t fail for the same reasons. If the viewer only needs the web app, cast the tab. If they need the full desktop context, use the Mac’s display tools instead.
Troubleshooting rule: when something fails, ask whether you’re dealing with permissions, compatibility, or the wrong capture mode. One of those three is usually the answer.
Building a Repeatable Screencast Production System
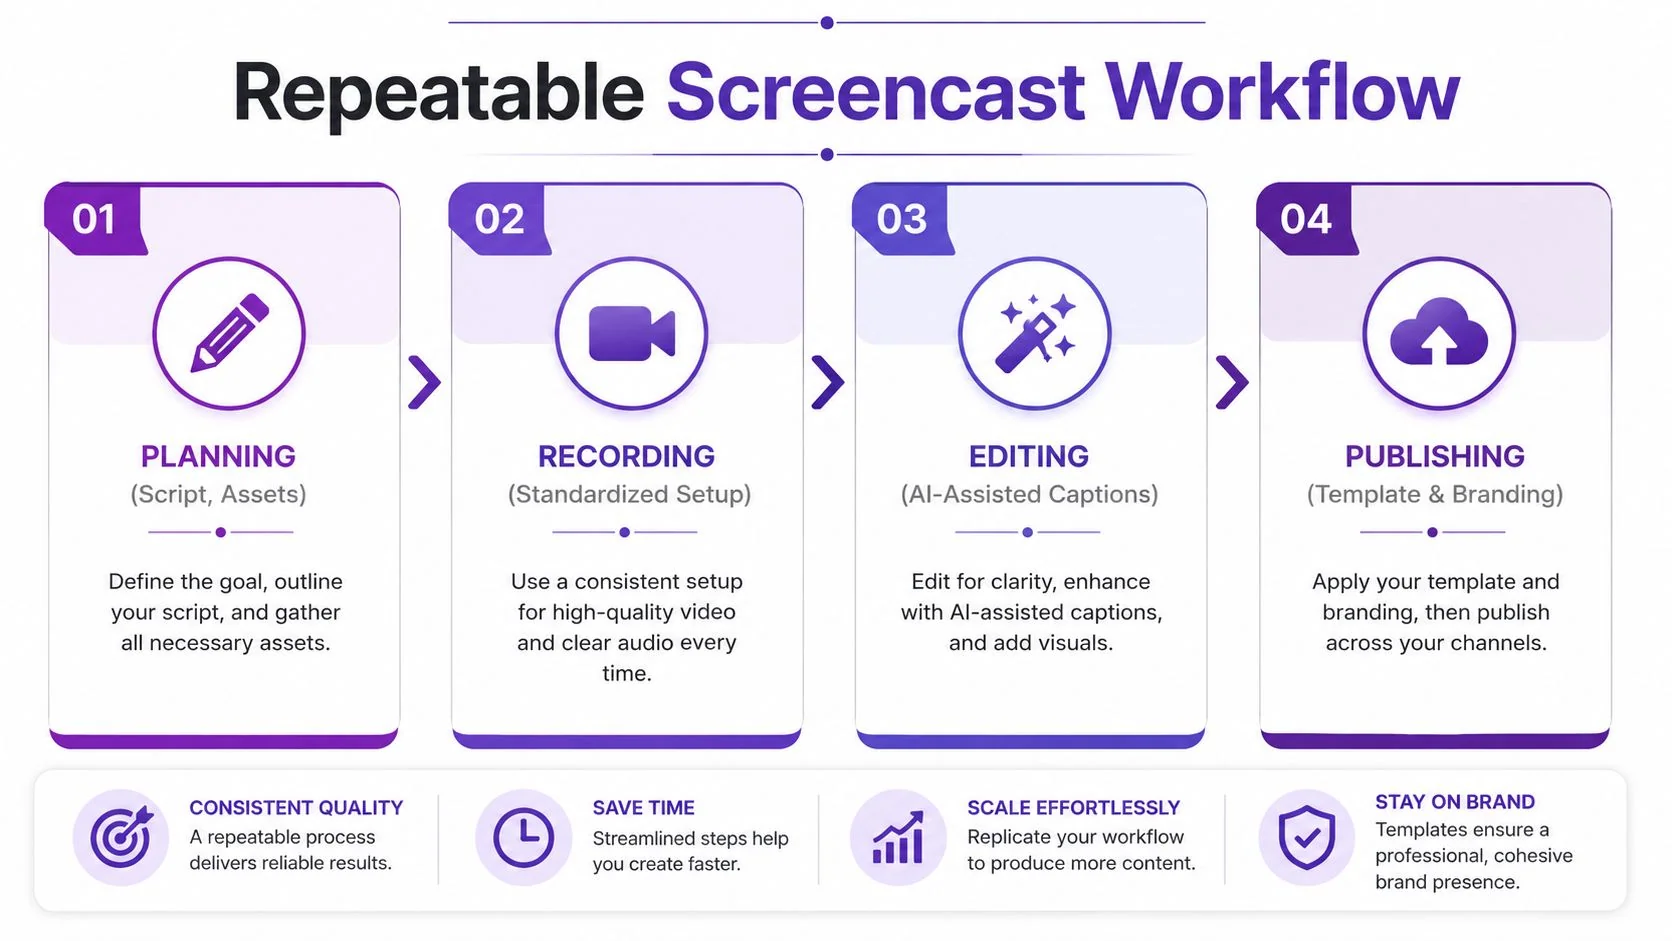
Teams that publish useful tutorials don’t rely on one heroic recording session. They build a workflow that starts with a script outline, uses a consistent capture setup, and ends with a repeatable editing and publishing path. That’s how groups like Bosch, Microsoft, and UNICEF can produce onboarding, training, and support materials without reinventing the process every time.
Make one recording serve more than one format
The strongest production systems treat the recording as source material, not the finished product. A single Mac capture can become a video demo, a help-center article, a support knowledge-base post, or an internal SOP when the workflow includes transcription, structure, and brand control. That’s the economic shift, because subject-matter experts spend less time re-explaining the same process in different formats.
Publishing options matter too. Embeddable players with language selectors make it easier to reuse the same asset across teams, while LMS and CMS integrations keep the content close to where people already work. Direct export up to 4K gives teams a quality ceiling for customer-facing materials, and shared workspaces make versioning and collaboration less painful when multiple people review the same tutorial.
A repeatable system also lowers the threshold for new content types. Product demos, feature release videos, customer onboarding, help-center videos, internal training, SOPs, and sales enablement walkthroughs all benefit from the same basic pipeline, clean recording, controlled edits, and branded publishing. That’s why a polished screencast process is less about video production and more about operational consistency.
If you want a workflow that turns a raw Mac screen recording into a polished tutorial and a matching article, visit Tutorial AI. It’s built to capture the screen, refine narration, and generate documentation from the same recording, which is exactly the gap many struggle to close. If your tutorials are stuck in rough draft form, this is the moment to replace the editing bottleneck with a repeatable process.