You just opened a fresh Minecraft world, the sun is already moving, and you’re trying to figure out whether you should punch a tree, open your inventory, or stop and change the settings first. That confused, slightly rushed feeling is normal. A good tutorial Minecraft setup doesn’t start with fancy builds, it starts with reading the screen well enough to make one clean first decision and not waste the opening day.
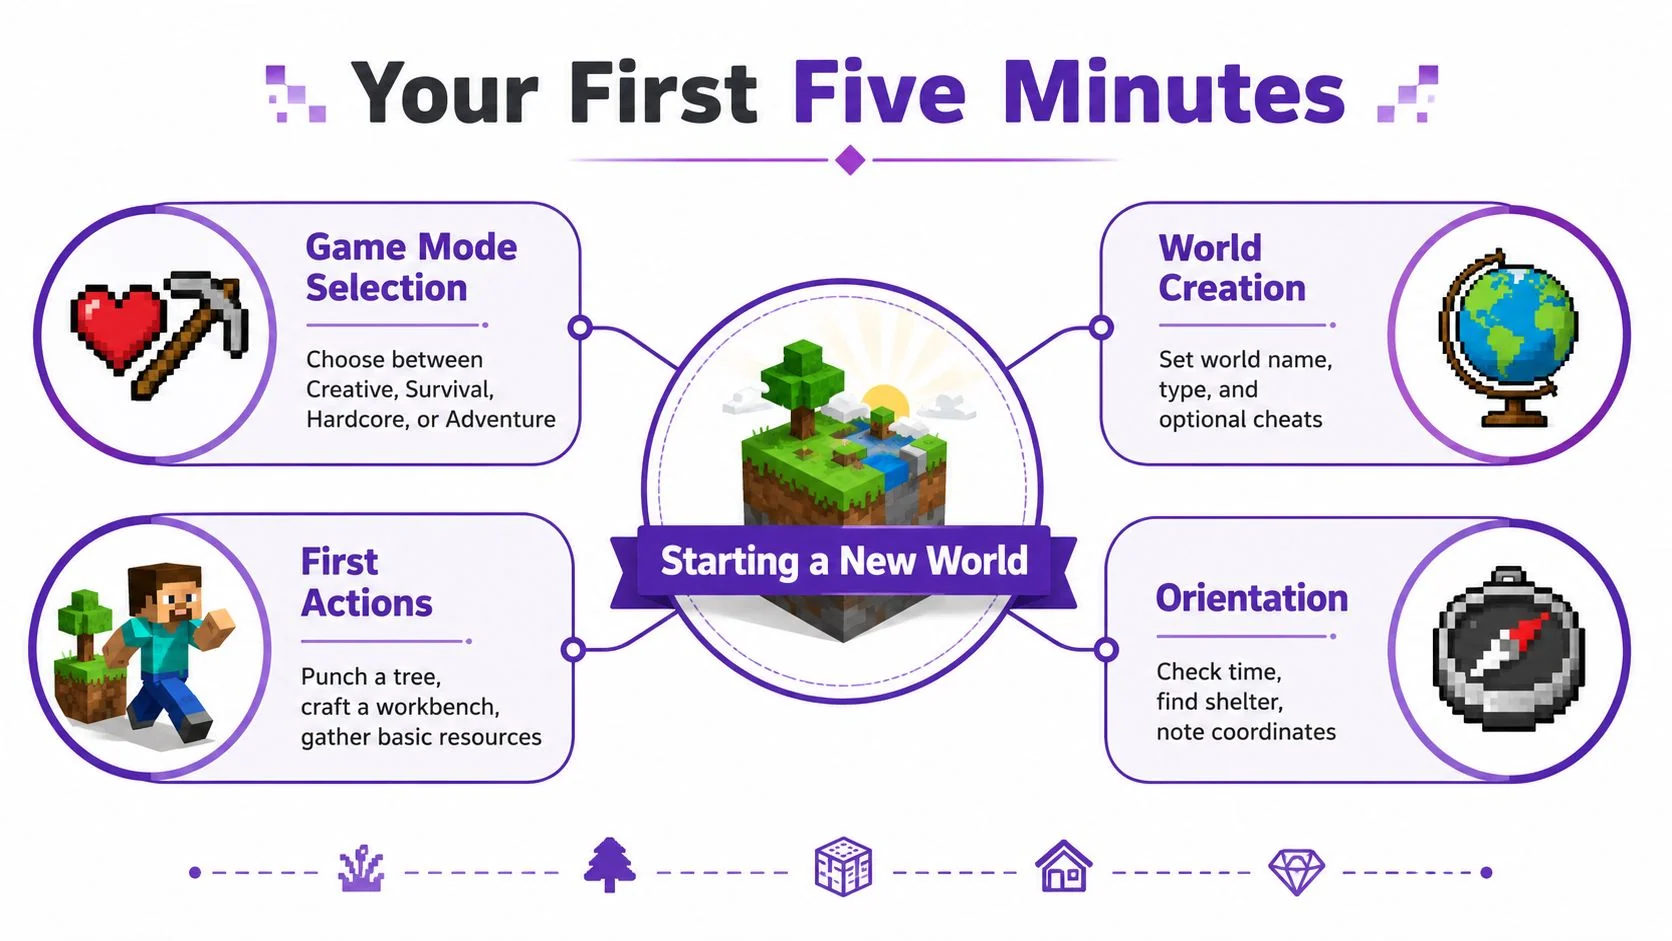
Your First Five Minutes in a New World
Choose the right mode before you move
If you want a normal survival start, pick Survival. If you want to test ideas without danger, Creative is easier because you’re not managing hunger or enemies. Hardcore is for players who want a harsher run, and it’s not the place to learn the basics.
Default world settings are usually fine for a first world. The trap a lot of new players fall into is spending too long in the menu, tweaking things they don’t yet understand, then spawning in with no plan. Pick a world name you’ll recognize later, leave the rest alone, and start.
Practical rule: your first goal isn’t to “play well,” it’s to get wood, build a table, and avoid getting lost before night.
The infographic below gives you a simple mental map for that opening stretch.
Read the screen like a tool, not a puzzle
Your hotbar is the row of items at the bottom. Think of it as your quick-access shelf. Slot 1 is usually where your main tool goes, and the rest should hold the things you need often, like blocks, food, and a weapon.
Your health hearts and hunger bar work together. If you stop eating, healing becomes harder, so food isn’t a bonus item. It’s part of staying alive. The inventory grid can feel messy at first, but it’s just a storage layout, not a challenge to fill every square.
Use your inventory when you need to move items around, your crafting view when you need to make basic tools, and your map only when you have one. The off-hand is useful later for shields, torches, or maps, but you don’t need to obsess over it in the first few minutes.
If you want a quick screen-recording example to watch later or share with a friend, you can use this screen recording guide for PC. A short clip of your own first spawn often teaches more than a long explanation.
Surviving the First Night and the First Week
The first night usually goes wrong the same way. You punch a tree, make a crafting table, look around for “just one more thing,” and by the time you notice the sun dropping, you’ve got too little wood and nowhere safe to stand. The fix is boring, but it works, keep your early loop tight.
Start with wood, then move in a straight line
Break logs, turn them into planks, then reserve some of those planks for the crafting table. Don’t turn all your wood into sticks. That mistake leaves you with plenty of sticks and not enough material to make the tools that actually matter.
Make a wooden pickaxe and use it to get cobblestone. After that, swap to stone tools as fast as you can. This is the first moment where Minecraft starts rewarding sequence instead of wandering.
Keep your block placement close and deliberate. The beginner guide recommends staying within four to five blocks and aiming the crosshair directly at the target block, which cuts down on failed placements and wasted movement when you’re building fast Minecraft beginner guide.
Put safety before exploration
Food matters the moment your hunger starts dropping. If you see animals, crops, or any easy source of food, collect what you can before you go underground. Caves are tempting, but wandering in before you’ve got light and a plan is how new players lose everything they just made.
When night is close, your hotbar should hold three things at minimum. A tool for blocks, a weapon, and building blocks for a quick wall or pillar. If you can make a shelter, do that instead of roaming.
A small shelter with a door is better than a perfect base you never finish before dark.
If you’re using this as a tutorial Minecraft practice run, treat the first week like a checklist, not a sightseeing tour. Wood first, tools second, food third, shelter before the sky goes black. That order keeps you alive long enough to learn the rest.
Essential Crafting Recipes Worth Memorizing
A beginner doesn’t need to memorize every recipe. You need the handful that show up over and over, because those are the recipes that turn raw materials into movement, safety, and light. Once you know these, the rest of the game stops feeling random.
The patterns that do most of the work
The crafting table opens more space, and that’s the item that changes everything early on. Planks to sticks is another basic pattern, but use it carefully. If you burn through all your planks too early, you box yourself in and slow down your first upgrade path.
The furnace turns stone and ore into usable materials. Torches keep caves readable and safer. A bed lets you sleep through the night and set a spawn point, which helps when your first base is still rough around the edges.
A short table you can come back to
Quick reference for crafting patterns
| Recipe | Materials | Primary Use |
|---|---|---|
| Crafting Table | 4 planks | Opens the 3x3 crafting grid |
| Wooden Pickaxe | planks, sticks | Mined first stone |
| Furnace | 8 cobblestone | Smelting and cooking |
| Torches | sticks, coal | Light and cave safety |
| Bed | wool, planks | Sleep and respawn point |
| Chest | planks | Storage |
| Basic Sword | sticks, planks or stone | Early combat |
| Nether Portal Frame | obsidian | Travel to the Nether |
One precise build to remember
A Nether portal is a special case because the frame has to be built correctly, then lit to work. The guide on Vandal says the frame needs at least 8 blocks of obsidian, with the sides, bottom middle, and top row arranged to make the rectangle, while the corner blocks can be any material. Lighting a fire inside the frame activates it Minecraft Nether portal guide.
If you’re writing your own notes, keep the recipes grouped by use, not alphabetically. The fastest ones to learn are the ones you’ll reach for in the middle of a night panic.
Building Techniques for Angles, Roofs, and Curves
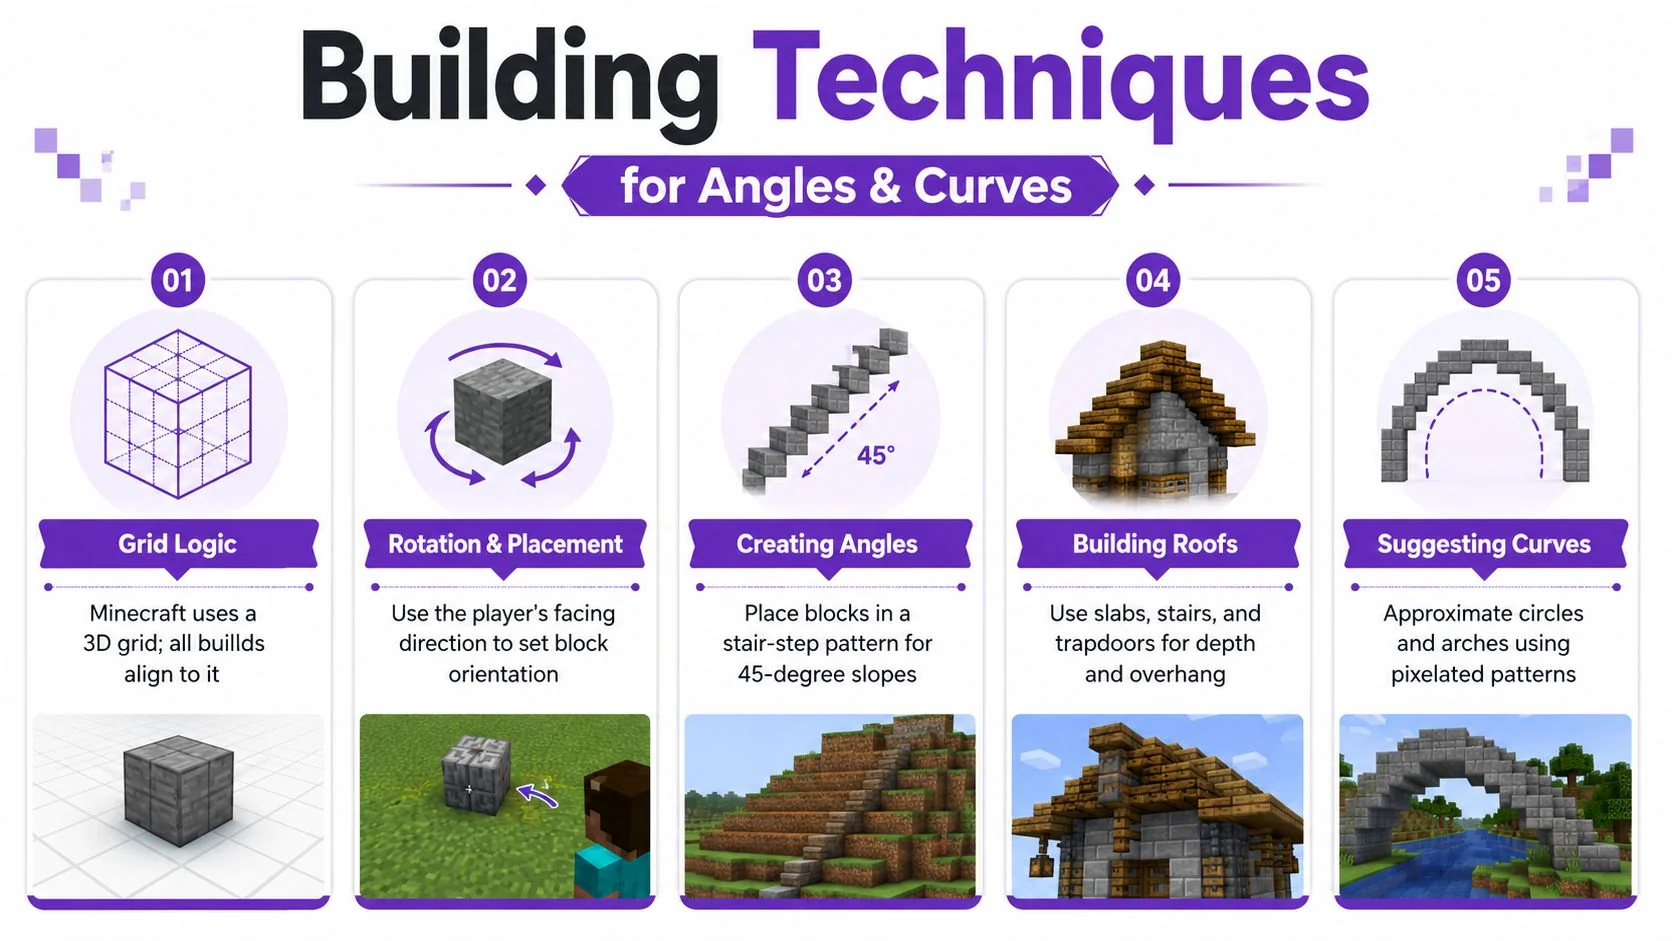
Most beginner build guides stop at square houses and simple towers. That’s fine for day one, but it leaves you stuck the first time you want a roof that isn’t flat or a tower that doesn’t look like a box. Minecraft is built on a grid, so the trick is learning how to bend that grid visually without fighting it.
Think in steps, not in smooth lines
The cleanest angled wall usually works because the line doesn’t jump around. The angled-building tutorial points out that the best angled lines are the ones that don’t deviate too much from line to line, which is just a practical way of saying the shape needs consistency, not randomness angled building tutorial.
That same logic helps with roofs. A gable roof looks better when you repeat a block-count pattern instead of guessing each row. Two-block wall segments, then a corner change, then another repeat. The exact pattern can vary, but the important part is that the rhythm stays steady.
Use the grid to suggest the shape you want
Circular towers and arches are never truly smooth in Minecraft, so don’t aim for perfect curves. Aim for a shape that reads correctly from normal viewing distance. That means using stair steps, small offsets, and repeating widths that approximate the curve.
The game rewards repetition more than improvisation. If a shape looks off, count the blocks again before you add more detail.
If you want a useful creative parallel outside Minecraft, the same kind of shape thinking shows up in projects like design custom Pokémon using AI, where the structure matters more than the decoration. In both cases, the outline has to work before the detail can help.
The idea to keep in your head is simple. Grid first, pattern second, detail last. Once you get that, odd angles stop feeling like a mystery.
Redstone Basics and Your First Automation
Redstone feels intimidating until you treat it like a set of switches instead of a magic system. A button sends a temporary signal. A lever stays on or off. A repeater delays and extends the signal, which matters when you want something to happen a moment later instead of instantly.
Start with one lamp and one switch
Build a tiny circuit with a button, a short line of redstone dust, and a lamp. Press the button, the lamp lights up, and you’ve just proved that the circuit works. That one success matters because it gives you a baseline for everything else.
Then swap the button for a lever. The lever changes the feel of the whole build because it lets you leave the circuit on. That’s useful for doors, hidden passages, and anything you want to keep active without holding a key down.
Expand from signal to mechanism
A pressure plate is just a floor trigger. A repeater helps when dust alone doesn’t carry the signal cleanly or when you want timing control. Put the pieces together and you can make a simple automatic door, then something more useful like a basic item sorter.
The point isn’t to memorize every layout. It’s to understand what each part does so you can fix a build when it breaks. If the lamp won’t light, check the source. If the timing feels off, add or adjust the repeater. If the trigger is too easy to trip, move the pressure plate.
For a broader workflow on recording these builds cleanly, the guide on how to make tutorial videos is useful because it shows how to keep a demo readable while you explain each step.
World Setup, Realms, and Light Server Hosting
The easiest way to play with other people depends on what you want to control. Single-player and LAN work when you just want to explore or play with someone on the same network. Realms are better when you want a simple always-on world that doesn’t ask you to manage server files. A light server host makes sense when you want more control and don’t mind a bit more setup.
Pick the path that matches your patience
Single-player gives you the least friction. You can test builds, use cheats if you’ve allowed them, and keep the whole thing private. That’s the right answer if you’re still learning basic survival or if you’re just practicing Redstone without interruptions.
Realms are the easiest shared option because the world stays online for invited players. That makes them good for families, small friend groups, or a steady creative project where nobody wants to host from their own computer. Self-hosting or a third-party server is more flexible, but it asks more of you, especially if you want plugins, more control, or a custom setup.
Don’t skip backups
A backup matters the first time someone deletes a build by mistake or a world file gets corrupted. Even a small world can hold hours of work, and losing it turns a fun project into a repair job. Keep a copy before you start major projects, especially if you’re experimenting with command blocks or mods.
Tutorial AI fits into this kind of workflow when you want to turn a screen recording into a polished tutorial video and a matching written article from the same recording. That’s useful for onboarding, internal training, or a help-center article that needs both visuals and step-by-step text.
Camera angles matter more than most people expect
Minecraft’s rotation system defines viewing angle in a formal way, and that matters for creators who want clean thumbnails, walkthroughs, and instructional clips Minecraft rotation reference. A saved angle, yaw and pitch snapping, or a custom third-person view can make a build easier to explain and easier to follow.
That’s why creators often mix commands like /tp, /gamemode, and /give with camera control instead of treating them as separate skills. Once you’re comfortable with the basics, those tools make your world easier to teach from and easier to revisit later.
Troubleshooting, Common Bugs, and What to Build Next
The first frustrating Minecraft problems usually sound bigger than they are. You can’t sleep, crops aren’t growing, mobs aren’t showing up, or the portal frame won’t light. Most of the time, the fix is a small missing detail, not a broken world.
Check the obvious things first
If you can’t sleep, make sure it’s actually night and the bed isn’t blocked. If crops aren’t growing, give them time and keep them in a proper farm setup. If mobs seem absent, your area may be too bright or too safe for them to appear where you’re standing.
A Nether portal that won’t light is usually a frame problem. Recheck the obsidian layout and make sure you’re trying to ignite the inside of the frame, not the outside. In Minecraft, the annoying bugs are often just mechanics waiting for the right condition.
Good debugging habit: change one thing at a time. If you change three things at once, you won’t know which one fixed it.
Build in milestones, not in vague goals
A starter base by day three gives you a home. A working farm by day ten gives you food security. A Nether trip by day fifteen pushes you into new materials, while a small Redstone build around day twenty makes automation feel real. A personal signature build by day thirty gives you something that feels like yours.
If you’re choosing gear for longer sessions, it helps to find your ideal gaming setup so the control layout, screen space, and comfort match the kind of building you want to do. The right setup won’t make the game easier by itself, but it does make long tutorials and build sessions less tiring.
If you want the simplest next step, keep playing with the same world and add one new habit at a time. Then look back at your early screenshots or clips and compare them with your later builds. That’s where progress gets obvious.
Tutorial AI can turn one Minecraft recording into a clean tutorial video and a matching article, which is handy when you want to teach a build without redoing the whole explanation twice. If you’re documenting a survival guide, a Redstone demo, or a world setup walkthrough, visit Tutorial AI and try it on your next recording.