You’re in the middle of a product task, not a video project. A PM wants a quick walkthrough, support needs a cleaner help article, or customer success needs a training clip that doesn’t sound improvised. On a Mac, the screen recorder is already there, but the work starts after capture, when the raw recording has to become something people can follow.
Why Mac Screencasting Became the Default for Product Teams
A lot of teams still treat a screen recording like a temporary artifact. Record it, send it, move on. That approach made sense when capture required extra software and setup, but Apple’s built-in workflow changed the baseline. macOS users can record through QuickTime Player, and Apple’s current support flow still centers on Shift-Command-5 in the Screenshot app and File > New Screen Recording in QuickTime Player, which is a big reason the Mac became a natural home for tutorial work and product education Apple’s current screen recording workflow.
The shift from optional tool to standard workflow
Before native recording became normal, the job was messier. Product educators had to install capture tools, learn their quirks, and accept a lot of friction before they could make a simple walkthrough. The native Mac recorder lowered that barrier, so support engineers, writers, and PMs could capture a process without waiting for a specialist.
That matters because screencasts are not a niche format. The use case has existed for a long time, with ScreenCam often cited as one of the first dedicated screen-recording products in 1993, and other historical summaries placing early software on the market by 1994 history of screen recording. The broader screencast format matured through the early 2000s, with the term screencast coined in 2004 and screen-recording software developing through 2005–2006.
Practical rule: native Mac tools are enough to start, but they only handle capture. If the audience expects a polished tutorial, the work after recording matters just as much.
What changed for product teams
Once screen recording became built in, the conversation shifted from “Can we record this?” to “How fast can we turn this into something useful?” That is why product teams use screencasts for product demos, feature release videos, customer onboarding, help-center videos, support article videos, internal training, SOPs, and sales enablement walkthroughs. The Mac already gives you a reliable path into that work.
The limitation is obvious to anyone who has shipped a few videos. Native tools capture the screen, but they do not solve rambling narration, uneven pacing, multilingual reuse, or the gap between a raw file and a finished asset. Teams that stop at the record button still need another workflow to turn one capture into a polished tutorial, a translated version, and a written article without redoing the same work three times.
Recording Your First Screencast Using Shift-Command-5
Open with Shift-Command-5. That shortcut brings up the Screenshot toolbar, the most direct built-in starting point for a screencast from Mac when you want a repeatable capture path without digging through menus.
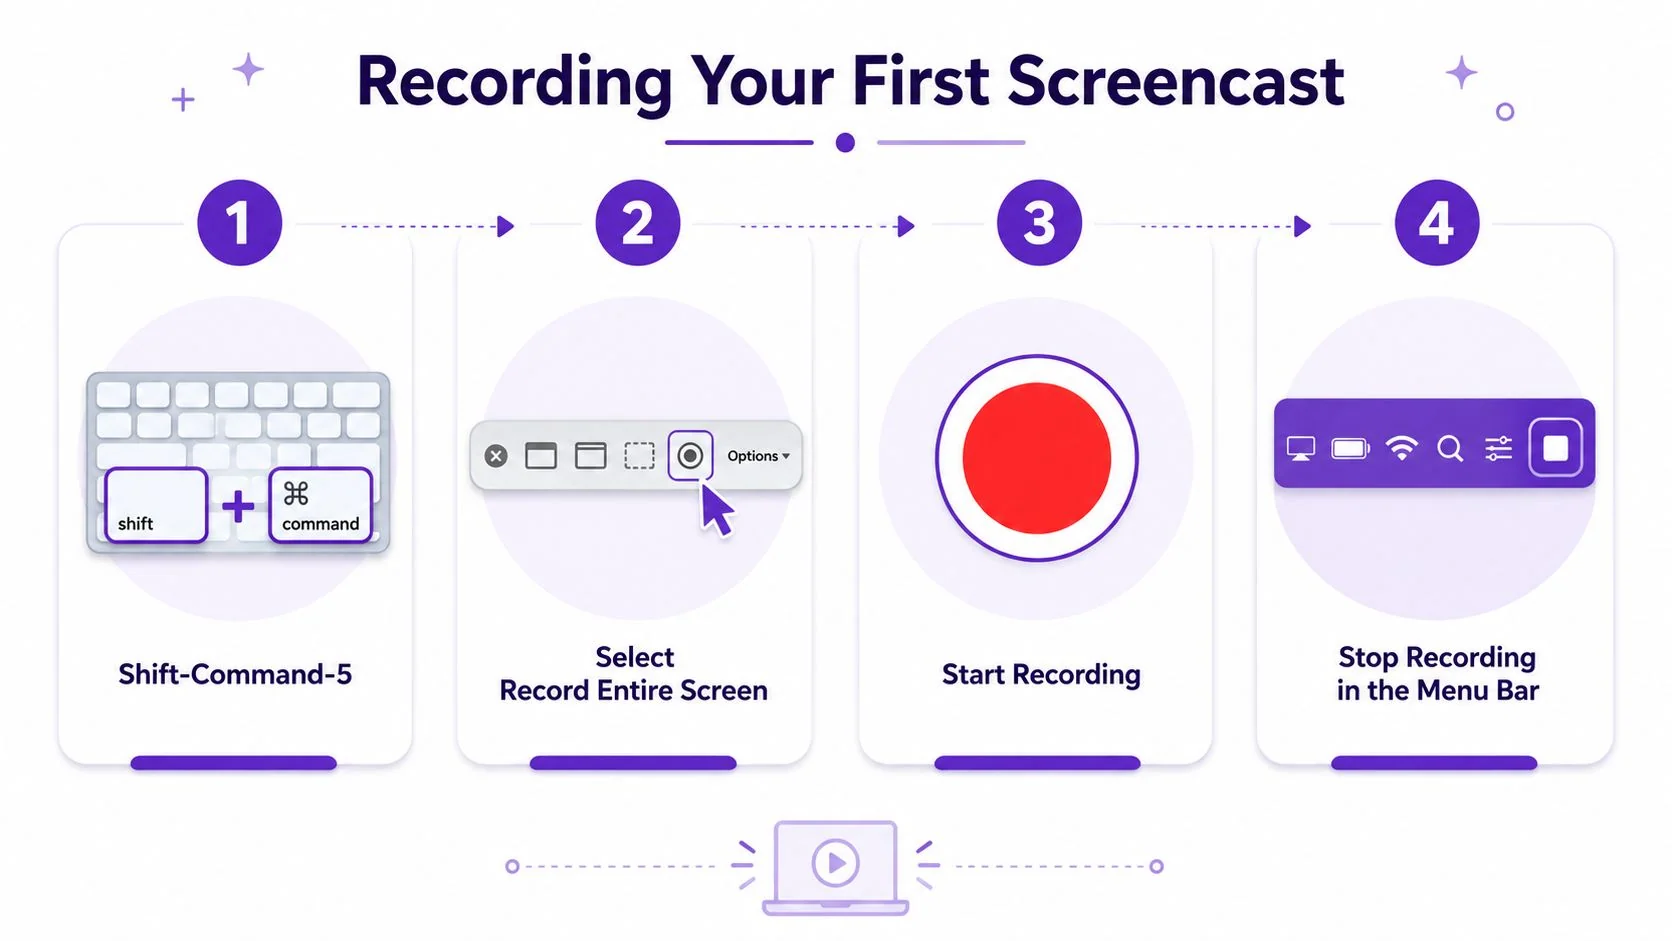
Start with the Screenshot toolbar
Press Shift-Command-5, then choose Record Entire Screen or Record Selected Portion. Entire-screen capture fits product demos, onboarding walkthroughs, and flows that move across several apps. Selected-portion recording works better for focused feature explainers, support clips, and any recording where you want to keep the rest of the desktop out of view.
Click Options before you start recording. That menu is where you set the details that prevent a redo later, including the timer, microphone, and Show Mouse Clicks. Apple’s Screenshot toolbar guidance keeps this workflow front and center because it is the most reliable built-in route for repeatable capture on Mac Apple’s Screenshot toolbar guidance.
For teams comparing native capture with a faster publishing workflow, a practical screen capture overview like Tutorial AI’s best free screen capture software guide helps frame what the built-in tools do well and where they stop.
Use a test clip before recording
A short preflight recording saves time. Record a few seconds, stop, and play it back at normal size. Check whether the UI text is readable, whether the pointer is visible enough, and whether the correct audio source is active. A short test clip catches the most common failures before you spend time narrating the full take.
If the first test clip is blurry, the problem is usually setup, not your explanation.
A few practical defaults work well. Use Record Entire Screen when the audience needs context, app switching, or broader product navigation. Use Record Selected Portion when the task is narrow and you want attention on a specific panel, modal, or settings area. For tutorial-grade capture, the goal is not just to record the screen. It is to make the final video easy to follow without fixing basic visibility problems in post, then turn that same capture into a translated version and a written article without repeating the work.
For a second reference point on setup choices, MEDIAL’s screen recording guide shows the same capture workflow from a practical Mac recording angle.
Choosing Between Native Tools and Dedicated Screen Recorders
Native macOS tools are enough for a lot of quick jobs. A product manager can record a walkthrough in minutes, a support rep can show a bug path, and an educator can capture a narrow procedure without opening another app. The built-in recorder gives you speed and low friction, which is why it stays in the toolbox.
Where native tools stop being enough
The moment you need a video that feels edited, the limitations show up. Loom and other casual recorders can make capture easy, but recordings often run 50–100% longer than needed because of rambling, pauses, and retakes. Dedicated editors like Camtasia and Adobe Premiere Pro can fix that, but they expect real editing skill. They’re powerful, and they’re not lightweight.
That’s the gap most product teams face. They don’t want to become video editors, but they do need the output to look intentional. A platform like Tutorial AI sits in that middle ground. It captures the screen and voice, then tightens pacing, updates scripts, and turns the same recording into both a video and a written article. That’s different from AI avatar tools like Synthesia, HeyGen, and Vyond, which generate synthetic talking heads instead of showing the actual UI.
| Tool Category | Best For | Editing Required | Typical Output Length |
|---|---|---|---|
| Native Mac tools | Fast internal walkthroughs, simple captures | Low | Usually close to the raw recording |
| Casual screen recorders | Quick sharing, ad hoc demos | Low to moderate | Often longer than necessary |
| Dedicated editors | High-polish production work | High | Depends on the editor’s skill |
| Tutorial AI | Polished tutorials, repeatable knowledge-base assets | Low to moderate | Tightened after capture |
A practical decision rule
Use native tools when speed matters more than polish. Use a dedicated recorder when the recording needs to become customer-facing content, training material, or a reusable help asset. If your output has to survive approvals, versioning, and localization, the post-recording layer matters more than the capture button.
For a quick external reference on a traditional Mac workflow, MEDIAL’s screen recording guide is a useful comparison point because it focuses on the classic record-and-export path many teams still use. If you’re comparing broader capture options, this free screen capture software overview is a useful internal starting point.
Setting Up Microphone and System Audio for Clear Narration
Audio is where most screencasts get redone. A small cursor slip is easy to forgive. Narration buried under fan noise, Bluetooth delay, or a notification chime in the middle of a sentence is harder to recover from. Set the input path before you record, because fixing a clean voice track later is always easier than rescuing a noisy one.
Choose the microphone before you speak
Pick your microphone in the recording options, then say a few lines and listen back. If you are using a headset, check for Bluetooth latency and any room echo before you commit to the final take. If the room is noisy, the recording will sound noisy, even when the screen content is perfect.
That is why background control matters so much. If your space picks up keyboard taps, HVAC hum, or noise from next door, a guide on how to soundproof your meetings can help you reduce the obvious problems before you hit record. The same rule applies to tutorials, because a clear voice track is easier to trust than a clean picture with messy audio.
Decide whether you need system audio
System audio matters when the demo includes UI sounds, in-app audio, or playback from a web app. If the recording is only a narrated walkthrough of menus and settings, you may not need it. If the product demo includes a notification tone, media playback, or a sound effect that helps explain the feature, capturing system audio gives the viewer the full experience.
The trade-off is setup complexity. Many teams record the screen first and add narration later, which keeps the capture process simpler and avoids room noise entirely. That also makes multilingual output possible from one base recording, since the same screen footage can support different voice tracks. If you need a practical reference for that part of the workflow, the Mac computer audio recording guide shows how teams capture internal audio for reuse without turning the setup into a repair job.
Live narration versus scripted voiceover
Live narration is faster when you know the product well and the path is straightforward. Scripted voiceover works better when the content will be reused, localized, or shared across teams. The more often a recording has to live beyond one first draft, the more value you get from separating the capture from the narration.
Practical rule: if audio quality is uncertain, record the screen cleanly first and fix the voice track later.
That approach also leaves room for multilingual narration without redoing the screen capture. Instead of forcing one live take to handle everything, you keep a cleaner base file and more options after capture.
Editing Techniques That Add Professional Polish
Most raw screencasts are usable. Few are polished. The difference usually comes down to editing decisions that make the viewer’s eyes travel where you want them to go, and remove the tiny frictions that make a tutorial feel amateur.
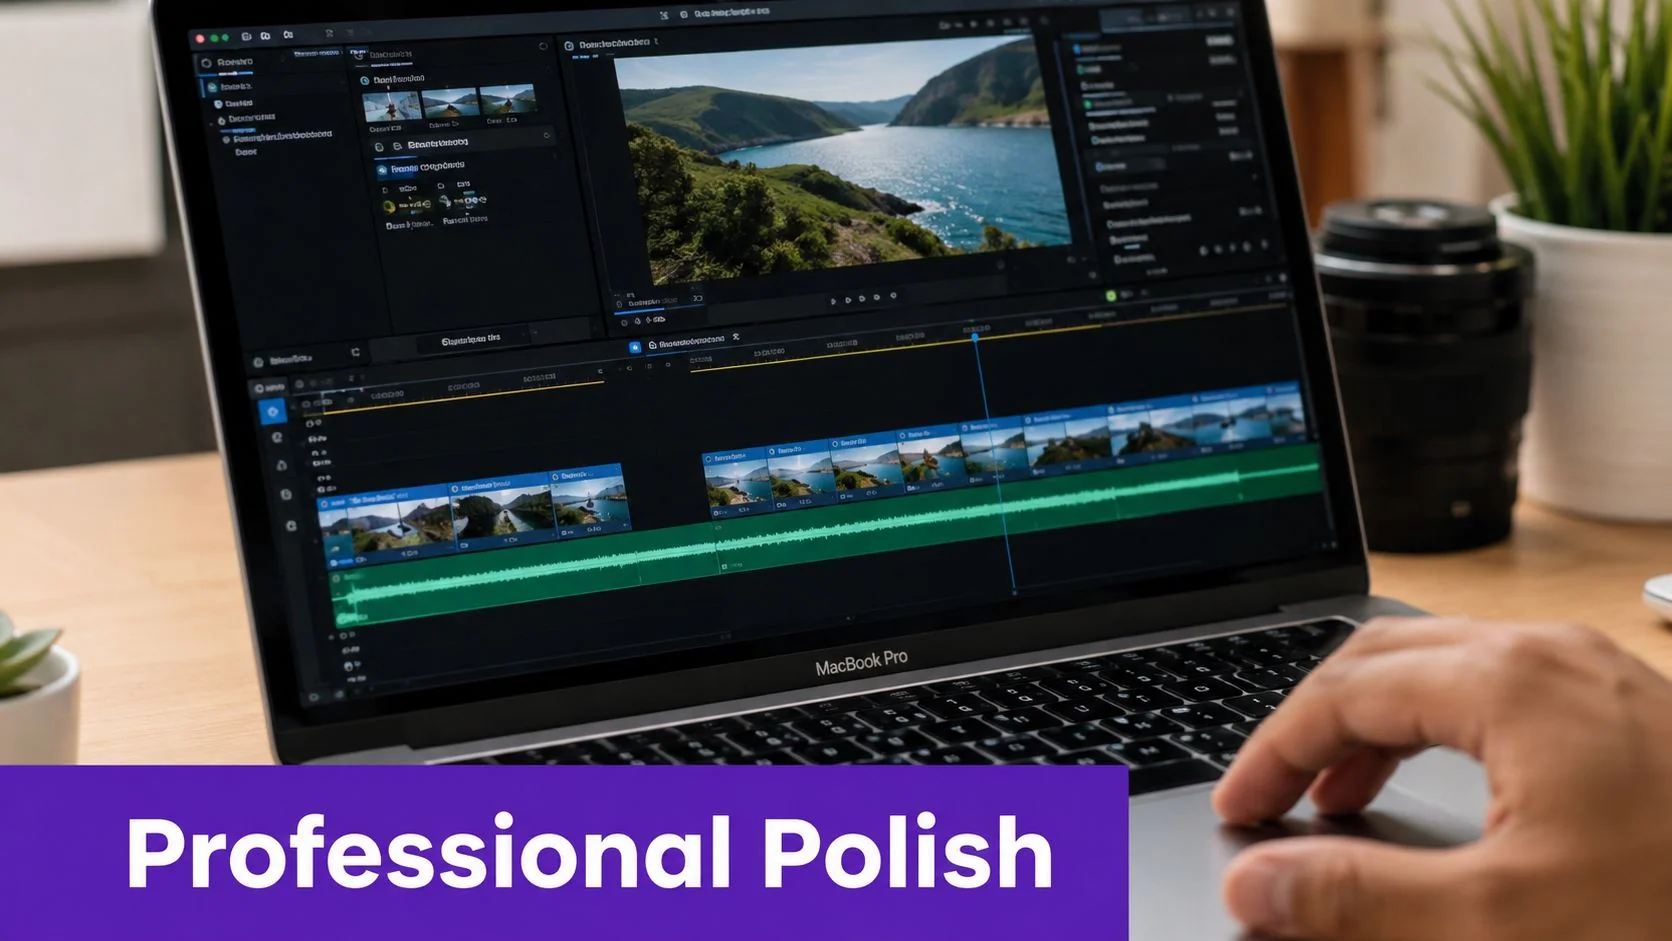
Cursor, zoom, and visual focus
Cursor treatment is the fastest way to improve clarity. Size adjustments help on dense dashboards. Smoothing keeps movements from looking jerky. Click highlights make it obvious when an action occurred. Those details matter because viewers often follow the pointer more closely than the content itself.
Smart zooms are equally useful, but only when they’re selective. Constant micro-zooming makes the edit harder to follow and can be more distracting than leaving the full screen visible. A better pattern is to zoom only when the interface gets dense, then return to the wider view once the step is clear.
Clean up sensitive areas without hiding the product
Background blur and shadows are useful when you need to protect sensitive data while keeping the UI readable. Product teams often need to obscure customer names, credentials, or internal notes while still showing the workflow. That’s a better trade than trying to crop away the problem and losing context.
Tutorial AI’s AutoRetime automatically adjusts pacing and cuts after the recording is captured, so you’re not manually dragging a timeline for every fix. Its Brand Kits keep visual treatment consistent across videos, which matters when one team member records onboarding and another records support content. It’s a practical option when you want script-driven edits instead of hand-timed timeline work.
Edit the script before you edit the timeline
The fastest workflow is to rewrite the transcript, then let the video, voiceover, timing, and captions update from that script. That approach is much quicker than cutting every pause by hand in a traditional editor. It also makes versions easier to maintain when the same tutorial needs a shorter variation or a different language.
A few edits deliver the most value with the least effort:
- Remove dead air: long pauses make tutorials feel longer than they are.
- Tighten repetitive phrases: repeat explanations dilute attention fast.
- Use focus changes sparingly: one clear zoom beats a stack of tiny ones.
- Keep captions aligned: if the transcript changes, the subtitles should change with it.
The point isn’t to create cinematic video. It’s to make the instruction easy to absorb, easy to update, and easy to reuse.
Exporting and Distributing Your Finished Screencast
A finished recording only matters if the right people can watch it without friction. That usually means balancing file quality, playback compatibility, and the places where the video will live. For software demos and knowledge-base content, 1080p at 30 FPS is the practical choice most of the time, because it keeps interface text readable without the bulk of a 4K file Mac screencast quality guidance.
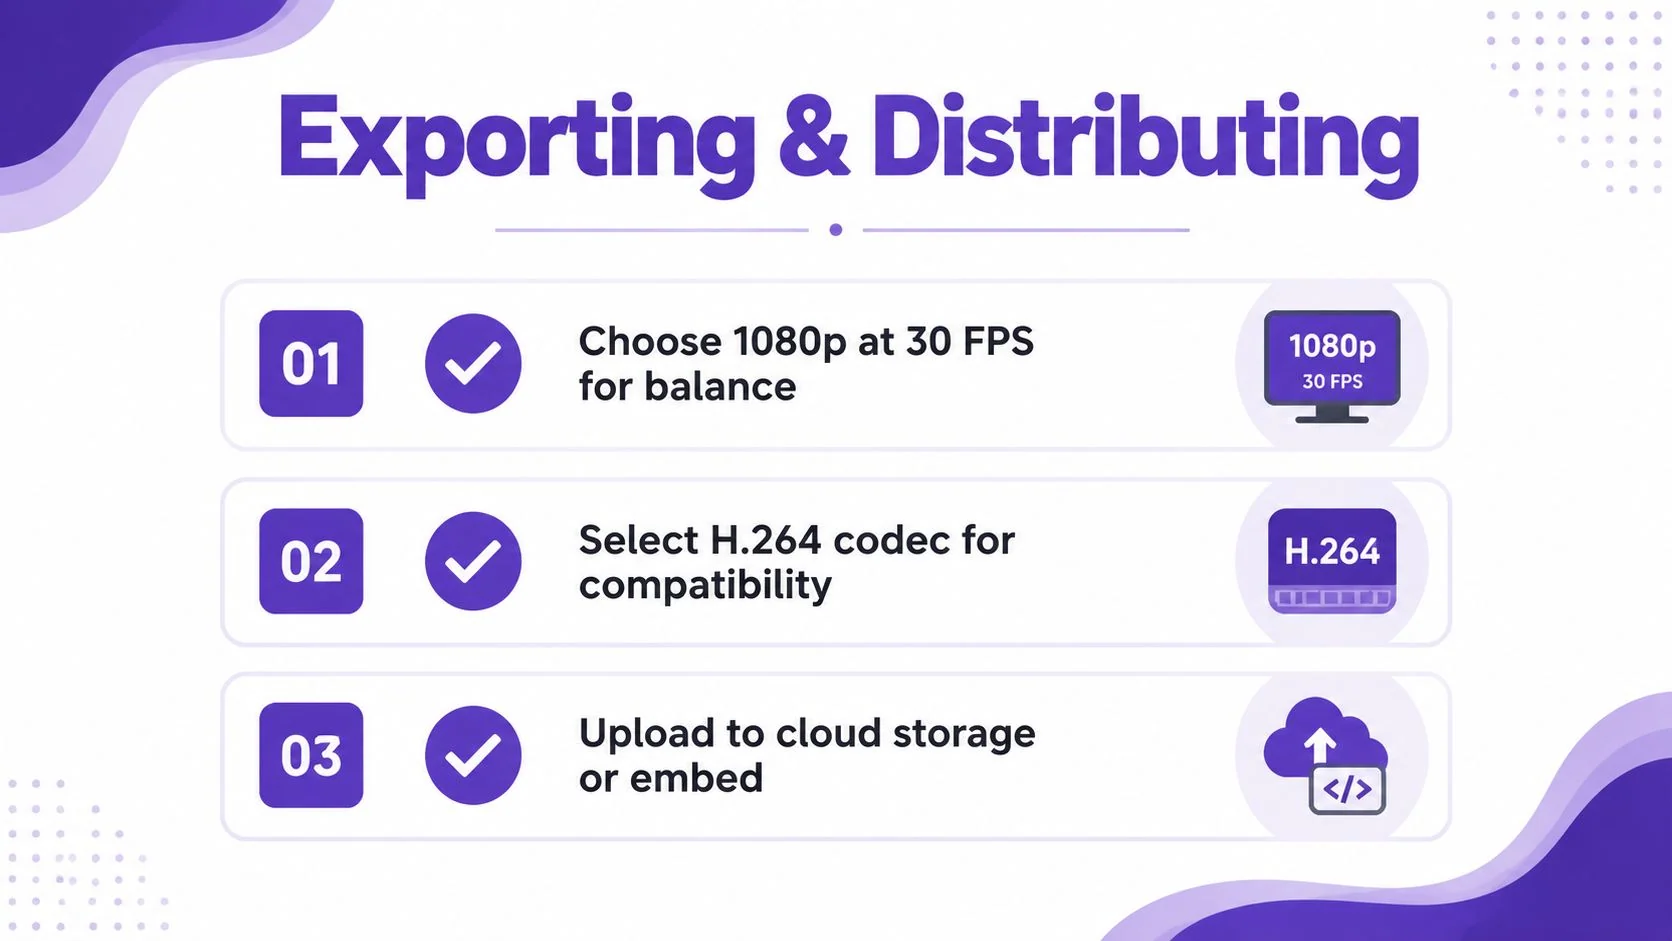
Export for the destination, not for pride
A crisp export that no one can open is still a failed deliverable. For broad compatibility, H.264 remains the safest choice for most Mac screencasts, especially when the video needs to play across browsers, help centers, and internal systems. If the audience is mostly on modern devices and file size matters more, HEVC can be worth considering, but compatibility should always come first for public tutorial assets.
That export decision becomes more useful when the same recording can produce multiple outputs. Tutorial AI can generate a formatted written article from the same recording, so a team can ship a video and a help article together instead of recreating the process twice. It also supports narration in 74 languages and a Multilingual Player that helps the same recording reach global audiences without manually rebuilding every version.
Distribute once, reuse many times
The best distribution setup is the one that fits into your actual stack. Embeddable players are useful when the content has to live in an LMS, CMS, CRM, or documentation tool. Share links work when the audience needs fast access and language selection in the player. Direct exports still matter for offline review, legal handoff, and internal archive workflows.
One recording can become a video, an article, and language-specific variants if the post-production workflow is set up before export.
That reuse is where the work compounds. Instead of treating each language or content format as a separate production, you start from one clean screen capture and let the tooling handle the variants. AutoRetime translations then re-time scenes, captions, and cuts so each language’s narration fits naturally, which is the difference between a translated asset and a usable one.
Preflight Checklist and Privacy Safeguards Before You Record
The most expensive mistake is discovering a problem after a long recording is already finished. A missing notification setting, a blurry display path, or a sensitive field left visible can turn a clean session into a full redo. A short preflight routine catches those issues before they cost time.
Run the environment check first
Turn on Do Not Disturb before recording. Close chat apps, email, and unrelated browser tabs. Clear the desktop of windows that do not belong in the video. If the interface already looks crowded, viewers spend energy sorting out what matters and what does not.
Display issues deserve the same attention. Overscan, scaling, adapter chains, and mismatched inputs can clip edges or blur text even when the recording software is working correctly. A recent guide on display-path problems recommends checking the display menu, swapping cables or adapters, trying another input, and testing a second monitor to isolate whether the Mac or the display path is at fault screen casting display troubleshooting. If text does not look right at normal size on your own screen, it will not look right in the final video.
Treat privacy like part of production
Product demos and internal training often expose more than people expect. Visible credentials, customer data, personal names, or internal notes should be blurred or removed before the recording ships. If the content is customer-facing, privacy review is required. Teams working under SOC 2 or GDPR expectations should treat screen content as production data, not background noise.
The blur sensitive data guide helps when you need a concrete masking workflow for fields, panels, or sections that should not be visible in the final asset. That cleanup is faster before distribution than after someone has already clipped a screenshot from your recording. Teams that publish often can also benefit from resources on turning calls into actionable insights, which fits the same habit of reviewing what should and should not leave the capture.
A tight preflight checklist looks like this:
- Enable Do Not Disturb: block alerts before the take starts.
- Close unrelated apps: reduce pop-ups and background load.
- Verify readability at normal size: do not trust zoomed-in playback alone.
- Check cables and adapters: isolate display-path issues early.
- Mask sensitive fields: protect personal and customer information before export.
For teams that publish often, that routine becomes muscle memory. It does more than prevent mistakes. It keeps recording sessions short enough that people do not start cutting corners.
If you want one more guardrail before export, build the privacy check into the same handoff you use for narration cleanup, captions, and written article drafting. That keeps the raw capture moving toward a polished video and a publishable help article in one workflow, instead of leaving sensitive details to be caught later.