You’re probably here because the usual timed photo went sideways. Someone blinked. The phone slipped against a mug. You hit the shutter, rushed into frame, and got ten photos that are all slightly wrong.
That’s why the self-timer on iPhone is more useful than it might seem. It’s not just for group selfies. Used properly, it’s one of the easiest ways to get steadier shots, better framing, and cleaner hands-free captures for everything from family photos to product demos and tutorial thumbnails.
Beyond the Group Shot Why Mastering the iPhone Self-Timer Matters
The timer is typically used as an emergency feature. You only reach for it when nobody else is around to take the picture, or when you want to avoid the awkward stretched-arm look.
That misses its full value.
The self-timer gives you control before the shutter fires. You can place the phone more carefully, adjust composition, step into the frame, and stop introducing shake with your hand at the exact moment the photo is captured. That matters for travel shots, portraits, table-top product images, and behind-the-scenes content.
It also changes how you work when the image has a job to do.
A support lead grabbing a thumbnail for a help article, a founder recording a quick social proof image, or a marketer staging a clean lifestyle shot for a landing page all benefit from the same thing: predictable framing and repeatability. The timer turns a rushed snap into a setup.
The best timed shots don’t feel “timed.” They feel composed.
There’s also a creative side. Once you stop thinking of the feature as a simple delay, you can use it to build better solo shots, more natural group photos, and cleaner captures for professional content workflows. That includes tripod-based photos for onboarding pages, explainer visuals, and software tutorial assets where you want your hands free and your framing locked.
The difference is small in effort, but big in outcome. Instead of hoping for one usable image, you start building a repeatable process.
How to Set the 3s and 10s Timer on Your iPhone Camera
The timer controls are easy to miss if you haven’t used them recently. Apple tucks them behind the Camera interface rather than leaving them permanently visible.
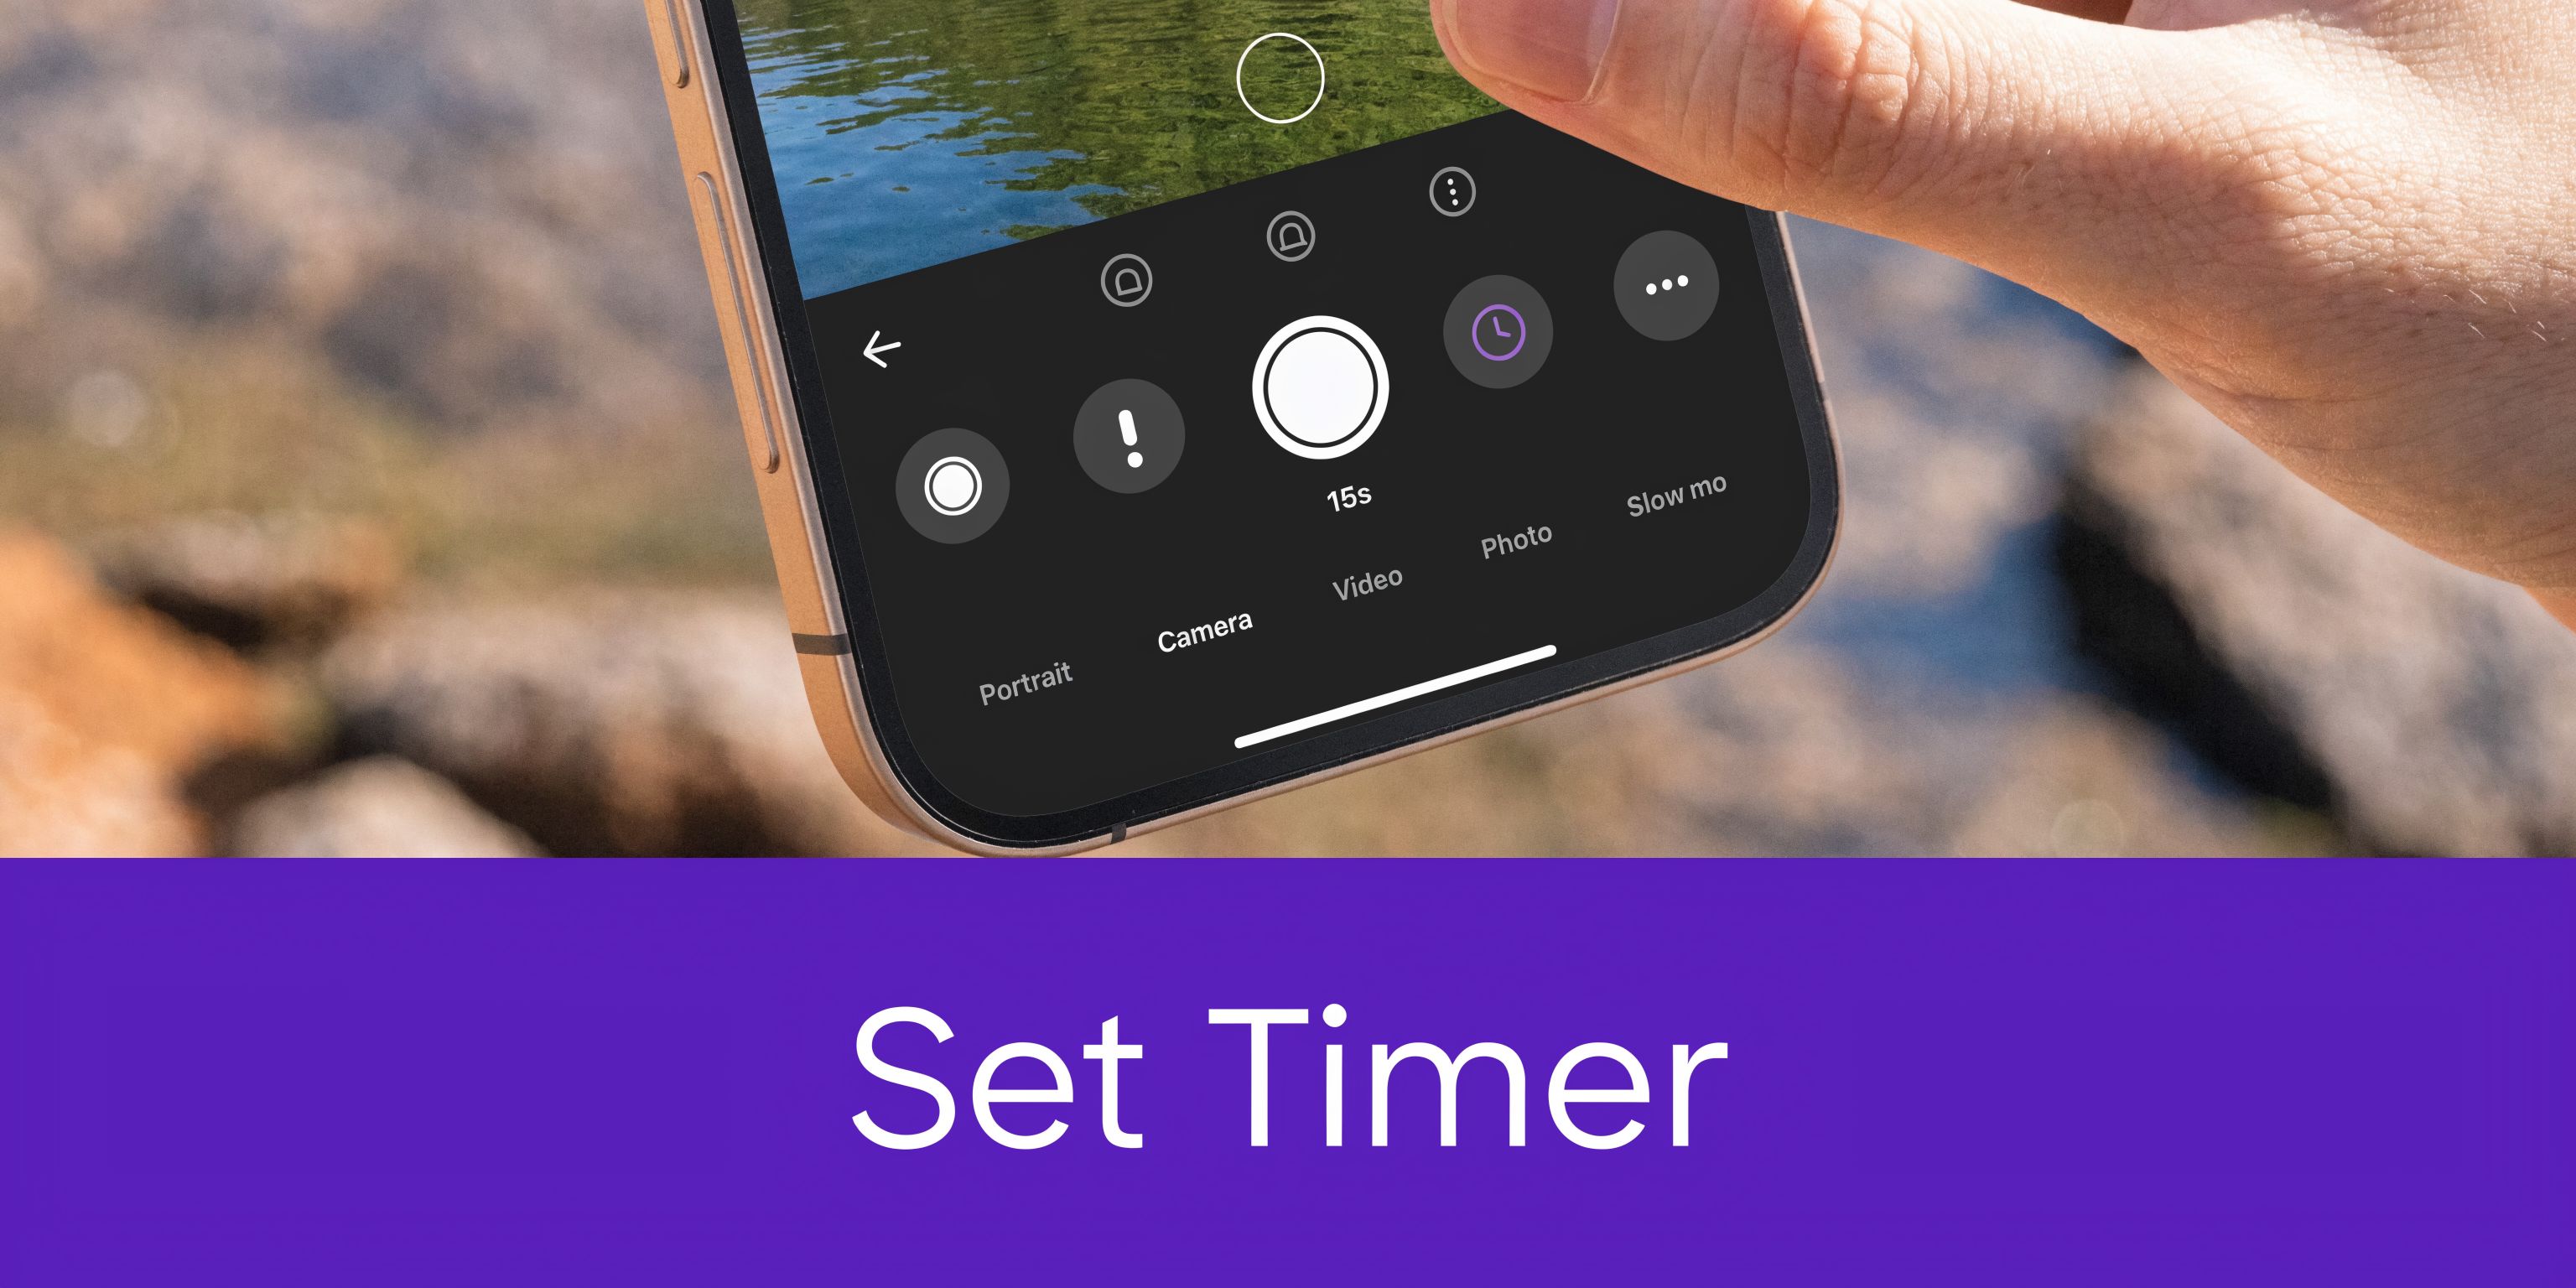
Where the timer lives
Open the Camera app and switch to Photo or Portrait mode. The native self-timer is available there. Tap the upward arrow at the top of the screen, or swipe up on the mode area below the preview to reveal extra controls.
From that control strip, tap the clock icon. You’ll see Timer Off, 3s, and 10s. Choose the delay you want, then press the shutter.
According to a walkthrough showing the native camera flow, the iPhone Camera app’s self-timer in Photo and Portrait modes triggers a 10-frame burst capture after you tap the upward arrow, choose the clock icon, and select 3s or 10s. It also gives you visual countdown flashes and audio cues, and you can review the burst in Photos afterward by swiping left in the app. That burst workflow uses the A-series chip’s processing to improve your chances of a stable shot in practice, as shown in this iPhone timer walkthrough on YouTube.
When to use 3 seconds and when to use 10
The 3-second timer is the better choice when the phone is already in position and you just need to avoid the small movement that happens when you press the shutter. It works well for:
- Desk setups: Product shots, food photos, or overhead captures where you’re already close to the phone.
- Quick portraits: You only need a step or two to settle into place.
- Tripod adjustments: You’ve already framed the shot and want minimal delay.
The 10-second timer is for shots that need movement before capture:
- Group photos: Everyone has time to settle without a sprint at the end.
- Solo travel photos: You can walk into frame and refine your pose.
- Hands-free tutorial visuals: You can place props, stand naturally, and let the camera fire on its own.
One common mistake is assuming the photo happens on the final beep and you can relax immediately. Don’t. The timer fires a burst, so hold your expression and posture a moment longer than feels natural.
Practical rule: If you’re jumping, turning, or photographing kids, stay still through the full burst instead of treating the timer as a single-shot trigger.
A quick video demo helps if you want to see the taps in sequence.
What happens after you press the shutter
Once the timer starts, the iPhone gives you a visible countdown with screen flashes. If sound is enabled, you’ll also hear audio cues. On supported devices, you may feel haptic feedback as part of the countdown behavior.
The important part is what happens at capture. The timer doesn’t just take one image and stop. It captures a burst of 10 frames, which gives you several near-identical options to choose from afterward. That’s why the self-timer on iPhone is more forgiving than many people realize. A tiny blink or micro-movement in one frame doesn’t ruin the whole attempt.
If Live Photos is enabled, the shot can feel more flexible still, especially when you want a bit of natural motion around the moment of capture.
Choosing Your Best Shot from the Timer’s Burst Photos
The biggest frustration with the self-timer isn’t starting it. It’s dealing with the pile of almost-the-same photos afterward.
That’s where most tutorials stop too early. They explain how to turn the timer on, but not how to manage the result efficiently.

Business Insider’s timer coverage confirms the native feature but leaves a gap around post-capture handling. Specifically, tutorials rarely explain an efficient workflow for sorting the automatic 10-burst series, even though that cleanup problem shows up often in user comments and forum questions, as noted in this Business Insider guide to the iPhone camera timer.
A fast workflow for picking the keeper
Open the shot in Photos. You’ll be looking at a burst stack, not ten separate moments you need to manage one by one.
Use this workflow:
- Scrub first: Swipe through the frames quickly to eliminate obvious blinks, bad hand positions, or moments where someone is half-talking.
- Check edges: Don’t only inspect faces. Look at hands, feet, hair, and the border of the frame. Great expressions get ruined by clipped fingers and awkward cropping.
- Pick more than one if needed: If the shot is for a client deck, social post, and internal doc, keep multiple strong variations instead of forcing one “perfect” winner.
- Mark your keeper: Use Favorites if you want to find the selected frame quickly later.
What slows people down
The mistake is over-editing before selecting. Don’t start adjusting exposure, cropping, or filters until you’ve chosen the frame worth keeping.
Another drag is trying to remember the best image from memory. Compare similar frames back to back. The winning shot often comes down to tiny differences: eyes open a bit more, shoulders more relaxed, or less tension in the mouth.
Choose based on expression first, technical flaws second. A slightly less “perfect” frame often feels more human and usable.
For content creators, this matters even more. If you’re taking timed shots for tutorial thumbnails, support article visuals, or marketing assets, clutter in the camera roll creates friction later. A clean selection habit saves more time than people expect.
Powerful Alternatives for Hands-Free iPhone Photos
The native timer is solid, but it has limits. Sometimes you need more distance, more precise control, or a way to repeat the same setup without touching the phone.
That’s where alternatives earn their place.
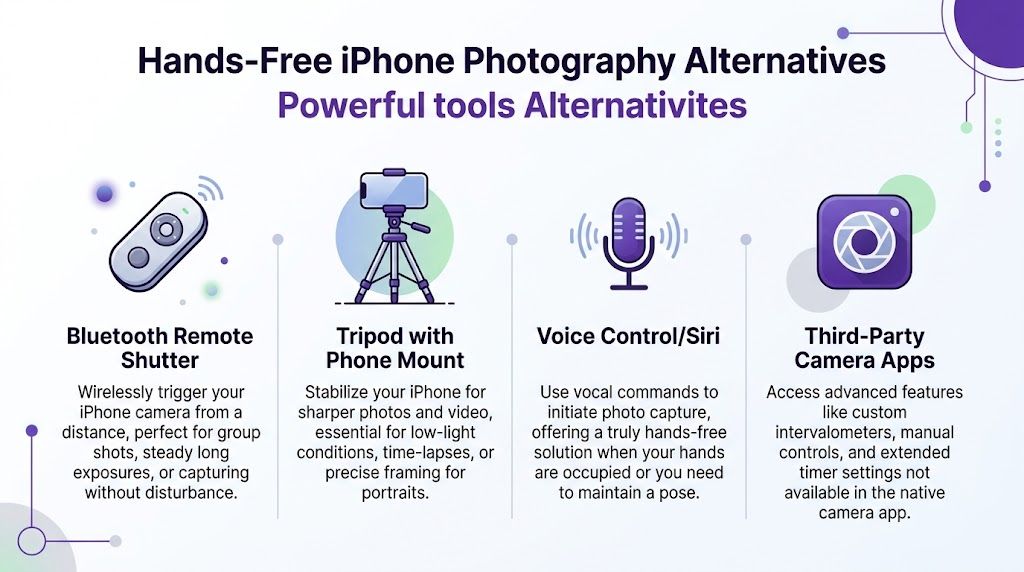
Which option fits which job
| Method | Best for | Main advantage | Main trade-off |
|---|---|---|---|
| Bluetooth remote shutter | Group shots, distance shooting | Trigger on demand without running | Another accessory to carry |
| Tripod with phone mount | Repeatable framing, low-light stability | Cleaner composition and less shake | Slightly slower to set up |
| Voice control or Siri-based options | When your hands are occupied | No physical touch needed | Less direct with the native timer |
| Third-party timer apps | Custom sequences and automation | More control than Apple’s native option | Extra app complexity |
Native timer versus app-based control
If you’re taking occasional personal photos, the built-in timer is usually enough. For repeatable workflows, it starts to feel narrow.
The clearest example is automation. Specialized timer apps and Shortcuts-based approaches let you build repeatable setups for things like front camera captures, tripod demos, or multi-shot sequences. That matters if you regularly make training content, product walkthroughs, or staged visual assets. A listing for a dedicated timer app notes that native iOS lacks direct voice activation for the timer, and that 40% of users who download specialized timer apps do so for advanced control in scenarios like multi-shot sequences or automated tripod captures for demos, according to the Self Timer app listing.
What actually works in practice
A Bluetooth remote is the most practical upgrade for photos. You keep the simplicity of the Camera app, but you remove the rush. That’s ideal for family shots, portraits, and scenes where timing matters more than automation.
A tripod is less exciting, but it has the biggest impact on consistency. If your self-timer shots feel amateur, the issue usually isn’t the timer. It’s unstable placement.
For Voice Control and app-triggered capture, usefulness depends on your tolerance for setup. They’re great in controlled environments. They’re less fun when you need a quick photo outdoors and just want the shot done.
If you build repeatable iPhone content setups, it’s also worth tightening the rest of your device behavior. Small settings changes affect how smooth the session feels, and resources like this guide to master your iPhone's discoverable mode can help when you’re working across accessories and nearby devices.
There’s also a visual side to this. If your hands-free shot is meant to look polished rather than merely functional, blur can separate you from a busy background. A practical next step is this guide on how to shape subject emphasis with background blur: https://www.tutorial.ai/b/how-to-blur-background
App-based control is best when you repeat the same shot pattern often. If you only need one good photo, simpler usually wins.
Quick Tips for Better Results with Your Self-Timer
Good timer photos come from setup quality, not just from tapping the clock icon correctly.
The first fix is stability. Put the phone on a tripod if you have one. If you don’t, use a shelf, stack of books, or any surface that won’t shift when you walk away. A stable phone makes the self-timer on iPhone look far more capable than it seems in casual use.
Composition and light
Turn on the Grid overlay in camera settings and use it. It helps with horizon lines, headroom, and keeping verticals from leaning when you’re placing the phone in a hurry.
Light matters just as much. Artificial lighting can create awkward exposure changes during delayed capture. A TechRadar walkthrough notes that the iPhone’s burst-mode self-timer reaches a 98% keeper rate in dynamic scenes, while overexposure under artificial light affects 22% of shots. The same source also notes that pairing timed captures with Photographic Styles can help creators keep color more consistent across images, and that using Tutorial AI for cursor-highlighted breakdowns can speed that workflow by up to 85% compared with manual editing in that context, according to this TechRadar guide to setting the iPhone timer.
Use that as a practical warning. If the scene includes mixed indoor lighting, test one frame before committing to a full set.
Small adjustments that change the result
- Hold the pose longer: Don’t relax the instant the countdown ends. Give the burst time to finish.
- Watch the background: Lamp poles, door frames, and monitor edges can seem fine in preview and distracting in the final image.
- Use Portrait mode selectively: It can look polished for solo shots, but edge separation sometimes struggles with hair, glasses, or props.
- Keep your lens clean: Fingerprints flatten contrast fast, especially in indoor light.
If you’re trying to decide whether your current phone is limiting image quality or if the issue is mostly technique, this breakdown of Which iPhone has the best camera? is a useful reality check.
Where this connects to tutorial production
A lot of subject matter experts use self-timed shots as part of a bigger content workflow. They capture a thumbnail, a team image, or a hands-free setup photo, then move into screen recording for demos, onboarding videos, explainer videos, feature release videos, knowledge base videos, or support article videos.
The bottleneck usually appears after recording.
Easy recording tools such as Loom are great for speed, but raw recordings often end up 50-100% longer than necessary. On the other end, professional editors like Camtasia or Adobe Premiere Pro can produce polished results, but they require real editing skill and more time than most experts can spare.
That’s why the workflow matters as much as the capture. Record freely, then tighten the output later. Strong lighting makes that easier, especially when you’re moving from stills into video. If you’re refining that part of the setup, this guide on practical video lighting is useful: https://www.tutorial.ai/b/lighting-for-video-recording
A better self-timer photo often starts with a better room setup, not a better camera setting.
Putting It All Together for Effortless Photos
Once you stop treating the timer as a last-resort feature, it becomes one of the most dependable tools in the iPhone camera. You get steadier framing, more intentional composition, and a cleaner way to put yourself in the shot without rushing.
The useful part isn’t just the countdown. It’s the workflow around it. Set the phone well. Choose the right delay. Review the burst intelligently. Use a remote or app when the native tool stops being enough.
That same mindset carries into professional content creation. Better planning before capture means less fixing later. If you want your photos or videos to look deliberate, start by deciding the shot before you press anything.
For repeatable content, a shot list helps more than most creators expect. This practical guide is a good place to start: https://www.tutorial.ai/b/what-is-a-shot-list
If you create demos, onboarding videos, explainers, feature release videos, knowledge base videos, or support article videos, Tutorial AI is worth a look. It’s built for subject matter experts who want professional results without editing like a video specialist. You can record naturally, even if your first take is messy, and turn that raw capture into an on-brand video that feels polished, without wrestling with a timeline the way you would in Adobe Premiere Pro.