You open Loom to make a “quick” product walkthrough. Ten minutes later, you’ve clicked the wrong menu twice, said “um” a dozen times, and dragged the cursor around while figuring out what to say next.
The worst part is that the knowledge is there. You know the product. You know the workflow. What’s missing is a production method that turns expertise into a clear video without forcing you to become a video editor.
That’s why what is a shot list matters far beyond film sets. For a software marketer, support lead, product manager, or solutions engineer, a shot list is the planning layer that makes a tutorial feel short, intentional, and professional instead of improvised and bloated.
The Unspoken Problem with Screen Recordings
A lot of software tutorial videos start with the same assumption. “I’ll just record my screen and talk through it.”
That sounds efficient. It usually isn’t.
What happens when you wing it
You begin with a clean goal, like showing a new reporting feature. Then the recording starts, and small problems pile up:
- You narrate while thinking: You explain the feature while deciding where to click next.
- You backtrack on screen: You open the wrong tab, then recover.
- You over-explain simple actions: A two-second click becomes a thirty-second detour.
- You forget visual emphasis: The viewer doesn’t know where to look.
- You leave sensitive details exposed: Names, emails, or internal data remain visible.
The result is a long raw take that asks the audience to sort out what matters.
For anyone making demos, onboarding videos, release videos, support clips, or knowledge base content, that’s a real production issue. If you want a better starting point for cleaner captures, this guide to screen recording for tutorials is useful.
Why busy experts struggle with video
Subject matter experts often assume the hard part is knowing the product. In video, the hard part is often sequencing attention.
A viewer needs to know:
- what they’re seeing
- why it matters
- where to look
- what happens next
If you don’t decide that before recording, your audience feels the uncertainty.
A messy tutorial usually isn’t a knowledge problem. It’s a planning problem.
The hidden tradeoff
Simple recording tools are great for speed, but raw recordings often run much longer than the final version should. You can feel this in practice. A casual, talk-as-you-go walkthrough often ends up far longer than a tightly planned tutorial covering the same task.
Professional editing tools can fix that, but they introduce a different problem. Camtasia and Adobe Premiere Pro can produce polished results, yet they demand editing skill, timeline patience, and a lot of cleanup work.
That gap is where many teams get stuck. They either publish the rambling version or postpone the polished version.
A shot list solves the problem upstream. It gives you a practical way to decide, before recording, what the viewer needs to see and hear.
What Is a Shot List in Video Production
A shot list is a structured pre-production document that breaks a video into individual planned shots. Think of it as a blueprint for the visuals.
Instead of saying “we’ll show the dashboard,” a shot list turns that into specific instructions: the scene number, the shot identifier, what happens on screen, the framing, the angle, the movement, the lens or framing choice, any equipment or lighting needs, audio notes, and production notes.
The simplest way to think about it
An architect doesn’t show up with a vague idea and start pouring concrete.
A director shouldn’t show up with a vague idea and start rolling camera either.
A shot list translates intent into execution. It tells the crew what needs to be captured so the final edit works.
Why crews rely on it
In film and video production, the director, cinematographer, and 1st AD often build the shot list together during pre-production. That collaboration matters because the document does two jobs at once:
- Creative alignment: Everyone understands how the story should look.
- Production alignment: Everyone knows what must be captured, in what order, with what setup.
That’s what allows teams to shoot out of sequence while still keeping every shot tied back to the script for editorial use later.
What a shot list prevents
Without a shot list, crews can miss essential coverage, including inserts and cutaways that seem obvious only after the shoot. That’s one reason production teams treat it as an operational document, not just a creative one.
According to StudioBinder’s overview of what a shot list is in video production, teams using detailed shot lists can reduce total shooting and production time by 15 to 30%, and failing to plan all necessary shots can lead to reshoots that inflate budgets by 20 to 50%.
Practical rule: A shot list isn’t bureaucracy. It’s insurance against missed footage and wasted time.
Why this matters even if you record software
You might not have lights, actors, or a dolly track. But you still have shots.
A full-screen interface view is a shot. A zoom into a button is a shot. A cursor move that directs attention is a shot. A highlighted click with narration is a shot.
Once you see that, the concept stops feeling “film industry” and starts feeling useful.
The Essential Components of a Traditional Shot List
A traditional shot list usually lives in a grid or spreadsheet. Each row is one planned shot. Each column answers one production question.
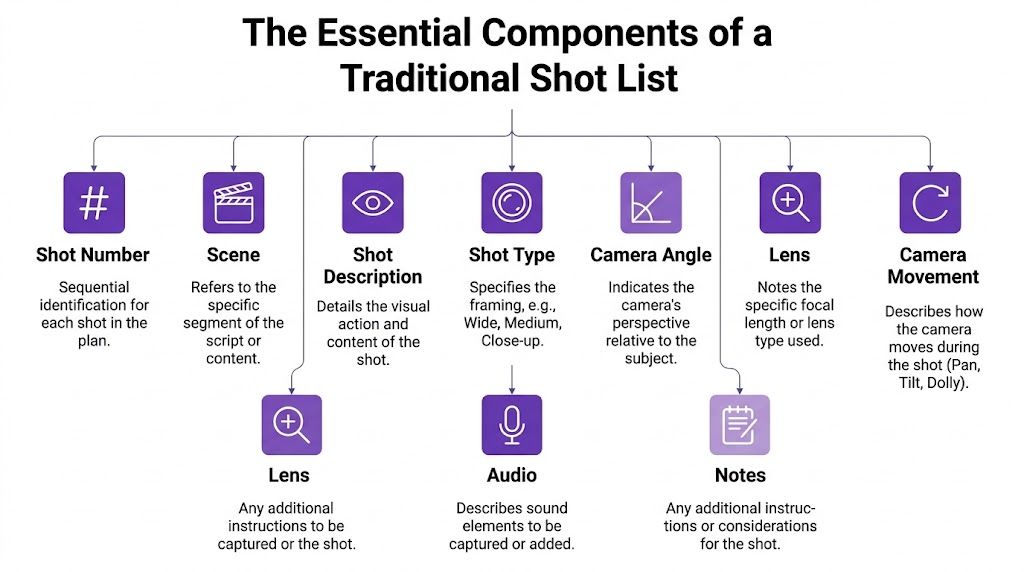
The core fields that matter most
Here’s what typically appears in a classic shot list.
| Component | What it tells the team | Example |
|---|---|---|
| Shot Number | The unique identifier for the shot | 2A |
| Scene | Which script moment this belongs to | Scene 2 |
| Shot Description | What happens in the shot | Customer opens laptop and signs in |
| Shot Type | How tight or wide the framing is | CU, MS, WS |
| Camera Angle | The camera’s perspective | Eye-level |
| Camera Movement | Whether the camera moves | Pan right |
| Lens or Framing | How the image is composed | 50mm |
| Audio | What sound matters in the shot | Boom mic, room tone, MOS |
| Notes | Extra instructions | Add product prop on desk |
If you’ve never built one before, the easiest mental model is to treat each row as a single answer to the question, “What exactly do we need to capture?”
For teams writing script and shot planning side by side, a clean video script format helps keep visuals and narration aligned.
What each field does on set
A shot list only looks administrative until you imagine the crew using it.
Shot number and scene
These keep the production organized.
A director may shoot Scene 8 before Scene 3 because the location is available today. The shot list keeps every setup linked to the correct scene so the editor can rebuild the story later.
Shot description
This is the heart of the row.
Good descriptions are specific enough that another person can understand the intended visual. “Show manager reacting to alert on screen” is usable. “Office stuff” is not.
Shot type
Shot type controls viewer attention.
A wide shot establishes context. A medium shot is often used for interaction. A close-up isolates a face, object, or key detail; visual storytelling becomes deliberate at this stage.
Camera angle and movement
These shape how a moment feels.
A low angle can make a subject feel dominant. A slow push in can add focus. A handheld move can feel tense or immediate. Even when the action is simple, movement changes meaning.
The details people forget
The fields below don’t always get top billing, but they save real time.
- Lens or framing: This helps the DP understand how compressed, intimate, or expansive the image should feel.
- Equipment: Tripod, slider, gimbal, or specialty rig changes setup needs.
- Lighting notes: A shot might need a different lighting approach than the one before it.
- Audio notes: If a shot is MOS, the team doesn’t waste time planning synced sound.
- Director or DP notes: Effects, props, continuity reminders, or editorial concerns belong here.
The best shot lists don’t try to be artistic essays. They remove ambiguity.
A quick example
A simple commercial moment might look like this:
- Shot # 4A: Wide shot of customer entering office
- Shot # 4B: Medium shot at desk, opening laptop
- Shot # 4C: Close-up of login field on screen
- Shot # 4D: Insert of hand pressing enter
- Shot # 4E: Reaction close-up after dashboard loads
Each row is small. Together, they create complete coverage.
That’s the key idea. A shot list isn’t one big instruction. It’s a chain of small, precise decisions.
Translating Film Language for Software Tutorials
Traditional shot list language can sound intimidating if your “set” is a browser window and a microphone. The trick is to translate, not copy.
Film terms have software equivalents
When filmmakers talk about framing, angle, movement, and coverage, software teams can use the same logic with different tools.
| Film language | Software tutorial equivalent |
|---|---|
| Wide shot | Full-screen app view |
| Medium shot | Window-level focus |
| Close-up | Zoom on a button, field, chart, or menu |
| Camera movement | Cursor path, smart pan, guided screen movement |
| Lens choice | Zoom intensity and framing style |
| Audio notes | Voiceover, click sounds, silence, or music cues |
| Insert shot | Tooltip, modal, metric card, or form field detail |
| Cutaway | Related screen, support context, or UI state change |
That’s the practical answer to “what is a shot list” for a SaaS team. It’s a plan for where attention goes on screen.
A dashboard walkthrough as an example
Take a simple reporting tutorial.
In film language, you might say:
- start with an establishing shot
- move to a medium
- push into a close-up
- grab inserts for detail
In software language, that becomes:
- show the full dashboard first
- focus on the analytics panel
- zoom into the filter dropdown
- isolate the export button
- capture the confirmation state after export
That’s the same planning instinct, just applied to interface design instead of actors and locations.
What “camera movement” means on a screen
Software tutorials don’t have a physical camera, but they still need motion discipline.
A few equivalents:
- Pan: moving visual focus from the left panel to the right workspace
- Push in: zooming toward a form field or metric
- Tracking shot: following a cursor through a multi-step workflow
- Static shot: holding on one area while narration explains a concept
If you want examples of supportive visual cutaways in tutorial-style content, these b-roll examples help clarify what counts as useful supplemental footage.
Here’s a useful walkthrough of how software presentation and screen-focused storytelling work in practice:
The most common confusion
People often assume a shot in a tutorial means “one screen.”
It usually doesn’t.
A single screen can contain several shots:
- full interface view
- zoom on left navigation
- highlight on “Settings”
- focused view of one toggle
- blurred background behind a modal
That’s why a good tutorial feels edited even before editing begins. The creator already decided how the viewer would move through the interface.
If a software screen contains three important things, treat them as three separate shots.
How to Create a Shot List for Your Next Tutorial
You don’t need a film crew or a complicated template. You need a repeatable way to plan the viewer’s attention.
Start with the outcome, not the recording
Don’t begin by opening the app and clicking around.
Start with one sentence: What should the viewer be able to do after this video?
Examples:
- create a new user account
- export a report
- configure SSO settings
- understand what changed in a feature release
That outcome becomes your anchor. Anything that doesn’t support it probably doesn’t belong in the video.
Break the workflow into scenes
A scene in a software tutorial is one meaningful step in the user journey.
For a “create a report” tutorial, your scenes might be:
- open the reporting area
- choose a template
- adjust filters
- generate the report
- export and share
That already makes the recording easier, because you’re no longer trying to improvise the entire video in one mental pass.
Turn each scene into individual shots
Turn each scene into individual shots, making the tutorial professional.
Professional cinematographers often aim for a coverage ratio of 5 to 7 shots per key action or dialogue scene. For tutorials, that translates well to planning multiple visual moments for each major step, such as zooms, pans, highlights, and state changes.
For a single scene like “adjust filters,” your shots could be:
- full reporting screen
- zoom to date filter
- highlight preset selection
- focus on team dropdown
- show updated chart after change
That gives you options. If one moment feels rushed or unclear, you have enough visual coverage to support the explanation.
Workflow shortcut: Plan more micro-shots than you think you need. You can remove them later. It’s harder to invent clarity after recording.
Write what the viewer sees and hears
A good tutorial shot list pairs the visual with the narration.
That doesn’t mean writing a stiff script for every breath. It means deciding what the viewer should hear while a specific visual is on screen.
For example:
| Shot # | Screen/Action Description | Visual (Zoom, Highlight) | Narration Script | Notes (e.g., Blur data) |
|---|---|---|---|---|
| 1 | Dashboard home screen loads | Full screen, no zoom | “Start from the dashboard home page.” | Blur customer name |
| 2 | Cursor moves to Reports | Highlight nav item | “Open Reports from the left navigation.” | Keep cursor slow |
| 3 | Reports page opens | Soft zoom on template area | “Choose the template that matches your use case.” | Hold for readability |
| 4 | Date filter menu expands | Tight zoom on filter | “Set the date range before generating the report.” | Add click emphasis |
| 5 | Export button clicked | Highlight button, slight zoom | “When everything looks right, export the report.” | Hide email in top bar |
This format is often sufficient for teams.
If you want help shaping the spoken side of the video before you record, this video scripting template offers a useful framework for tightening narration without making it sound robotic.
Add the details people regret forgetting
The best shot lists include notes for all the practical issues that usually show up late.
Use notes to flag:
- Sensitive information: customer names, emails, account IDs
- Timing needs: hold longer on dense UI
- On-screen text: labels, callouts, lower thirds
- Transitions: cut, zoom, pause, or visual reset
- Version control: which product build you recorded
Keep it lightweight
Your shot list doesn’t need to be beautiful. It needs to be usable.
A plain spreadsheet, Notion table, or shared doc is enough if it helps you answer these questions before recording:
- What’s the next shot?
- What should the viewer focus on?
- What am I saying over it?
- What needs editing attention later?
That’s how you turn one long screen recording into a sequence of deliberate teaching moments.
Three Common Shot List Mistakes to Avoid
Bad shot lists don’t fail because the format is wrong. They fail because the thinking is sloppy.
Mistake one: being too vague
“Show dashboard” is not a shot.
It doesn’t tell you where to focus, what changed, what matters, or what the narration should cover. A useful version is more like: “Zoom into the Q3 revenue chart, hold while explaining the trend line toggle.”
Vagueness creates extra work later because the editor has to guess what the planner never decided.
Mistake two: forgetting inserts and cutaways
Tutorial creators often plan only the main path.
They remember the broad sequence, but skip the support shots that make the video easier to follow. In software content, inserts and cutaways can include:
- a close view of a dropdown selection
- a confirmation toast after save
- a hover state that reveals hidden controls
- a brief return to the full screen for orientation
These moments seem minor until the edit. Then you realize the explanation needs visual support you never recorded.
Missing coverage rarely feels expensive during recording. It feels expensive when you’re trying to rescue the final edit.
Mistake three: skipping the shot list because the video is “simple”
This is the trap that catches experienced product people.
Simple videos often get less planning because they seem obvious. But obvious to the creator isn’t always obvious to the viewer. A short feature update can become disorganized fast if you click through it from memory.
In professional production, missed planning can trigger reshoots that inflate budgets by as much as 20 to 50%. That figure comes from the same StudioBinder analysis cited earlier, and the lesson applies cleanly to software tutorials even when the consequences are smaller in dollar terms. The cost may show up as re-recording time, extra editing, delayed publishing, or a support video that still confuses customers.
A quick self-check before you record
Run your shot list through these questions:
- Can another person follow it? If not, it’s too vague.
- Does each major step have enough visual coverage? If not, add inserts.
- Have you planned emphasis, not just sequence? Viewers need direction.
- Did you mark anything sensitive that should be blurred or hidden? Don’t leave that to memory.
A short video can survive a rough script. It usually won’t survive unplanned visuals.
Execute Your Shot List Perfectly with Tutorial AI
The old workflow usually forces a bad choice.
You either record quickly in a simple tool and live with a long, messy take, or you move into a professional editor and spend serious time polishing timing, zooms, narration, and visual cleanup.
Neither option is great for a subject matter expert who just needs to publish a strong tutorial.
Why the old options break down
A raw Loom recording is fast to capture, but the speed is often deceptive. When you speak off the cuff, pause to think, correct yourself, and wander through the interface, the finished recording often ends up much longer than necessary.
Traditional editing software solves the polish problem, but it assumes someone on the team knows how to shape a timeline, trim aggressively, manage zooms, rebuild narration, and keep everything visually consistent.
That’s a lot to ask from a product marketer, support manager, or enablement lead.
What changes when the shot list drives the workflow
A shot list gives structure before recording. An AI-first workflow helps you execute that structure without needing expert editing technique.
That matters because a modern tutorial usually needs all of these at once:
- clean voiceover
- consistent pacing
- guided visual focus
- polished cursor behavior
- blurs for sensitive data
- on-brand styling
- export-ready output
When those tasks stay manual, the bottleneck becomes editing skill.
What the workflow looks like in practice
A strong approach is simple:
- plan the tutorial in shots
- record naturally, following the sequence
- let AI handle the visual and timing polish
- refine the script instead of wrestling with the timeline
That’s why this workflow fits busy experts. You can speak freely without over-rehearsing every line, then clean and shape the tutorial after recording.
For teams learning how to turn rough ideas into better structured generation instructions, this guide to an AI video prompt is a useful companion resource.
The features that map directly to a shot list
A shot list becomes much more powerful when your editing tool can act on it.
Here’s how that mapping works:
| Shot list item | Execution need | Helpful capability |
|---|---|---|
| Zoom to settings panel | Focus attention | Smart zooms after recording |
| Emphasize click path | Make actions easier to follow | Cursor tracking, smoothing, highlights |
| Tighten spoken explanation | Improve clarity without re-recording | Script-based editing and narration updates |
| Hide customer details | Protect private information | Blurs and background effects |
| Keep videos on-brand | Consistent visual identity | Brand kits, custom fonts, slides |
| Localize versions | Align visuals across languages | Auto-timed translations and narration sync |
This represents the key shift. The subject matter expert doesn’t have to perform like a polished on-camera host or edit like an Adobe Premiere Pro specialist. They can focus on the content while the tooling helps deliver a professional result.
A shot list is most valuable when the person with product knowledge can use it without becoming a full-time editor.
Why this is especially useful for SaaS teams
SaaS teams create a lot of video content that looks small but adds up fast:
- demos
- onboarding clips
- feature release videos
- support article videos
- internal training walkthroughs
- knowledge base explainers
Each one benefits from the same discipline. Clear shots. Planned emphasis. Controlled pacing.
When the production process supports that without heavy editing overhead, more experts can create useful videos themselves. That’s how tutorial quality improves across a team, not just in the hands of one video specialist.
Go From Plan to Polished Video in Minutes
A shot list isn’t a film-school exercise. It’s a practical planning tool for anyone who needs to explain software clearly.
It solves a familiar problem. You know the product, but raw screen recordings often turn that knowledge into long, uneven videos. A shot list fixes the structure before recording starts. It tells you what to show, where to focus, what to say, and what details need special handling.
That’s why the answer to what is a shot list is simple. It’s a blueprint for attention.
For software marketers, support teams, trainers, and product educators, that blueprint turns demos, onboarding videos, feature updates, and knowledge base content into something viewers can follow without friction.
The old choice used to be speed or polish. With a planned shot list and modern AI-assisted editing, you can get both.
If you want to turn raw screen recordings into polished tutorials without mastering a complex timeline editor, try Tutorial AI. It helps subject matter experts record naturally, then turn that footage into clear, on-brand videos with smart zooms, cursor effects, script-based editing, AI narration, blurs, and fast publishing.