Before you write a single word of a tutorial, you need to get one thing straight: your job is to see the world through your user’s eyes. Great instructions aren’t just a list of clicks. They’re a carefully crafted bridge that takes someone from a state of confusion to a feeling of accomplishment. It’s about empathy, logic, and anticipating needs before they even arise.
Building the Foundation for Flawless Instructions

Before you can show someone the way, you have to know where they’re starting from. The single biggest mistake I see people make is assuming their user knows what they know. We’re all guilty of it. It’s called the “curse of knowledge,” and it’s why so many guides skip over the most critical details—because to the expert, they seem obvious.
To break that curse, you have to intentionally step out of your expert brain and into the mind of a total beginner. This groundwork is what separates a helpful guide from one that just creates more support tickets.
Adopt a Beginner’s Mindset
Empathy isn’t a soft skill here; it’s your most critical tool. Take a second and really picture the person you’re writing for. Are they a tech pro exploring a new feature, or a complete novice who feels overwhelmed? Are they in a hurry, frustrated, or just curious? Their mindset dictates the tone and level of detail you need.
Think about who might show up:
- The Frustrated User: They’re trying to fix something now. They need short, direct commands, not a history lesson.
- The Curious Explorer: This person is learning for the sake of learning. They’ll appreciate a little context about why a step is important.
- The Overwhelmed Novice: They need everything spelled out. No jargon, no assumptions. Every click matters.
My rule of thumb? Always write for the least experienced person in your audience. The power user can skim, but the novice who gets lost is gone for good.
Define One Clear Goal for Your Guide
Every tutorial needs a single, laser-focused objective. A guide that tries to do too much at once becomes a confusing mess. Before you start, finish this sentence: “When they’re done, the user will be able to…”
This is your North Star. It keeps you honest and prevents you from going off on tangents. For instance, “Learn about user settings” is a terrible goal. It’s vague. But “Change their account password”? That’s something you can build a guide around.
The whole point of a tutorial is to solve one specific problem. A clear goal ensures every single step you write serves that purpose and gets your user to the finish line without any detours. Once that goal is locked in, gut-check every step against it. Does this action get them closer to changing their password? If the answer is no, it doesn’t belong here. Nailing this is a key part of mastering the proper format for technical documentation that actually works for users.
Break the Process into Logical Phases
With your user and goal defined, it’s time to map out the journey. Don’t dive into the nitty-gritty steps yet. First, think in bigger chunks—the major milestones of the process. It’s like creating an outline for a book before you write the chapters. It gives you structure and makes sure you don’t miss anything.
For a task like “Connect a third-party application,” your phases might look like this:
- Preparation: What do they need before they start? Think API keys, login info, and getting to the right screen.
- Authorization: This is the actual connection part—entering credentials and granting permissions.
- Configuration: Now that it’s connected, what initial settings do they need to choose?
- Verification: How do they know it actually worked? Show them how to confirm the connection is live.
When you break a big task into smaller phases like this, it feels way less intimidating for the user. It also keeps you, the writer, organized and on track. Later, these phases will become the main sections of your guide, making it a breeze for users to follow along.
Structuring Your Guide for Clarity and Action
Let’s face it. You poured your heart and soul into that last guide, but your users probably didn’t hang on every word. They skimmed. They jumped around. They were on a mission for a quick fix, not looking to read a novel. This isn’t a knock on your writing; it’s just the reality of how people consume content online.
Your guide’s structure has to pull double duty, serving two completely different audiences at the same time: the impatient scanner who just wants the answer now, and the diligent reader who needs every last detail. The secret to making both happy is a classic technique from the world of journalism called the “inverted pyramid.”
Lead With the Most Critical Information
The inverted pyramid model is beautifully simple: get straight to the point. Start with the main conclusion, the key action, or the final outcome. This immediately gives the scanners what they came for, letting them solve their problem and move on.
The data backs this up. Research shows that a staggering 67% of online readers skim content instead of reading it word-for-word. That single statistic is precisely why your step-by-step instructions have to be organized to deliver value in seconds. If you’re curious, you can find more insights about these online reading habits from the full research.
Once you’ve delivered the payload, then you can start layering in the supporting details, prerequisites, and context for those who need to dig deeper.
By putting the most important takeaway at the very beginning, you respect your user’s time. They get the gist in a few seconds and can decide for themselves if they need to stick around for the specifics that follow.
Layer in Details and Context Gracefully
After you’ve established the core action, it’s time to build out the rest of your instructions. This is where you explain the “why” behind a step, list any prerequisites, or clarify potential options. The trick is to avoid creating an intimidating wall of text.
Think of formatting as the guardrails for your reader’s attention:
- Numbered Lists: These are your best friend for actions that must be done in a specific sequence. The numbers are a powerful visual cue that tells the user, “Follow these in this exact order.”
- Bullet Points: Perfect for anything non-sequential. Use them for prerequisites, a list of required tools, or different options a user could choose from.
- Bold Text: This is essential for helping users find things on their screen quickly. Make UI elements like button names (Save Configuration), menu items (File > Export), or field labels (Username) pop.
Using this formatting strategy turns your guide into a visual map. It lets users navigate directly to the information they need without getting lost in the surrounding text.
Use Do’s and Don’ts for Quick Reference
Sometimes the clearest way to explain a concept is to show both the right and wrong way of doing things. A simple comparison table can make formatting best practices click instantly, which is especially handy when training new writers or keeping a team consistent.
Here’s a quick reference guide comparing effective and ineffective formatting techniques for creating clear, skimmable step-by-step instructions.
Instructional Formatting Do’s and Don’ts
| Formatting Element | Do (Effective Practice) | Don't (Ineffective Practice) |
|---|---|---|
| Actions | Use numbered lists for sequential steps (1, 2, 3). | Use bullet points for a required sequence. |
| UI Labels | Use bold text for button and menu names. | Use italics or quotes, which are less scannable. |
| Prerequisites | Use a bulleted list before the main steps. | Bury requirements in a long paragraph. |
| Paragraphs | Keep them short, 1-3 sentences maximum. | Write long, dense blocks of text. |
Getting this dual-approach structure right—leading with the critical outcome and then layering details with smart formatting—is what elevates good documentation to great documentation. It meets every user where they are, ensuring everyone can find their way to a solution.
The Professional Workflow for Perfect Instructions
Great instructions don’t just happen by accident. They’re the product of a deliberate, structured process. I’ve seen it time and again: someone jumps straight from a rough idea to hitting “publish,” and the result is almost always a mess of errors and frustrated users. The pros, on the other hand, rely on a system.
This professional method breaks the writing process down into clear, manageable phases. Educational research backs this up, showing that separating tasks reduces cognitive load and seriously improves the quality of your work. It’s a five-stage framework: Planning, Drafting, Revising, Editing, and Publishing.
For teams creating software tutorials and instructional videos—like our clients at Tutorial AI who work in L&D, product marketing, or customer support—this approach is a game-changer. It cuts down on writing anxiety and makes everyone more productive. You can find more insights on why this structure works so well for writers at /b/documentation-and-training.
The key is to stop trying to write and edit at the same time. It’s a classic productivity killer. When each stage has one clear goal, you can focus your mental energy where it’s needed most.
Planning and Drafting Your Instructions
The Planning stage is all about getting your ducks in a row. Before you write a single word of instruction, you need to gather your materials: screenshots, resource links, prerequisite info, and any code snippets or data your user will need. This is also when you lock in your tutorial’s goal and map out the logical flow, just as we discussed earlier.
With a solid plan in hand, you move on to Drafting. Your only job here is to get the steps down on the page. Don’t get hung up on perfect grammar or finding the most elegant turn of phrase. Just focus on translating your outline into a clear sequence. Write freely and concentrate on making sure the information is accurate and complete.
The biggest trap in writing is trying to edit while you draft. By separating these activities, you give yourself the freedom to create without the pressure of perfection, which makes the entire process faster and less stressful.
Revising, Editing, and Publishing
Once the first draft is done, it’s time to put on a different hat for the Revising phase. This is your big-picture review. Read through the entire guide from your user’s perspective. Does the flow make sense? Are the transitions logical? Did you forget a crucial step? This is where you might move entire sections around to improve clarity and flow.
After you’re happy with the structure, you zoom in for the Editing stage. Now you’re hunting for details. Scrutinize every sentence for grammar, spelling, and punctuation mistakes. Check that your terminology is consistent and that you’ve stuck to your style guide. This is the polish that makes your instructions look professional.
This image shows a similar idea applied to skimmable writing, where you deliver the most critical information first, then fill in the details and context.
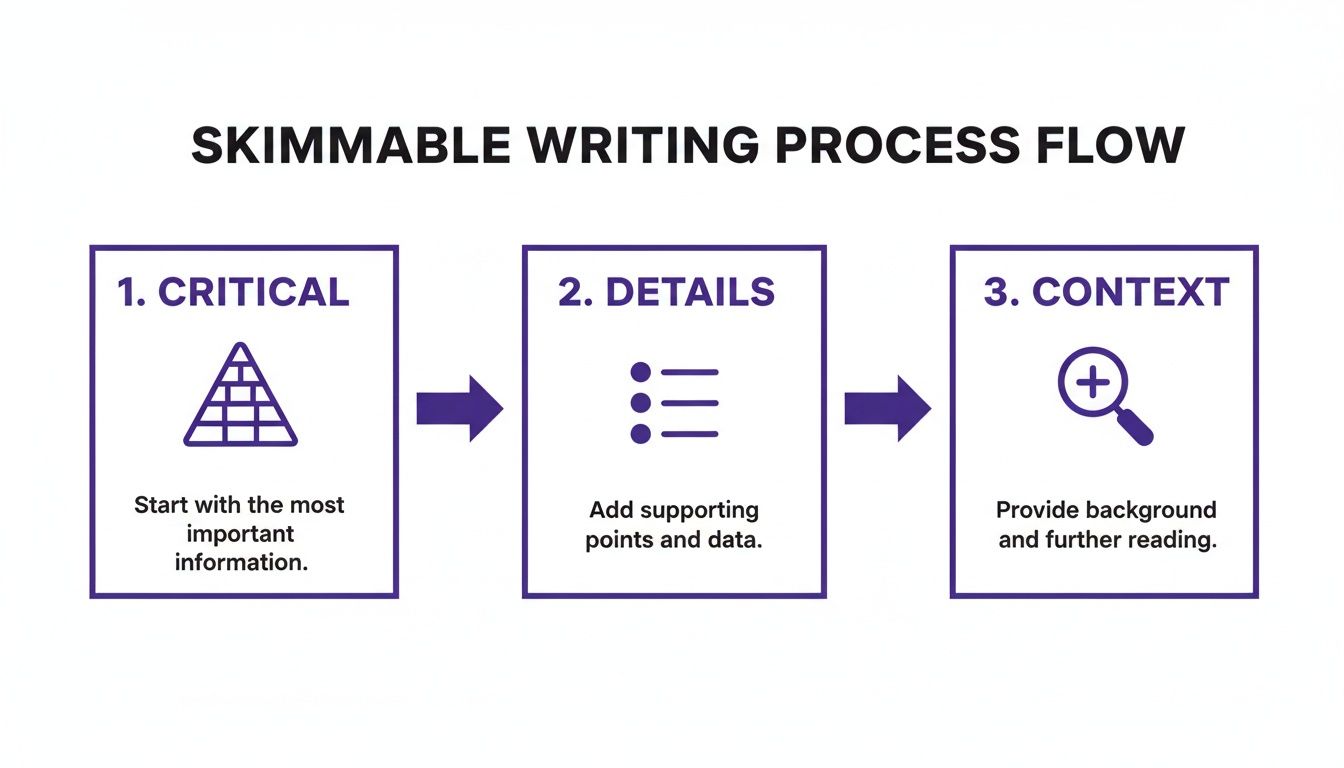
It’s all about intentional structure—guiding the user from the must-do actions to the nice-to-know context in a way that just makes sense.
Finally, the Publishing stage is more than just clicking a button. It involves a final quality check on the live version. Make sure all links work, images load properly, and the formatting looks good on both desktop and mobile. This entire workflow, from a spark of an idea to the final published guide, is what separates good instructions from great ones. These principles are universal, applying to everything from software guides to mastering a multi-step design process. Getting this separation of tasks right is a core skill for anyone in documentation and training.
Getting Each Step Right: The Anatomy of a Perfect Instruction

Think of your tutorial as a recipe. If even one ingredient is off, the whole dish can fail. That’s why every single instruction you write needs to be a perfect, self-contained unit of guidance. The goal is to get your user from point A to point B with zero friction or second-guessing.
This is about more than just listing actions. It’s about creating a series of small, confident “wins” for the user. Nailing this level of detail is what separates a frustrating tutorial from one that feels like a trusted expert is sitting right there with them.
The Four Essential Parts of a Perfect Step
Every instruction, no matter how simple it seems, should be built on four core components. Think of it as the DNA of a clear step. If you miss one, users get lost. When all four are there, they move forward with confidence.
This isn’t just a hunch; academic research on procedural documentation backs this up. A truly effective instruction has to lay out every procedure in the right order and be explicit enough for a complete novice to succeed. You can dig deeper into these structural requirements in the full research on the essential components of instructional procedures.
Here are the four parts you need in every step:
- Context: Where is the user right now? This orients them.
- Action: What, specifically, do they need to do? This is the command.
- Method: How do they do it? This clarifies the process.
- Result: What happens right after they do it? This confirms they did it right.
When you consciously build these four elements into every step, you create a safety net that catches your user before they can fall.
Use Active Language and Precise Commands
Your instructions aren’t a casual chat—they’re a series of direct commands. The language you choose needs to reflect that. Start every step with a strong, active verb that tells the user exactly what to do.
Weak, passive phrasing creates confusion. For example, “The next thing is to make sure the settings are saved” is vague. Is there a button to press? Something I need to check first?
Instead, be direct and commanding:
- Click the Save Settings button.
- Enter your name in the Full Name field.
- Select the Advanced Options tab.
- Navigate to the Dashboard > Reports menu.
This command-based language is impossible to misinterpret. It gives the user the action (Click) and the target (the Save Settings button) in one clean shot. I’ve found that consistently using bold text for UI elements like button and menu names helps users spot them on the screen in a fraction of a second.
A great step feels like a direct order from a helpful expert. It’s not a suggestion or an observation. It’s a clear, actionable command that leaves no room for misinterpretation.
Finding the “Just Right” Level of Detail
One of the hardest things to master when writing step-by-step instructions is figuring out how much detail to include. Give too little, and you leave beginners stranded. Give too much, and you overwhelm everyone with noise. The sweet spot is providing just enough information to complete the current action and confidently move to the next.
Let’s look at three ways to write the same instruction:
Too Little Detail:“Now, set up the integration.”(This is basically useless. It tells the user the goal but gives them zero guidance on how to achieve it.)
Too Much Detail:“Locate the blue ‘Connect New App’ button, which is in the upper-right corner of the integrations dashboard, just to the left of your profile avatar. After you click it, a modal window will appear with a list of over 50 applications you can connect to, alphabetized by name. Scroll down…”(This is cognitive overload. It buries the key action in a mountain of unnecessary detail and talks about future steps.)
Just Right:“From the integrations dashboard, click the Connect New App button in the top-right corner. A list of available applications will appear.”(This is perfect. It provides the context, the action, the method, and the immediate result, all without any fluff.)
This Goldilocks approach—not too little, not too much—is the hallmark of great technical writing. It respects the user’s time while giving them the precise guardrails they need to succeed at every turn.
Turning Your Steps into a Polished Video Tutorial
Your written instructions are the perfect blueprint. But let’s be honest, many people simply learn better by watching something being done. Video can elevate a good guide into a great one, but actually producing high-quality video has always been a massive headache.
The typical “quick and dirty” screen recording, often done with tools like Loom, creates its own problems. These recordings are often 50-100% longer than they need to be, filled with filler words like “um” and “uh,” long pauses, and the inevitable wrong click that needs to be corrected.
It’s an experience that feels unprofessional and frankly, wastes your user’s time. On the other end of the spectrum are professional tools like Camtasia or Adobe Premiere Pro. They can create incredible results, but they come with a brutal learning curve that most subject matter experts just don’t have the time for. This is where so many great video ideas die on the vine.
From Raw Recording to Polished Tutorial
What if there was a better way? Imagine your go-to expert—the one who knows the software inside and out—could simply hit “record” and walk through a process without a script or a single rehearsal. That’s exactly what Tutorial AI makes possible.
Tutorial AI’s tools let you speak freely without any practice and still your video will look professional, as if it was edited in Adobe Premiere Pro. The platform takes your raw screen recording and transforms it into a polished tutorial by generating a professional video. It allows the subject matter expert to create on-brand videos extremely efficiently.
This whole approach lets your experts stick to what they do best: sharing their knowledge. They don’t have to become video editors overnight. They just demonstrate the steps, and the technology handles all the cleanup, delivering a polished, on-brand video in a tiny fraction of the usual time.
The Power of Effortless Video Creation
The real magic here is efficiency. When the person with the knowledge can also create the video, you cut out the painful, slow, and expensive handoff between them and a separate video team. This is a game-changer for getting timely content out the door.
Think about all the places this can make an impact:
- Demos and Onboarding Videos: Nail that first impression with clean, sharp walkthroughs for new users.
- Explainer Videos: Visually break down complex features into simple, digestible guides.
- Feature Release Videos: Rapidly produce high-quality announcements for every new update, showing people exactly what to do.
- Knowledge Base & Support Article Videos: Embed crystal-clear video tutorials directly into your support docs to slash ticket volume and help users help themselves.
Tutorial AI empowers your team’s experts to become efficient video creators. It turns their raw screen recordings into studio-quality tutorials, ensuring every video is on-brand, professional, and ready to publish in minutes, not days. This ability to turn expertise into a visual asset on the fly is a huge advantage. When you’re ready to make the jump from text to video, it helps to keep some best practices for creating effective explainer videos in mind to ensure your message lands perfectly.
For a deeper dive, our guide on how to create how-to videos covers the whole process. Combining your carefully crafted written instructions with a polished video creates an unbeatable learning experience, helping your users find success no matter how they prefer to learn.
Got Questions? Let’s Talk Through Some Common Sticking Points
Knowing the theory behind writing good instructions is one thing. Putting it into practice when you’re staring at a blank screen is another entirely. Over the years, I’ve seen the same questions pop up again and again from writers trying to build genuinely helpful guides.
Think of this as your go-to FAQ for those tricky, real-world scenarios. Getting these right can be the difference between a guide that helps and one that just adds to the confusion.
How Do I Know If My Instructions Are Actually Simple Enough for a Newbie?
The absolute best way to know for sure? Watch a real person try to use your guide. Seriously. Grab a colleague from a different department—someone who isn’t steeped in your project’s jargon—and ask them to follow your steps while you watch quietly.
This “over-the-shoulder” test is pure gold. You’ll immediately see where they hesitate, squint at the screen, or ask a question. Those are the spots where your expert assumptions have crept in.
If you can’t wrangle a live volunteer, try reading your instructions out loud. Does it sound like a normal human conversation, or more like a legal document? If it feels clunky or awkward to say, it’ll be even harder for a beginner to understand.
Remember, the goal isn’t just technical accuracy; it’s clarity. An instruction that’s 100% correct but completely baffling to a new user has failed its mission. Always spell out acronyms the first time and lean on simple, direct verbs like ‘Click,’ ‘Type,’ and ‘Select.‘
What’s the “Right” Number of Steps for a Tutorial?
There’s no magic number, but I live by this rule: ** one guide, one self-contained task**.
If you find your step count creeping past 10-12 steps, that’s a huge red flag. It probably means you’re trying to cram too much into a single article. A massive 25-step guide just looks intimidating and makes it easy for users to get lost partway through.
A much better approach is to break that monster task into smaller, focused guides. This makes each piece of content far more approachable and easier for people to find via search.
For instance, instead of one epic “Complete Your Profile Setup” guide, split it up:
- Part 1: How to Create Your Account
- Part 2: Choosing and Uploading a Profile Picture
- Part 3: Customizing Your Notification Settings
This modular structure respects the user’s time and lets them jump straight to the specific solution they need, without having to skim through a wall of text.
How Should I Handle Steps with Different Options or Paths?
Ah, the classic “if-then” scenario. This is where so many guides fall apart. When a user has to make a choice, you have to make their path crystal clear.
The trick is to state the condition before you give the instructions. Use formatting like subheadings or indented bullet points to create a clear visual separation between the different choices.
Here’s a clear way to handle a conditional step:
- Now, check if you are a new or existing user. If you are a new user, follow the next few steps below.
- If you are an existing user, you can jump ahead to step 6.
5a. For New Users: Type your email address into the Email field.5b. Next, create a strong password in the Password field.
This structure immediately tells people which instructions are for them, preventing them from heading down the wrong rabbit hole. For really complex workflows with multiple branches, don’t be afraid to include a simple flowchart or diagram. It can be a massive help for users trying to visualize the entire process before they dive in.
Turning your expertly written steps into polished video tutorials has never been easier. With Tutorial AI, you can transform a simple screen recording into a studio-quality guide in minutes, without any editing expertise.Create your first professional tutorial for free!