Ever find yourself thinking, "I wish I could just show them what's on my screen"? You're in the right place. This guide is your complete map for capturing anything on your PC, from a quick screenshot of an error message to a full-blown video tutorial. We'll cover the tools you already have and the ones worth getting when you need more power.
Your Launchpad for PC Screen Captures
Knowing how to grab a quick snapshot or record a short video of your screen is a modern-day superpower. It cuts through the noise. Instead of typing out a long explanation for a support ticket or a team chat, you can send a visual that gets the point across instantly. The good news? Your Windows PC is already loaded with free, capable tools to get you started.
We'll begin with the essentials that are built right into the operating system, like the trusty Snipping Tool and the surprisingly powerful Xbox Game Bar. These are fantastic for handling most everyday tasks without needing to install a single thing.
Think of it like this: do you need a still image or a video? The right built-in tool is just a keyboard shortcut away.
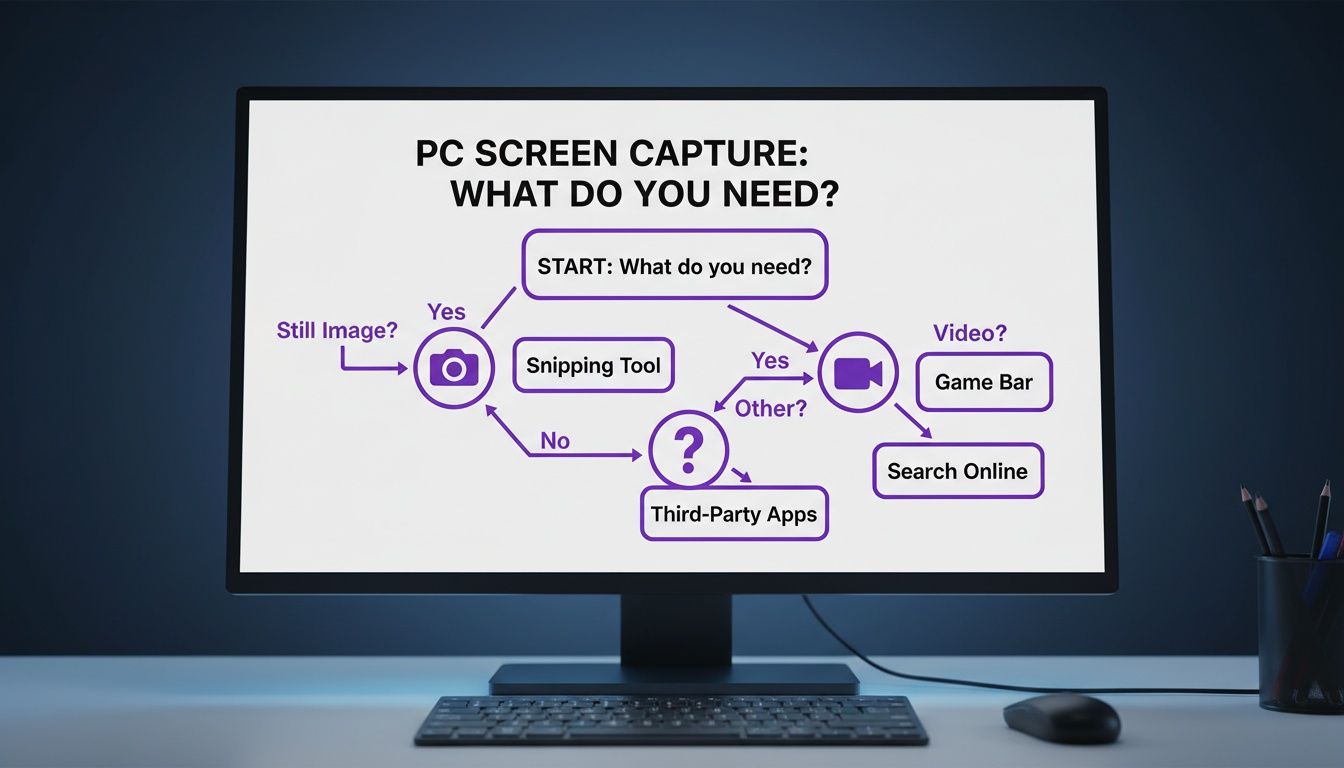
The biggest takeaway here is that for simple, immediate needs, you don't have to look far. Windows has you covered for both static images and video clips straight out of the box.
This isn't just a niche skill anymore. With the massive shift to remote work, the screen recording software market has boomed, with North America alone accounting for 35-40% of it. This was fueled in part by a 60% jump in video marketing between 2020 and 2023. People are communicating visually more than ever.
If you're just dipping your toes in, our guide on the best free screen capture software is a great place to find some excellent starting points.
But basic captures are just the beginning. The real growth is in professional use for training, tutorials, and virtual support, which now makes up over 55% of the market. And these users need more than just a simple recording. A staggering 70% of professionals look for tools that offer post-recording edits like cursor highlights and smart zooms to make their content clearer and more engaging. We'll dig into how you can achieve that polished look later on.
Mastering Screenshots with Built-In Windows Tools
Going beyond the basic Print Screen key opens up a surprisingly powerful set of tools that are already baked into your Windows machine. You can capture practically anything, from your entire multi-monitor setup down to a single tiny icon, without installing a shred of extra software. Let's dig into what your PC can already do.
The first simple upgrade to your screenshot game is Alt + Print Screen. This little combo is a lifesaver. Instead of grabbing everything, it intelligently captures just the active window. It's perfect for quickly sharing a specific app's settings or an error message without exposing your messy desktop or other open programs.
The Modern Shortcut: Snip & Sketch
If there's one shortcut you should commit to memory, it's Windows Key + Shift + S. This command is the fastest way to get a precise capture. It instantly dims your screen and brings up a small toolbar at the top, letting you decide exactly what to grab.
This overlay gives you a few handy options right away:
- Rectangular Mode: Your go-to for most things. Just click and drag to draw a box around what you need.
- Free-form Mode: Feeling creative? This lets you draw any shape you want to isolate something with an irregular outline.
- Window Mode: A personal favorite. Just hover over any open window and click once to capture it perfectly, even if it's not the one you're currently using.
- Full-screen Mode: Does exactly what it says on the tin, capturing the whole screen just like
Print Screenbut with more options afterward.
After you snip, the image zips right to your clipboard, ready to paste. You'll also get a notification; click it, and you can immediately mark up the screenshot with highlights, ink, and text before saving the final file.
When to Use the Classic Snipping Tool
While the Windows Key + Shift + S shortcut is fantastic for speed, the old-school Snipping Tool app has one killer feature the modern overlay lacks: a delay timer. This is the secret to capturing tricky on-screen elements that only appear when you're hovering your mouse over them, like a dropdown menu or a tooltip.
Set a delay for 3, 5, or 10 seconds, and you'll have just enough time to get your cursor in place and trigger the menu or pop-up before the screenshot is taken automatically. It's a simple fix for a really common frustration.
Think about it this way: you're making a quick "how-to" for a coworker. You could use the Window Snip to show them a specific settings panel. Or, if you're a designer pulling inspiration, the Free-form Snip is brilliant for grabbing just one cool element from a website for your mood board without any of the surrounding clutter. These built-in methods give you all the precision you need.
Recording Your Screen with Xbox Game Bar
Sometimes, a static screenshot just doesn't cut it. When you need to show a process, demonstrate a feature, or report a bug that involves multiple steps, video is the way to go. You might be surprised to learn that your Windows PC already has a great tool for this, and you don't need to install a thing. It's called the Xbox Game Bar, and despite the name, it's not just for gamers.
Before you can use it, it’s worth taking a second to make sure it's switched on. Just head into your PC's Settings, find the Gaming section, and you can toggle the Game Bar on if it isn't already.
Your First Screen Recording
Getting started couldn't be simpler. Just press the Windows Key + G shortcut. This brings up the Game Bar overlay, which appears right on top of whatever you're doing. You’ll see a few different panels, but the one you want is labeled Capture.
Inside that Capture panel is a record button (a little circle). Clicking it—or using the even faster Windows Key + Alt + R shortcut—starts recording immediately. You'll see a small timer pop up to let you know it's working. When you're done, just hit that same shortcut again to stop. Windows automatically saves your videos into a "Captures" folder inside your main Videos library.
One of the most useful features is the control it gives you over audio. You can easily record your microphone and the sounds from your computer at the same time. The Audio widget lets you tweak the volume for your apps, system sounds, and your mic, so you can get the balance just right. For a closer look at all the options, we've got a detailed guide on how to record on Windows 10.
This kind of built-in convenience is becoming more critical. The market for screen capture software is expected to hit USD 2,542.63 million by 2035, largely because of the shift to hybrid work. A massive 75% of enterprises now rely on these tools for everything from training to team updates. As market growth reports and their insights show, AI features are also playing a huge role, with some tools claiming to cut production time by up to 40%.
Practical Tips for Better Recordings
The Xbox Game Bar is fantastic for quick, no-fuss recordings, but it's important to know its limits. The biggest one is that it can only record a single application window at a time. It won't capture your entire desktop or the File Explorer, so plan your recording around the specific app you want to show.
My biggest piece of advice for anyone starting out: always do a quick test recording. Seriously. Before you spend 10 minutes recording a detailed tutorial, do a 15-second test to check your audio levels and video clarity. There’s nothing worse than finishing a perfect take only to realize your mic was muted the entire time.
For simple, on-the-fly video captures, the Game Bar is a powerful tool to have in your back pocket. It's the perfect choice when you need to show someone what's happening on your screen without the overhead of downloading and learning a whole new piece of software.
Turning Your Raw Footage into a Polished Video with Tutorial AI
So, you’ve captured your screen. That’s a great first step, but let's be honest—the raw footage is rarely ready for an audience. It’s usually full of those little hesitations, the "ums" and "ahs," long pauses, and the occasional misclick that can make even a short tutorial feel like a marathon.
This is where most people get stuck. You have two extremes: simple tools like Loom are quick and easy, but the final video is often 50-100% longer than necessary. On the other side, you have professional-grade software like Camtasia or Adobe Premiere Pro, which are fantastic but require expert video editing knowledge.

From Messy Recording to Professional Tutorial
This is exactly the gap Tutorial AI was built to fill. It's designed to generate polished video tutorials from your raw screen recordings. Tutorial AI's tools let you speak freely without any practice and still your video will look professional, as if it was edited in Adobe Premiere Pro. You can focus on sharing your expertise, knowing the final video will look professionally edited.
And this kind of efficiency is becoming more important every day. The screen capture market hit a massive USD 2.5 billion in 2024 and is expected to more than double to USD 5.1 billion by 2033. This boom is fueled by the rise of remote work and the endless demand for digital training. We're already seeing that 44% of companies report 32% faster editing by using AI tools for tasks like auto-transcription. The right tool really does make all the difference.
Tutorial AI allows the subject matter expert to create on-brand videos extremely efficiently. By cutting out the need for a separate video editor, it dramatically reduces production time and costs, allowing teams to create more high-quality content, faster.
This is a game-changer for creating all sorts of on-brand content based on screen recordings, such as:
- Demos and Onboarding Videos: Guide new users through your product with instructions that are both clear and concise.
- Explainer Videos and Feature Release Videos: Announce what's new with polished visuals that get people excited.
- Knowledge Base Videos and Support Article Videos: Build a library of helpful guides to answer common questions and make your customers happier.
Streamlining Your Post-Production Workflow
To take your raw footage from good to great, you can even use an AI Video Summarizer to quickly pull out the most important moments from a long recording. It’s a great way to identify the key takeaways before you even start fine-tuning the edit.
For more hands-on tips, you might find our https://www.tutorial.ai/b/quick-reference-guide for creating effective tutorial videos useful. When you combine smart recording with intelligent editing, any screen capture can become a truly valuable asset.
Pro Tips for Professional Screen Captures
Capturing your screen is easy, but creating a professional screen capture that’s actually helpful? That’s an art. The real difference between a confusing screenshot and a crystal-clear tutorial often boils down to a few small, but crucial, details. Getting these right can completely change how effectively you teach, train, or troubleshoot.
Set the Stage Before You Hit Record
Before you even think about hitting that capture key, take a minute to prepare your digital workspace. Think of it as setting a stage for your audience.
Clean Up Your Desktop: Nobody needs to see the dozens of random files cluttering your background. Hide your desktop icons and close any applications that aren't part of your demonstration. A clean, focused background keeps your viewer’s attention right where you want it.
Silence the Noise: There's nothing worse than a perfectly timed email or chat notification popping up mid-recording. Turn on Focus Assist on Windows (it's in your Action Center) to block all those distracting pop-ups. It’s a simple click that can save you from a major headache.
Dial In Your Capture Settings
Once your desktop is tidy, it's time to get the technical side sorted. The right settings make all the difference.
Get the Resolution Right: Stick to a standard 16:9 aspect ratio, like 1920x1080 pixels (Full HD). This ensures your video looks sharp and fits perfectly on most screens and platforms like YouTube without any of those ugly black bars.
Prioritize Clear Audio: You can have a beautiful 4K recording, but if the audio is scratchy, muffled, or full of background noise, people will tune out immediately. Position your microphone a few inches from your mouth, but slightly to the side, to avoid "plosives"—those harsh 'p' and 'b' sounds.
A quick 10-second test recording is your best friend. Listen back to it. Is your voice clear? Is the volume right? Can you hear the hum of your computer fan or your dog barking in the next room? This one tiny step can save you from having to re-record an entire session.
- Make Your Cursor an Actor: Is your audience supposed to follow your mouse? Most screen recorders let you highlight the cursor with a yellow circle or add a visual effect when you click. These little cues are fantastic for guiding your viewer’s eye and making your instructions impossible to miss.
Polish Your Capture After the Fact
The work doesn’t stop when the recording does. A little post-production polish can take a good capture and make it great.
For screenshots, annotations are your most powerful tool. A simple arrow, a numbered step, or a red box drawn around a key button provides instant context. Don't make your audience guess what they're supposed to be looking at.
When it comes to video, think about pacing. Edit out any dead air or long pauses. You can easily speed up monotonous parts, like waiting for a progress bar to finish loading, to keep your viewer engaged. Strategic zooms are also incredibly effective. When you're talking about a tiny button or a specific menu option, a slow zoom in focuses attention and leaves no room for confusion.
It’s this level of care—tidying your workspace, optimizing your settings, and adding a few thoughtful edits—that transforms a simple screen grab into a professional, high-impact piece of content.
Your PC Screen Capture Questions Answered
You've got the basics down, from simple keyboard shortcuts to more robust recording tools. But as with any tech skill, real-world questions pop up pretty quickly. Let's dig into some of the most common issues people run into when capturing their PC screen so you can troubleshoot on the fly.
How Can I Screenshot Just a Specific Part of My Screen?
Forget grabbing your whole screen and cropping later. The fastest way to do this is with the Windows Key + Shift + S shortcut.
As soon as you press it, your screen will dim, and a small menu will appear at the top. This brings up the Snipping Tool's capture mode, letting you click and drag to draw a box around exactly what you need. The moment you let go of the mouse, that selected area is copied to your clipboard, ready to paste into a chat, email, or document. It’s incredibly efficient for sharing just the important bits.
Why Is My Screen Recording Coming Out Black?
Ah, the dreaded black screen. It’s a classic issue, and it usually points to one of two culprits: graphics drivers or content protection. Before you do anything else, make sure your PC’s graphics drivers are fully updated. That alone solves the problem a lot of the time.
If you’re trying to record protected content from a streaming service, you’re likely running into Digital Rights Management (DRM), which is designed to prevent recording. For other apps, especially when using the Xbox Game Bar, make sure the window you want to record is active. Sometimes, you may need to dig into the app’s settings and disable "hardware acceleration" or switch from full-screen to a windowed display mode.
What Is the Best File Format for My Captures?
The format you choose has a big impact on the final quality of your work. Here’s a simple rule of thumb:
- For screenshots: Always go with PNG (Portable Network Graphics). It's a "lossless" format, meaning it preserves every single pixel perfectly. This is crucial for keeping text, icons, and interface elements looking crisp and clear.
- For screen recordings: Stick with MP4. It’s the universal standard for a reason. You get a fantastic balance of high-quality video without the massive file sizes, and it will play nicely on just about any device, platform, or editor you can think of.
Can I Record My Voice and Computer Audio Simultaneously?
Absolutely. Most modern recording tools, including the built-in Xbox Game Bar, are built to capture multiple audio streams at once. Inside the Game Bar’s audio settings, just make sure you select “All” to grab your microphone input along with all the sounds your computer is making.
Before you hit record on a long session, do a quick sound check. Make sure your mic is selected as the input source and isn't muted. This tiny habit can save you the headache of having to re-record everything.
One of the biggest hurdles after recording is the editing process. Raw footage captured with simple tools like Loom can easily be 50-100% longer than it needs to be. On the flip side, diving into professional software like Camtasia or Adobe Premiere Pro can feel like learning a whole new profession.
This is where a tool like Tutorial AI really shines. It's designed for subject matter experts who need to record their screen freely, without a script. The AI then steps in to trim, polish, and structure the video, giving it the professional feel of a project edited in Premiere Pro. It’s a game-changer for creating polished demos, onboarding guides, feature announcements, and knowledge base videos in a fraction of the time.
Ready to turn your raw screen recordings into professional tutorials effortlessly? Discover how Tutorial AI can help you create studio-quality videos in minutes. Learn more about creating polished tutorials.