
How do I add a video clip to a tutorial?
Insert another screen recording straight into your video with Clips — or place other footage, like a webcam intro or B-roll, on a slide.
How you add a clip depends on what it is:
- Another screen recording — a second take, extra steps you recorded separately, or a demo from another project. Insert it with Clips; it becomes part of your video with its own narration.
- Other footage — a webcam intro, a sign-off, or B-roll that isn’t a screen recording. Put it on a slide.
Adding another screen recording
- Record or upload the clip. Record it with the Desktop App, or upload the file — uploaded recordings are listed with your other screen recordings.
- Open Clips in the project and hover over the timeline. Click the + (Insert here) where the clip should play. To add it in the middle of a recording, split the clip there first.
- Choose Screen recording, pick the recording, and confirm with Insert video & open script. AI writes narration for the new clip.
To reuse a clip you already made in another project, choose From another project instead — it arrives with its narration, sync markers, and zooms. See Combine multiple recordings into one video for every option.
Replacing an outdated part of your video rather than adding to it? See Update or replace part of a recording.
Adding other footage on a slide
For footage that isn’t a screen recording, add a slide and put the video on it. The slide acts as a scene you can place anywhere in your script.
-
Upload the clip to your Asset Library. Open the Asset Library from the left navigation in the dashboard and use Upload media. You can also upload directly from a slide’s top toolbar — click the video button → Upload media.
-
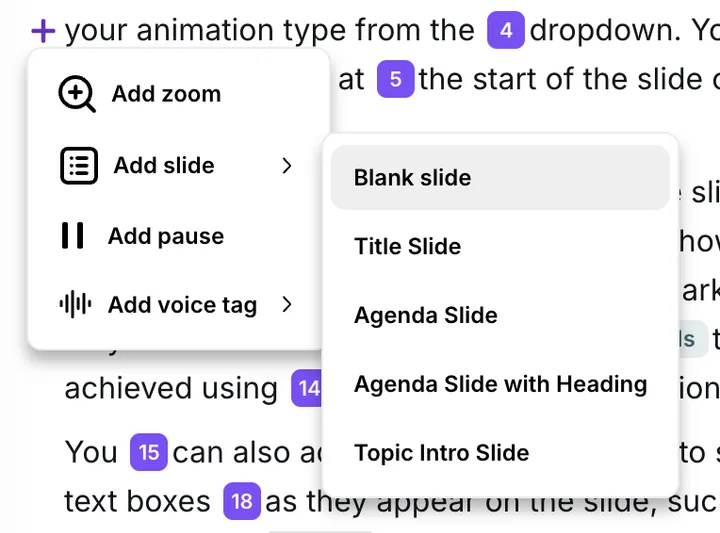
Add a slide where you want the clip to play. In your narration script, position your cursor where the clip should appear. Click the + button on the left, then choose Add slide → Blank slide.
- Drop the video onto the slide. With the slide selected, open the Video tab in the top toolbar and pick the clip from your Asset Library. Choose Full screen to make the clip fill the slide, or Split screen to keep it alongside other content.
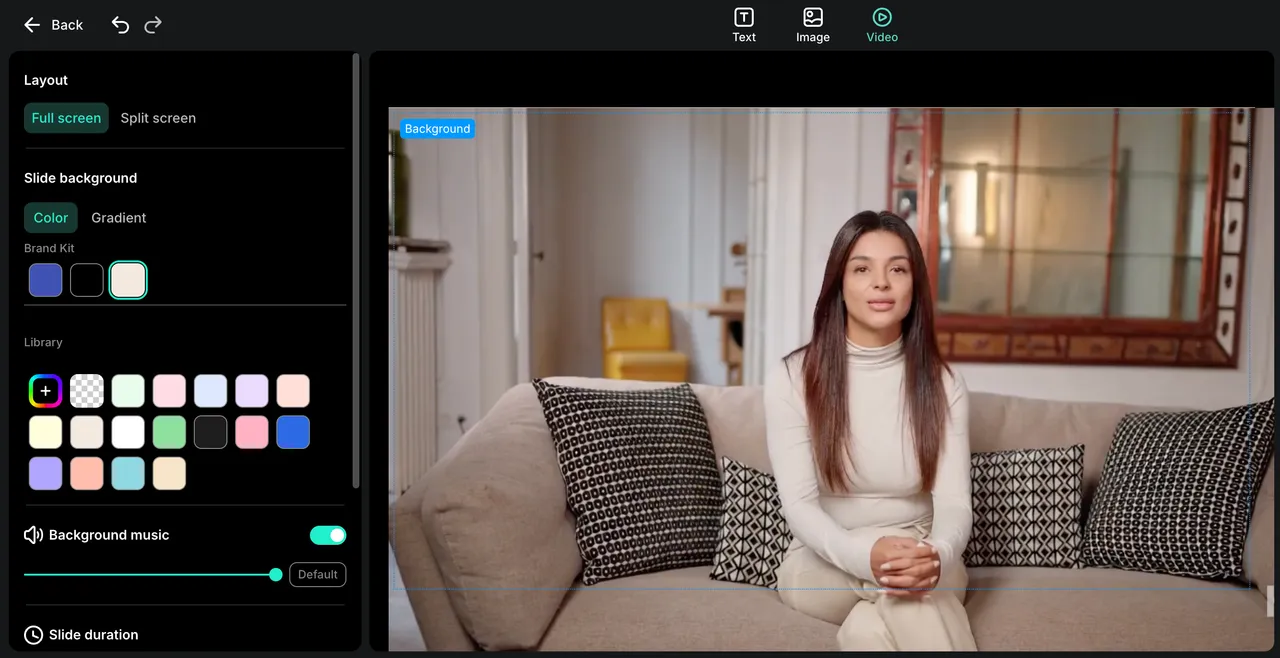
- Adjust the timing. The slide’s duration controls how long the clip plays. Write narration for the slide if you want the AI narrator to talk over it, or leave it silent to let the clip’s own audio carry the moment.
Inserting uploaded images and videos directly from your Library in Clips is coming soon.
Tips
- Match the setup for screen recordings. Record extra footage in the same app, window size, and theme as the original, then use a Direct Cut transition so the join looks seamless.
- Let a slide clip’s own audio play. If footage on a slide has audio you want to keep, leave the slide’s narration empty so the two don’t compete.
- Reuse across projects. Anything in the Asset Library is available in every project, so a webcam intro you recorded once can go into any future tutorial.