You finish a product demo, open the export window, and get hit with a wall of choices. H.264. AAC. VBR. Progressive. Bitrate. Keyframes. The problem isn’t just technical confusion. One wrong export can turn a sharp onboarding video into a soft, muddy mess once YouTube processes it.
That problem gets worse for tutorials and screen recordings. A talking-head clip can survive mediocre compression. A software demo can’t. If your menu text blurs, your cursor jitters, or your code window turns mushy, viewers feel it immediately.
Most advice on video specs for youtube stays generic. It tells you the platform accepts HD, likes MP4, and supports different frame rates. That’s useful, but it doesn’t answer the practical question business teams face: how do you export demos, walkthroughs, release videos, and knowledge base clips so the interface stays readable after YouTube re-encodes it?
Your Guide Through the Maze of YouTube Export Settings
The export dialog is where a lot of otherwise strong videos go sideways. A product marketer records a feature launch. A support lead finishes a help center walkthrough. A trainer edits an onboarding lesson in Camtasia, Premiere Pro, Descript, ScreenFlow, or Final Cut Pro. Then they stare at settings they only touch once a week and hope the preset is good enough.
Sometimes it is. Often it isn’t.
The biggest mistake I see is treating all video the same. Screen recordings behave differently from camera footage. Sharp lines, UI panels, browser tabs, code editors, and small text create compression stress in a way that a softly lit interview usually doesn’t. YouTube will process whatever you upload, but it can’t restore detail you threw away during export.
Practical rule: Export decisions should protect legibility first, then file size, then convenience.
That order matters for tutorials. If your viewer can’t read the button label or follow the cursor movement, the video has already failed, even if the upload finished quickly.
There’s another common trap. Fast recording tools are excellent for sending quick updates, but raw screen captures often include hesitations, dead air, repeated takes, and wandering mouse movement. That makes the final video longer than it needs to be. On the other side, full editing suites give you control, but they also assume you know what B-frames, scan types, and bitrate modes do.
Good exports come from understanding a few settings that matter and ignoring the rest. Resolution, aspect ratio, frame rate, codec, container, bitrate, and audio settings do most of the heavy lifting. Once those are right, YouTube has a much better source file to work with.
Quick Reference for YouTube Upload Specs 2026
A lot of bad YouTube exports happen in the last 30 seconds before upload. The tutorial is finished, the screen recording looked sharp in the editor, then someone picks a preset that shrinks text, muddies thin interface lines, or creates motion artifacts around the cursor. Use this table to avoid that.
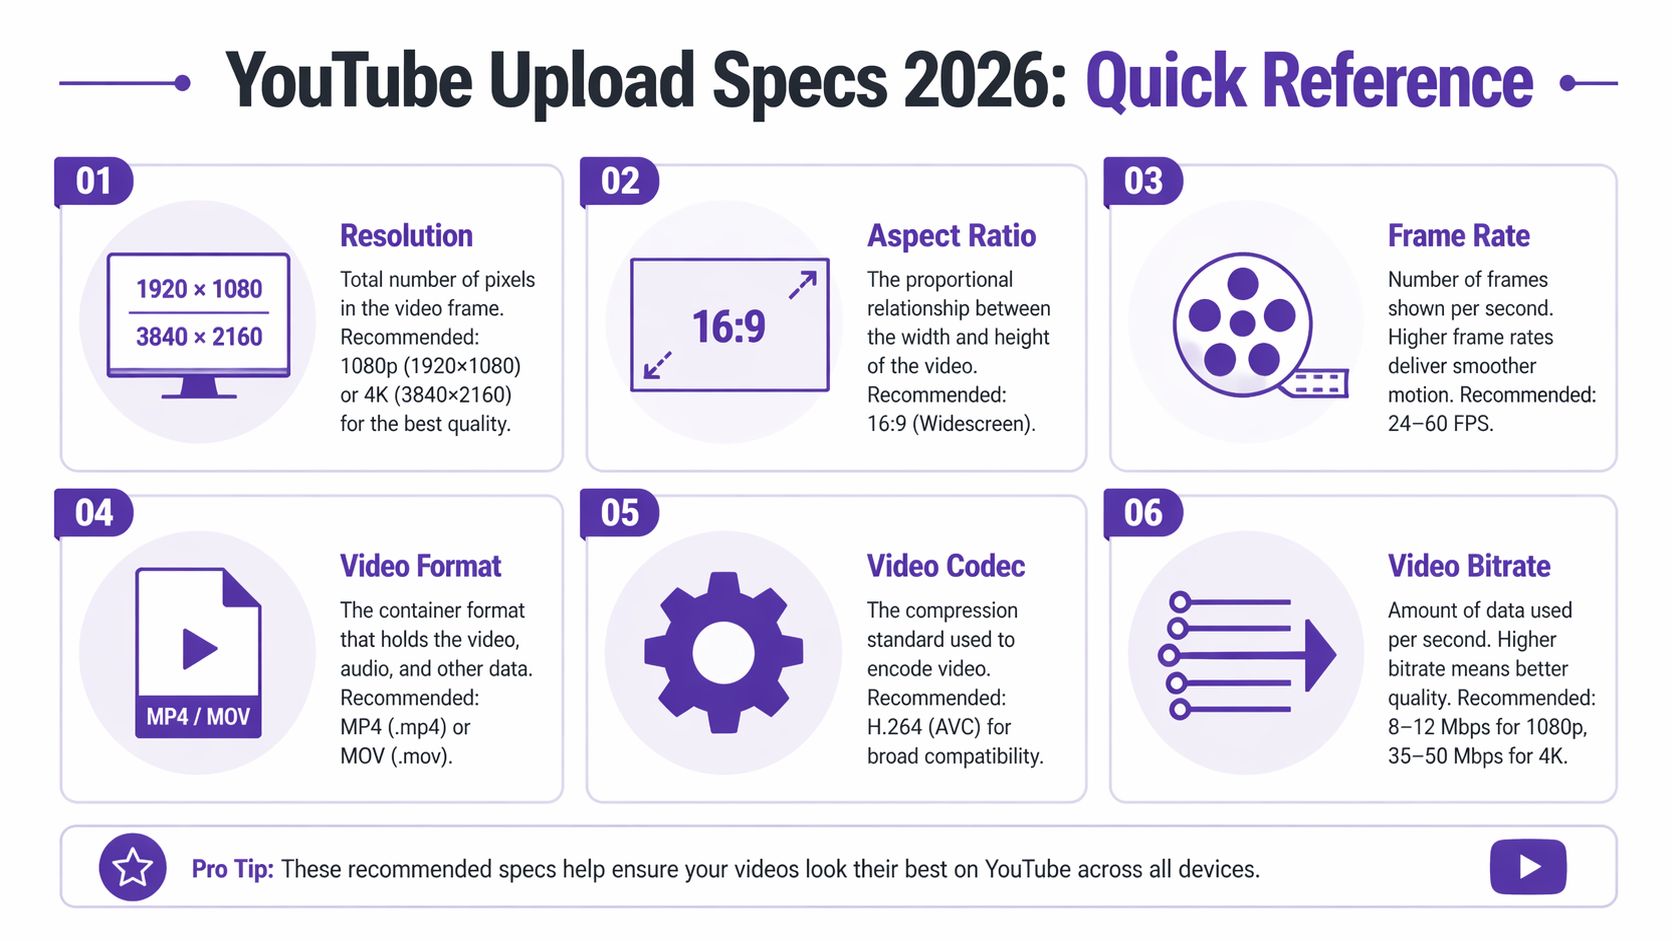
| Specification | 1080p (Full HD) | 4K (UHD) |
|---|---|---|
| Resolution | 1920x1080 | 3840x2160 |
| Aspect ratio | 16:9 | 16:9 |
| Container | MP4 | MP4 |
| Video codec | H.264 | H.264 |
| Audio codec | AAC-LC | AAC-LC |
| Audio sample rate | 48kHz preferred | 48kHz preferred |
| Frame rate | Match source, commonly 30 fps | Match source, commonly 30 fps or 60 fps |
| Bitrate mode | VBR | VBR |
| Suggested bitrate | Use a high-quality 1080p VBR export preset | Use a high-quality 4K VBR export preset while matching native capture |
For business tutorials, this format stack remains the safe default: MP4 container, H.264 video, AAC-LC audio, native frame rate, and VBR. If you need a quick refresher on how codecs affect quality and file size, this explanation of video codecs for creators covers the practical trade-offs.
The screen-recording wrinkle is clarity. Camera footage can hide mild compression. Product demos cannot. Menus, code, spreadsheets, browser tabs, and small UI labels expose weak exports fast, so the goal is not just compatibility with YouTube. The goal is preserving readable detail after YouTube re-encodes the file.
Vertical publishing needs a separate plan. If your team is cutting clips from a longer tutorial, this guide to YouTube Shorts is useful because Shorts follow a different publishing pattern than a standard 16:9 tutorial or support video.
Fast decisions that save time
- Use 1080p by default: It is still the right balance for most software tutorials, support videos, and training content.
- Move to 4K for dense interfaces: 4K helps when your recording includes small text, complex dashboards, or crop-ins during editing.
- Match the source frame rate: Screen captures recorded at 30 fps should usually stay at 30 fps. Exports at 60 fps do not create cleaner motion if the source was 30.
- Stay with MP4 and H.264: This keeps uploads predictable across editing tools and review workflows.
- Use VBR for uploads: It usually preserves sharp text and UI edges better than forcing a flat bitrate across the whole file.
Fundamental Video Specs Explained
The core of video specs for youtube comes down to three visible choices: resolution, aspect ratio, and frame rate. If these are wrong, no advanced encoding tweak will rescue the result.
According to Onlypult’s summary of YouTube video specifications, YouTube treats 16:9 as the standard aspect ratio for horizontal content, sets 1280x720 as the minimum for HD quality, supports resolutions from 426x240 up to 7680x4320, and places 1920x1080 in the sweet spot for most creators. The same source notes support for 24, 25, 30, 48, 50, or 60 fps, with MP4, H.264, and AAC-LC as the preferred format stack.
Resolution and why 1080p still wins
For business tutorials, 1080p is usually the right call. It gives you enough pixel density to keep interface elements readable without creating oversized files or slower upload cycles. That matters when your team publishes demos, feature announcements, or support explainers regularly.
Higher resolutions can look better, especially when you’re zooming into dense UI or exporting polished marketing tutorials. But higher resolution doesn’t fix a weak capture. If the source recording is soft, a larger export mostly gives you a larger soft file.
A simple approach is:
- 720p: Acceptable only if bandwidth or source limitations force it.
- 1080p: Best default for most tutorials and screen recordings.
- 1440p or 4K: Useful when the source is high quality and the interface needs extra sharpness on large screens.
If codec terminology still feels abstract, this primer on what a video codec is helps connect the export options to what occurs inside the file.
Aspect ratio and framing discipline
For standard YouTube uploads, record and export in 16:9 unless you have a clear reason not to. That shape fits the platform’s default player and avoids awkward letterboxing for normal desktop viewing.
Screen-recorded tutorials often fail before export because the presenter records a cluttered desktop. Notifications pop in, sidebars steal space, and the app window sits too small inside the frame. A good 16:9 export starts with a clean 16:9 composition during recording.
Clean framing beats brute-force resolution. A focused browser window at 1080p usually looks better than a busy desktop exported at a higher setting.
Frame rate and the feel of motion
Frame rate changes how movement looks. For tutorials, the key question is not cinematic style. It’s whether cursor motion, scrolling, dropdowns, and transitions feel clean.
Use the frame rate you captured natively. For many software walkthroughs, 30 fps is the practical default because it keeps cursor movement smooth enough without inflating file size. 60 fps can help for faster UI motion, gaming, or highly animated products, but it isn’t automatically better for every tutorial.
Advanced Encoding Settings for Optimal Quality
A tutorial can look sharp in the editor and still come out soft after upload. The usual cause is not YouTube “ruining” the file. It is an export that was acceptable for live-action footage but too weak for screen content, where small text, thin UI lines, and cursor edges expose compression problems fast.
For business tutorials, the safe baseline is still familiar. Export to MP4 with H.264 High Profile, progressive scan, AAC-LC audio at 48kHz, and variable bitrate. If you want a quick refresher on how the wrapper and compression method work together, this guide to the best video format for YouTube uploads gives the right mental model.
Codec and scan settings
H.264 remains the practical choice for standard YouTube delivery. It exports reliably from Premiere Pro, Final Cut Pro, DaVinci Resolve, ScreenFlow, and HandBrake. It also fits the upload path YouTube handles predictably. HEVC or H.265 can reduce file size, but that benefit matters more in storage or client delivery than in a normal tutorial publishing workflow.
Progressive scan matters a lot for screen recordings. Interlaced video can create edge shimmer and line breakup that might pass on talking-head footage but looks poor on menus, spreadsheets, browser tabs, and code editors.
Use this setup as a default:
- Container: MP4
- Video codec: H.264 High Profile
- Scan type: Progressive
- Chroma: 4:2:0
- Bitrate mode: VBR
- B-frames: Leave the standard encoder default if your software exposes it
Bitrate for screen recordings
Bitrate is where tutorial exports often fail.
For camera footage, compression can hide in texture and motion. For software demos, it shows up first in text, icons, side panels, and UI gradients. That is why generic bitrate advice often feels wrong for tutorial producers. A settings range that looks fine on a face-on-camera clip can leave a browser window looking muddy.
For 1080p at 30 fps, a practical starting point is VBR in the 8 to 12 Mbps range. That usually holds up well for product walkthroughs, slide-based lessons, dashboard tours, and LMS training videos. If the recording includes dense interfaces, small fonts, or frequent zooms into detailed panels, push toward the top of that range or test slightly above it.
More bitrate is not a magic fix. If the source capture is soft, scaled oddly, or recorded from a tiny app window stretched to full frame, a larger export just preserves those problems more faithfully.
Field note: Crisp tutorials come from the full chain. Clean capture resolution, sane scaling, readable UI size, and controlled bitrate all matter more than one oversized export number.
Audio settings that keep things simple
Audio should be stable and easy to process. Tutorial viewers will forgive plain sound faster than they will forgive inconsistent sound.
| Setting | Recommended choice |
|---|---|
| Audio codec | AAC-LC |
| Sample rate | 48kHz |
| Channels | Stereo unless you need a specific surround workflow |
For onboarding videos, internal training, and product education, clear narration beats heavy post-processing. Keep levels consistent, avoid clipping, and export in standard AAC settings that YouTube handles cleanly.
Understanding YouTube Container and File Limits
A lot of people use “file format” and “codec” as if they mean the same thing. They don’t. The container is the wrapper. The codec is how the video and audio streams are compressed inside that wrapper.
For YouTube uploads, MP4 is the default container because it’s widely supported, stable, and aligns with YouTube’s recommended encoding workflow. If your editor offers MP4 with H.264 video and AAC audio, you’re choosing the path with the fewest surprises.
There’s one small technical detail that matters more than it sounds. YouTube’s recommended upload settings call for an MP4 file with the moov atom at the front for fast start processing, as noted in the YouTube upload format guidance summarized here. Most modern export presets handle this automatically, but older tools and odd transcode pipelines don’t always.
Why this matters in practice
The container doesn’t make a blurry tutorial sharp. It does affect compatibility, upload behavior, and initial playback handling. If a team sends you a MOV, MKV, or another format from a mixed workflow, YouTube will often still process it, but MP4 tends to reduce friction.
A few practical habits help:
- Export from your editor directly to MP4: Avoid unnecessary intermediate conversions.
- Don’t re-save compressed files repeatedly: Each additional pass can soften detail.
- Check the final file, not just the timeline preview: Editors can look sharper in preview than the exported upload does.
Upload problems often begin before YouTube sees the file. They start with inconsistent handoffs between recorder, editor, and export tool.
For long internal trainings or webinars, file management also becomes an operational issue. Even when YouTube accepts the upload, giant files slow review cycles, approvals, and revisions. For business teams, a stable MP4 workflow keeps publishing predictable.
Optimizing Screen Recordings and Tutorials for Clarity
Screen recordings punish lazy export habits. Camera footage can hide a lot. Desktop video can’t. Every toolbar label, browser tab, side-panel icon, and settings menu tells on you when compression gets aggressive.
That’s why generic advice about video specs for youtube often misses the underlying issue. It assumes motion-heavy footage, not detailed interfaces. But tutorials are judged by legibility, not just overall visual smoothness.
Why text gets blurry so fast
The challenge comes from the nature of screen content. Software interfaces contain hard edges, tiny fonts, and large flat-color regions. Compression systems have to preserve those edges while YouTube also prepares the video for playback across different devices and bandwidth conditions.
The practical consequence is simple. If you export a screen recording too aggressively, the first thing you lose is often the exact thing your viewer came for: readable information.
Google’s YouTube help documentation, as summarized in this tutorial-focused breakdown, doesn’t go deep on screen recording specifics, which leaves many creators guessing. That summary highlights an important nuance: for low-motion tutorial content, a VBR of 5 to 8 Mbps for a 1080p video can often preserve sharpness without making files unnecessarily bloated.
What works better for demos and walkthroughs
For screen recordings, a good export starts before the export panel:
- Record a clean workspace: Close side apps, hide notifications, and enlarge the app window.
- Use deliberate zoom logic: Don’t rely on viewers to spot tiny UI changes on their own.
- Keep cursor movement controlled: Fast, erratic mouse movement creates avoidable visual noise.
- Match source and export settings: Don’t stretch a weak capture into a higher-resolution file and expect it to improve.
The second part is bitrate strategy. Tutorials often benefit from a bitrate choice tuned to low-motion, detail-heavy footage rather than one borrowed from gaming or cinematic footage. If the content is mostly a stable UI with voiceover, a well-chosen VBR can preserve text better than a generic export preset that was designed for broader use.
Common mistakes that make tutorials harder to watch
I see the same failures repeatedly in SaaS demos and support videos:
| Mistake | What happens |
|---|---|
| Recording the full desktop | The actual app becomes too small in frame |
| Exporting at a weak bitrate | Text and icons soften after upload |
| Using unnecessary motion effects | Cursor and zoom movement feel distracting |
| Over-sharpening to compensate | UI edges start to look harsh and artificial |
A solid workflow for tutorials values restraint. Keep the frame clean. Keep motion purposeful. Give the encoder enough data to preserve text. Then let YouTube do its job with a strong source file.
For a more recording-specific workflow, this guide to screen recording for tutorials is worth reviewing.
Creating Professional Tutorials Efficiently with Tutorial AI
There’s a production gap in tutorial video creation that is a common challenge. Lightweight recorders are fast, but they usually produce rough first takes. Full editing suites can absolutely produce polished results, but they also demand real editing skill and more time than most subject matter experts have.
That gap matters because the people who know the product best usually aren’t editors. They’re in support, product marketing, enablement, success, or training. They know what should be shown on screen. They just don’t want to spend their afternoon tightening cursor paths in Premiere Pro.
The trade-off most teams run into
Tools like Loom are excellent when speed matters more than polish. But casual recordings often come out 50 to 100% longer than necessary, based on the author’s brief for this article. People pause, restart thoughts, move the cursor while thinking, and leave in moments that would never survive a proper edit.
At the other end, tools like Camtasia and Adobe Premiere Pro offer serious control. The cost is complexity. Someone has to trim mistakes, clean pacing, align zooms, manage callouts, balance audio, and export properly. That’s manageable for a video editor. It’s not ideal for a product manager trying to ship a release video before lunch.
What efficient tutorial production actually needs
The best workflow for business tutorials usually includes these capabilities:
- Record naturally: The presenter should be able to speak freely without rehearsing every line.
- Edit by meaning, not by timeline: Text-based editing is much faster for non-editors than frame-by-frame trimming.
- Improve visual focus after recording: Cursor emphasis, smart zooms, and background cleanup matter a lot in software demos.
- Keep branding consistent: Support videos and onboarding clips shouldn’t feel disconnected from the rest of the company’s content.
The strongest tutorial workflows let the expert stay the expert. They don’t force them to become a part-time video editor.
That’s why AI-assisted tutorial production has become such a practical middle ground. It lets teams move beyond rough first takes without requiring full post-production expertise. For demos, onboarding videos, explainer videos, feature release videos, knowledge base clips, and support article videos, that’s often the difference between “we should make more video” and “we can.”
What polished looks like in practice
Professional tutorial videos usually feel simple on the surface. The cursor glides instead of shaking. Zooms arrive at the right moment. Pauses disappear. The pacing feels intentional. Brand styling stays consistent across intros, slides, captions, and transitions.
Those details are what make a support walkthrough feel trustworthy. They also determine whether viewers stay focused on the lesson or get distracted by rough execution.
Essential Specs Beyond the Video File
A strong YouTube upload isn’t just the exported video. The surrounding assets shape whether people click, understand, and continue watching.
Thumbnails and first impressions
Your thumbnail is the packaging. For tutorial channels, that usually means clear product visuals, readable text if you use text at all, and visual consistency across a series.
The practical rules are simple:
- Design for clarity: A thumbnail should still make sense when viewed small.
- Use one focal point: Too many UI elements create noise.
- Keep branding recognizable: Repeating layout logic helps viewers identify your videos quickly.
For tutorial content, thumbnails that mimic the actual software environment often work well because they set expectations accurately. If the video is a feature walkthrough, the thumbnail should feel related to that feature, not like a generic stock banner.
Captions, metadata, and rights management
Captions matter more for tutorials than many teams assume. Product names, menu labels, and technical terms are often misheard by automatic systems. Uploading your own caption file gives you more control over accuracy and improves the viewer experience.
Descriptions and chapters help too, especially for longer training content. A viewer who can jump directly to “user permissions,” “billing settings,” or “CRM sync” is more likely to get value from the video.
If your channel relies on original music, branded sound design, or licensed assets, rights management becomes part of the publishing workflow as well. Teams dealing with ownership and claims should understand how to maximize your YouTube Content ID royalties, especially if audio assets are part of a broader content operation.
End screens and cards that actually help
End screens and cards should continue the learning path. For tutorial channels, the best next step is usually another useful video, a product setup sequence, or a deeper related walkthrough.
A few practical choices work well:
- Link to the next logical tutorial: Keep users in the same workflow.
- Avoid irrelevant promotion: It interrupts learning momentum.
- Use consistent naming: Clear titles make follow-up choices easier.
The supporting assets should feel like an extension of the tutorial itself. Clean, helpful, and easy to understand.
YouTube Live Streaming Specifications
Live streaming changes the job. With pre-recorded uploads, you can fix mistakes before export. With live video, your encoder, connection, and platform settings have to work in real time.
For YouTube Live, the practical baseline is straightforward. The verified guidance above notes that live stream minimums align at 720p at 30 fps, while 1080p at 60 fps is a recommended target for higher-motion live content. That creates a useful decision point for business teams.
Choosing between stability and motion
If you’re streaming a webinar, product tour, Q&A, or training session, 720p at 30 fps is often the safer choice when stability matters most. It’s usually enough for presenters, slides, and moderate screen sharing.
If you’re streaming gameplay, highly animated interfaces, or very fluid motion, 1080p at 60 fps can produce a cleaner experience when your setup can support it consistently. The key phrase is “consistently.” A theoretically better stream that stutters is worse than a lower setting that holds.
Live settings that matter most
Streaming software like OBS Studio, StreamYard, vMix, or Ecamm Live exposes a lot of controls. You don’t need all of them. Focus on these:
- Match output resolution to the actual show format: Don’t upscale a weak source.
- Use a stable frame rate: Avoid changing it mid-workflow.
- Stick with standard codecs and containers where the tool expects them: Reliability matters more than experimentation during a live event.
- Test screen-sharing readability before going live: Small text that seems readable on your monitor can become hard to parse for viewers.
For live tutorials, readability beats ambition. A stable stream that keeps the interface clear will outperform a more aggressive setup that drops quality under pressure.
The safest rehearsal is a private or unlisted test stream. Check text clarity, cursor visibility, audio sync, and scene changes before the public event.
Frequently Asked Questions on YouTube Specs
Should you upload 4K if your source is only 1080p
Usually no. A 1080p screen recording exported to 4K does not gain real detail, and for tutorials that matters because UI text, icons, and fine interface lines need native sharpness, not a larger file. If the original capture was soft, scaled, or recorded from a browser zoom level that made text small, a 4K export only preserves those problems at a higher resolution.
There are edge cases. Some teams upload higher-resolution exports to influence YouTube’s processing and get a cleaner result after compression, but that only helps if the source was captured cleanly in the first place. For business tutorials, the better use of time is to capture at the right resolution, keep text large enough on screen, and export without unnecessary scaling.
Progressive or interlaced
Choose progressive. YouTube expects progressive video, and it is the right format for screen recordings because interlacing introduces combing and edge artifacts that show up fast on menus, spreadsheets, code editors, and thin UI lines.
For tutorials, progressive video also keeps cursor movement and text transitions cleaner during platform processing. If your editor or capture tool still exposes interlaced options, ignore them for YouTube uploads.
What color settings should most creators use
For standard business tutorials, use Rec. 709 color for SDR delivery and keep the full workflow consistent from capture through export. That is the safe default for YouTube, for desktop screen recordings, and for tutorial footage that mixes app interfaces, webcam shots, slides, and browser windows.
Also pay attention to gamma and range handling. A common problem in tutorial production is not “wrong color grading.” It is mismatched interpretation between the screen capture app, the editor, and the export settings, which can make whites look dull, blacks look lifted, or interface grays look muddy. If your software gives you a choice, stick to standard SDR settings and avoid unusual HDR or wide-gamut exports unless you have tested the full path and know how YouTube will display it.
For screen tutorials, consistency matters more than style. A neutral Rec. 709 export preserves brand colors predictably and keeps UI contrast readable, which is more useful than aggressive grading on software footage.
What happens if your file doesn’t match ideal specs
YouTube will process many files that are less than ideal, but it will not repair weak source quality. If your upload starts with soft text, low-bitrate screen capture, scaling artifacts, or cluttered frames, YouTube compression usually makes those flaws easier to see.
That is why tutorial producers should treat the upload spec as the final checkpoint, not the rescue step. Capture clearly, size the interface for readability, export with sensible settings, and give YouTube a strong master file to work from.
If your team makes demos, onboarding videos, feature release explainers, or support tutorials, Tutorial AI is built for that exact workflow. You can record your screen, speak naturally without over-rehearsing, and turn the raw take into a polished, on-brand video without doing expert timeline editing in Premiere Pro or Camtasia. It’s a practical way to create professional tutorial videos fast, especially when the subject matter expert needs to own the content without becoming a full-time editor.