Learning how to screen record on a PC is one of those skills that has quietly moved from a “nice-to-have” to a “must-have” in the modern workplace. It’s no longer just for IT support. We’re talking about creating clear, effective visual content for just about anything—training new team members, demoing a product, or walking a customer through a fix.
Why Mastering Screen Recording Is a Game Changer
Let’s be honest: showing is almost always better than telling. A quick video can cut through the noise and explain a complex process far better than a long email or a dense document ever could. It’s an essential tool for anyone who needs to communicate with clarity.
The market backs this up. The screen recording software industry isn’t just growing; it’s exploding. It jumped from $9.58 billion to a predicted $10.92 billion in just one year, which is a massive compound annual growth rate (CAGR) of 14.0%. With North America holding 49% of the market share, it’s clear that businesses are all in on video. For anyone in training, L&D, or customer support, this isn’t just a trend—it’s a fundamental part of the job now. You can dig into more of the global market data over at giiresearch.com.
From Simple Clips to Polished Productions
Screen recording tools have come a long way. We’ve gone from clunky, built-in options to a whole ecosystem of powerful software. Think about how a great screen recording can make a real difference in day-to-day work.
- Slash Support Tickets: Imagine a support team building a library of quick, focused videos answering the top 10 most common customer questions. This frees up agents to handle the truly tricky issues.
- Close Deals Faster: A sales engineer sends a prospect a personalized demo that hones in on the exact features they asked about. That’s far more impactful than a generic, one-size-fits-all presentation.
- Streamline Employee Onboarding: An HR or IT team creates a polished set of videos walking new hires through everything from setting up their email to navigating internal software. Everyone gets a consistent, smooth start.
These aren’t just hypotheticals; they’re happening every day. But getting from a raw, messy recording to a polished, professional video can feel like a huge leap. If you want to go deeper into creating top-tier instructional content, our guide on screen recording for training is a great place to start.
Bridging the Gap Between Simplicity and Professionalism
Here’s the classic dilemma: you either get easy-to-use tools that produce clunky results, or you get professional tools with a ridiculously steep learning curve.
Quick-and-dirty tools like Loom are great for firing off a fast message, but the final videos are often 50-100% longer than necessary, full of “ums,” pauses, and re-dos. On the other end, you have powerhouse editors like Camtasia or Adobe Premiere Pro. They can produce stunning results, but they require serious video editing skills that most subject matter experts simply don’t have the time to learn.
This guide is here to help you navigate that gap. I’ll show you how to capture your screen cleanly and introduce you to new workflows that can deliver that polished, professional look without the headache.
Instant Recording with Built-In PC Tools
Sometimes you just need to record your screen right now. You’re not looking to download, install, and learn a whole new piece of software. For those moments, Windows has a surprisingly decent tool baked right in: the Xbox Game Bar. It’s easily the fastest way to get a screen recording done on a PC without any prep work.
Getting it running is a breeze. Just hit the Windows key + G on your keyboard. An overlay pops up with several “widgets,” and from there, you can hit record, capture your microphone, and tweak audio levels. Once you stop, your video is automatically saved in the Captures folder inside your main Videos library, ready to go.
But what are you recording for? The “why” behind your recording—whether it’s for troubleshooting, training, or something else—really dictates the tool you should be using.
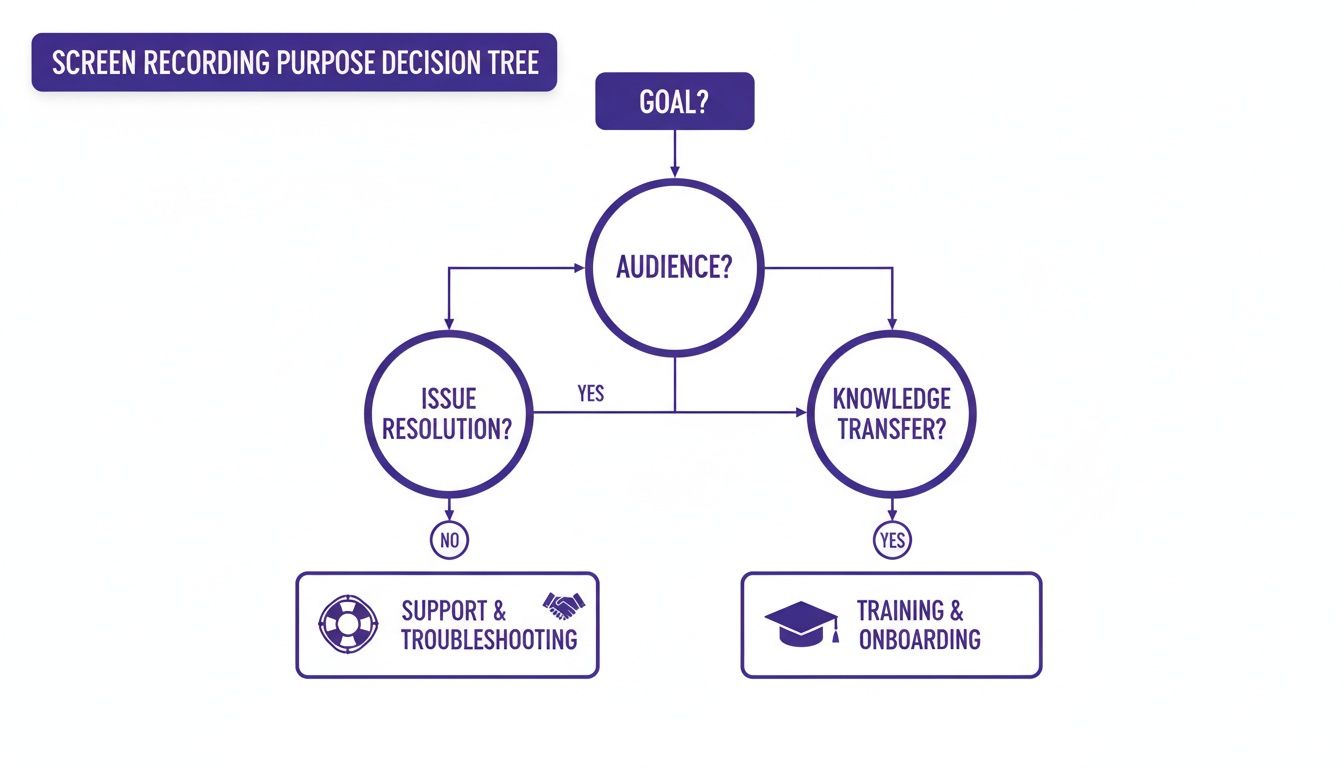
As you can see, a quick bug report has very different needs than a detailed onboarding tutorial. The complexity of your goal should guide your tool choice.
Working Within the Game Bar’s Limits
The Xbox Game Bar is great for its speed, but it comes with some serious strings attached. The biggest one? It can only record one application window at a time. That means it cannot capture your full desktop or even the File Explorer.
This is a common frustration when trying to create a tutorial that involves more than one step. If you need to switch between programs or show someone where to find a file, the Game Bar just stops recording. To get around this, you have to plan your entire workflow to take place inside a single window, which isn’t always practical.
My Pro Tip: Before you even think about hitting record, get your application window sized and positioned exactly how you want it. This saves you a ton of time trying to crop things later and makes the final video look clean and intentional right from the start. Audio is another thing you need to wrestle with. The Game Bar grabs all your system sounds by default, which can make for a noisy, distracting video. You’ll want to make sure your own voice comes through loud and clear. For a deep dive on getting this right, check out our guide on how to screen record with sound for a full audio setup walkthrough.
Choosing the Right Screen Recording Tool
So, when should you stick with the Game Bar versus grabbing a more specialized tool? It really boils down to matching the tool to the task. If you’re making a quick, informal clip of a single app, the Game Bar is your best friend.
But the moment your needs get more complex, you’ll feel its limitations. To help you figure out what’s best for your project, let’s compare the options we’re covering.
| Feature | Xbox Game Bar (Built-in) | OBS Studio (Advanced) | Tutorial AI (AI-Powered) |
|---|---|---|---|
| Best For | Quick, simple clips of a single app or game. | Complex, multi-source recordings and live streaming. | Professional demos, training, and knowledge base videos. |
| Ease of Use | Very Easy | Difficult (Steep learning curve) | Very Easy (Doc-like editing) |
| Desktop Capture | No | Yes | Yes |
| Editing | None | Limited (Requires other software) | Advanced AI editing built-in |
| Cost | Free (Included in Windows) | Free (Open-source) | Free and Paid Tiers |
Think of the Xbox Game Bar as a great entry point. It teaches you the basics of screen recording without any cost. But when you find yourself needing to create polished, multi-step tutorials or professional demos, that’s your cue to level up to a more powerful solution.
Gaining Full Control with Dedicated Software
When a quick capture isn’t enough, and you need more polish, it’s time to move beyond the built-in tools. Dedicated software to screen record on a PC offers a level of precision and flexibility that tools like the Xbox Game Bar simply can’t provide. If you’re serious about creating high-quality, professional-looking content—especially without a budget—OBS Studio is the undisputed king.
OBS is a free, open-source powerhouse that puts you in the director’s chair. Forget being stuck recording just one app. With OBS, you build “scenes” by layering different “sources”—your application window, your webcam feed, a browser, images, and your microphone. You can arrange them all perfectly, creating a single, cohesive video.
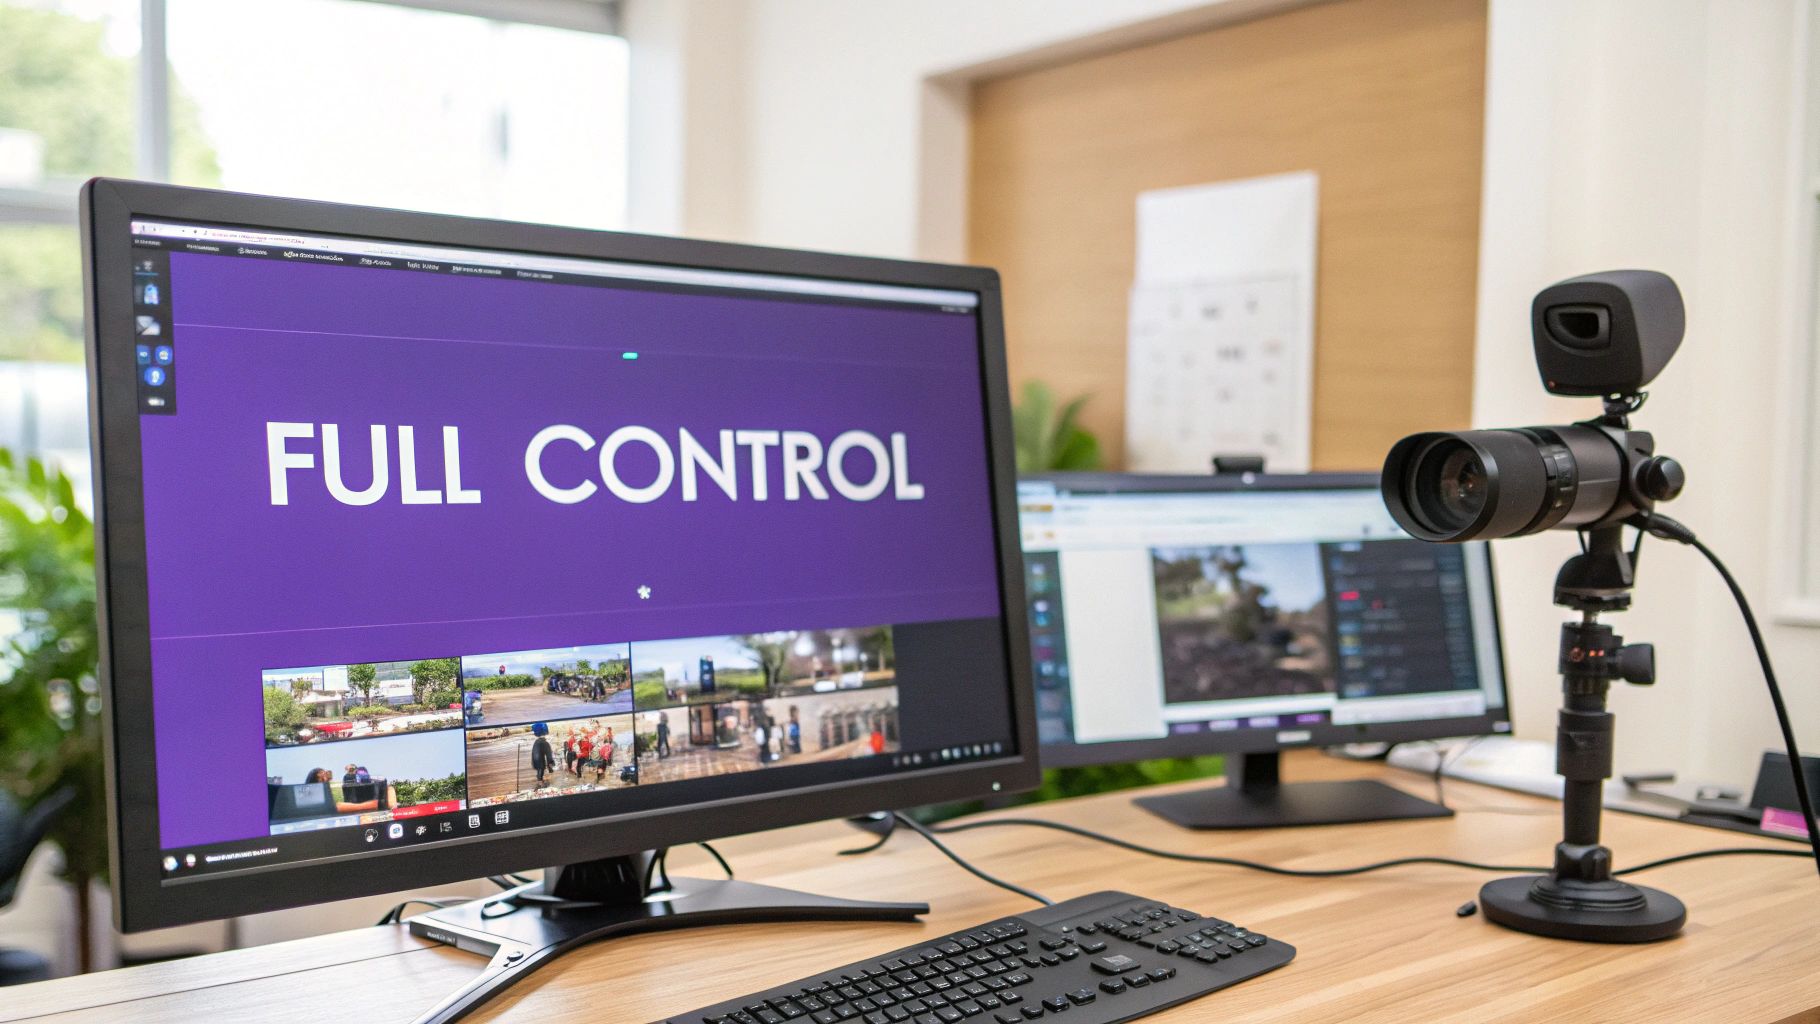
This kind of granular control is what separates a quick, throwaway clip from a polished, professional tutorial. You can position elements precisely, switch between different layouts on the fly, and manage every audio track independently.
Dialing in Your Recording Settings
Jumping into OBS for the first time can feel a little intimidating, but you can get 90% of the way to a fantastic recording by focusing on just three key areas. Getting these right from the start will save you from the headache of a pixelated or choppy final video.
- Resolution & Frame Rate: For most software demos and tutorials, 1920x1080 (1080p) is the gold standard. A frame rate of 30 FPS is perfectly smooth for most screen recordings. If you’re capturing fast-paced action like gaming, bumping it up to 60 FPS will deliver that extra-slick feel.
- Bitrate: Think of bitrate as the data rate for your video—higher means better quality. For a crisp 1080p recording at 30 FPS, aim for a video bitrate between 4,000 and 6,000 Kbps. If you’re recording at 60 FPS, you’ll want to increase that to 6,000–9,000 Kbps to keep things looking sharp.
- Output Format: While OBS gives you options, MP4 is your best bet. It’s universally compatible, making it easy to upload to YouTube, Vimeo, or just share directly with colleagues.
If you’re curious about other tools, our guide to the best free screen capture software breaks down even more options.
Mastering Your Audio Mix
A great visual presentation can be completely derailed by bad audio. Whether it’s system dings drowning out your voice or your microphone being too quiet, a poor audio mix is a fast way to lose your audience’s attention. This is where the OBS audio mixer becomes your best friend.
I’ve seen this countless times: creators leave all audio at default levels. A simple pro tip is to immediately lower your “Desktop Audio” track to around -20 dB while keeping your microphone closer to 0 dB. This one tweak ensures your voice is front and center, with application sounds serving as quiet background context instead of a jarring distraction. The mixer lets you control the volume of every single source independently—your mic, desktop audio, even a specific music app. You can also add audio filters, like noise suppression to eliminate background hum or a compressor to make your voice sound more consistent. Taking just a few minutes to dial in your audio mix will dramatically elevate the quality of your screen recordings.
The AI-Powered Future of Screen Recording
While a powerhouse tool like OBS gives you incredible control, it also leaves you with a raw video file. That’s where the real work begins—hours spent in complex editors like Camtasia or Adobe Premiere Pro. But what if you could skip that whole post-production headache and still get a studio-quality tutorial? That’s exactly what AI-powered workflows are making possible.
This isn’t just a small shift; it’s part of a massive trend. The screen recording market, already valued at $9 billion, is expected to explode to $30.1 billion by 2034, growing at a 14.3% compound annual rate. That growth isn’t just from more people hitting “record”—it’s fueled by smarter tools. AI-driven editing and cloud-based capture are already slashing post-production time by 50-70%. You can dig into the full market analysis over at ResearchAndMarkets.com.
This move toward radical efficiency is where platforms like Tutorial AI are changing the game. It is designed for generating polished video tutorials from simple screen recordings, perfect for creating demos, onboarding videos, explainer videos, feature release updates, knowledge base content, and support article videos.
From Raw Recording to Polished Video, Instantly
Let’s be honest: raw screen recordings are often bloated. An easy-to-use tool like Loom is great for speed, but the resulting videos are often 50-100% longer than necessary, filled with ums, ahs, and long pauses. On the other hand, professional software like Camtasia or Adobe Premiere Pro requires expert video editing knowledge.
Tutorial AI’s tools bridge this gap. You can speak freely without any practice, and your video will still look professional, as if it were edited in Adobe Premiere Pro.
The moment you hit stop, the AI takes over. It automatically:
- Strips out filler words like “um” and “uh.”
- Trims away awkward silences and dead air.
- Deletes mistakes and repeated phrases.
In minutes, you get a tight, professional video that looks like it took hours to edit. This allows the subject matter expert to create on-brand videos extremely efficiently, without needing to hand off the recording to a video specialist.
This workflow empowers the person with the knowledge to also be the creator. It closes the gap between expertise and professional video production, making it possible for anyone to create on-brand, high-quality content extremely efficiently.
Editing Your Video Like a Document
Maybe the biggest leap forward AI brings is a totally new way of editing. Instead of fiddling with complex timelines and audio waveforms, Tutorial AI lets you edit your video like a text document.
The platform transcribes your audio, and you just edit the text.
Want to remove a sentence? Just delete it from the script, and the corresponding video and audio are gone instantly. Need to change what you said? Simply type the new words. The platform generates new narration in a lifelike AI voice that matches your own, perfectly syncing it to the video.
This approach is a game-changer for creating all kinds of professional content:
- Product Demos: Show off new features without worrying about a flawless take.
- Onboarding Videos: Build a consistent and clear training library for new team members.
- Explainer Videos: Break down complex ideas into simple, visual guides.
- Knowledge Base Videos: Create a robust library of video support articles to reduce support tickets.
This doc-like workflow takes the fear out of recording. You can just speak naturally, knowing any little slip-up can be fixed with a few keystrokes. This trend of AI simplifying complex tasks is happening everywhere; seeing how the best AI-Powered Marketing Tools are automating other workflows gives you a sense of where this is all heading. Ultimately, the focus shifts from a perfect performance to clear communication, letting you concentrate on what really matters: sharing your knowledge.
Polishing and Sharing Your Final Video
Hitting “stop record” is really just the beginning. The raw footage is your foundation, but the real magic happens in post-production. This is where you transform a simple screen capture into a polished, professional, and trustworthy piece of content that actually gets your point across.
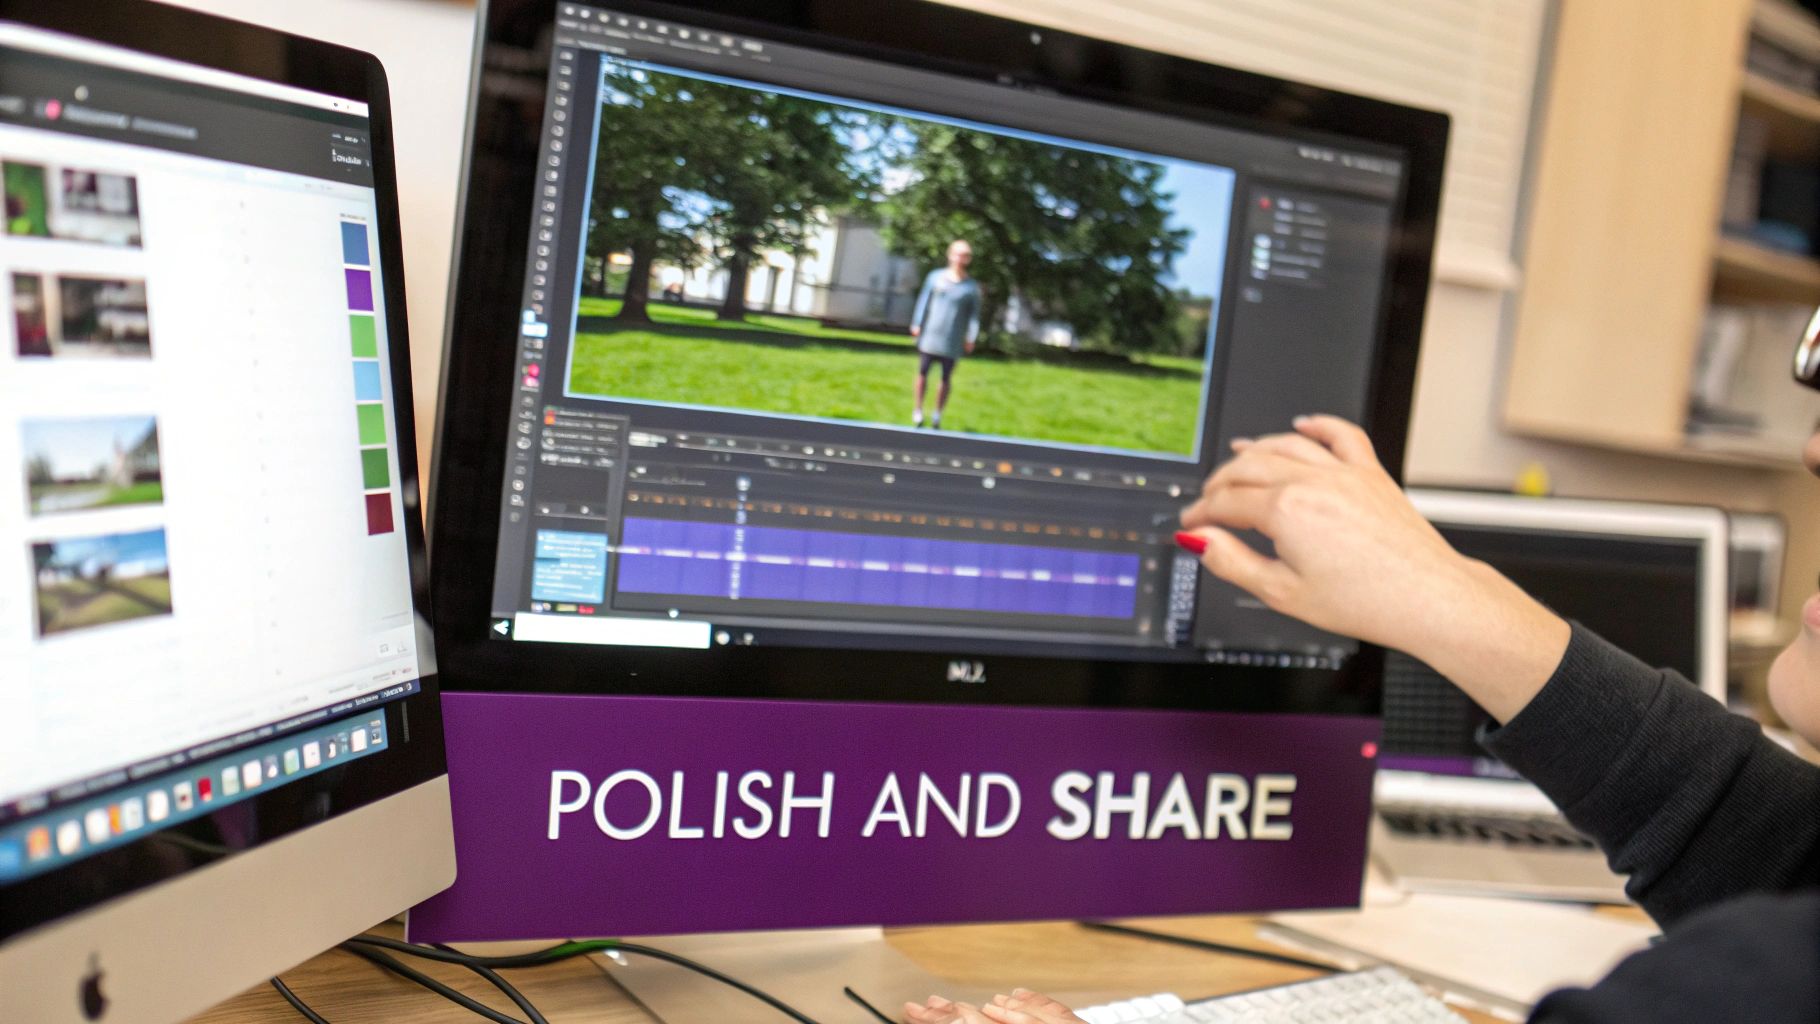
Think of it this way: this final stage isn’t just about making things look nice. It’s about building trust and making your video accessible to a wider audience. Small touches like adding your company logo, creating a consistent intro, or blurring out sensitive information can completely change how people perceive your work.
Essential Enhancements for a Professional Look
Before you share your video with the world, a few key enhancements can make a huge difference. These additions don’t just add clarity; they show your audience that you respect their time.
- Add Captions and Translations: This is a no-brainer. You immediately open up your content to a global audience and anyone with hearing impairments. Plus, since so many people browse with their sound off, captions are critical for engagement.
- Apply Brand Elements: Consistency is key. By incorporating your company’s logo, colors, and fonts, you reinforce your brand identity and make your content instantly recognizable.
- Blur Sensitive Information: This one is non-negotiable. Always protect privacy by blurring personal details, customer data, or internal system info. It’s a must for any video shared publicly or even internally for training.
The need for high-quality, accessible video content has exploded, especially with the boom in online education where enrollments have jumped by 200%. This shift has driven a 40% spike in demand for features like closed captions and multilingual dubs, catering to diverse, global teams. As the industry heads toward an $18.25 billion valuation by 2029, expect to see advanced features like AI noise suppression and smart zooms become standard.
Strategic Distribution for Maximum Impact
Once your video is polished and ready, you need to get it in front of the right people. How you share your recording is just as important as how you made it.
Your first decision is the file format. For most people, MP4 is the way to go. It’s the universal standard, offering a great balance of quality and file size that works on just about any platform or device. While MOV is a high-quality option, especially in the Apple ecosystem, its larger files can be a pain for web sharing.
Choosing your distribution channel depends entirely on your audience. An internal knowledge base or Learning Management System (LMS) is perfect for employee training, while a platform like YouTube is better for broad public outreach or marketing content. If you’re embedding videos directly into websites, knowledge base articles, or sales proposals, always use an embeddable player. It creates a seamless experience and keeps viewers right where you want them—on your page.
Optimizing for Different Platforms
Your sharing strategy needs to change depending on where you’re posting. A video for an internal team has very different needs than one blasted out on social media.
For example, if you’ve created a slick product demo, understanding how to effectively share videos on LinkedIn could be the difference between landing a new client and getting lost in the feed.
Here are a few platform-specific tips to keep in mind:
- YouTube: Focus on a strong title, a keyword-rich description, and a custom thumbnail that grabs attention. This is all about discoverability.
- Internal LMS: Make sure the video format is compatible with your system. If your platform supports it, consider adding interactive elements like quizzes to boost engagement and retention.
- Sales Proposals: Use a clean, ad-free player. You want the prospect’s focus to be entirely on your product demo, which reinforces a professional and confident image.
Got Questions? We’ve Got Answers
Diving into screen recording often brings up a few common questions, especially when you’re trying to get things just right. Whether you’re making your first recording or trying to level up your quality, let’s clear up some of the most frequent queries.
What Gear Do I Actually Need to Start?
Honestly, you probably have everything you need right now. For a basic screen capture, your PC is enough. Windows has the Xbox Game Bar built right in, so you can start recording in seconds.
But if you want to create something more polished and professional, a couple of extra pieces make a world of difference:
- A Webcam: Your laptop’s built-in camera works, but a dedicated external webcam will give you a much crisper, clearer picture. It’s a must-have for adding that personal touch to your videos.
- A Microphone: This is the big one. Clear audio is non-negotiable. A decent USB microphone will be a massive upgrade over your computer’s built-in mic, cutting out background noise and making your voice sound rich and clear.
That’s really it. With your computer, a webcam, and a solid mic, you’re all set to produce high-quality screen recordings.
What’s the Best Screen Recording Software for a Total Beginner?
When you’re just starting out, you want a tool that’s straightforward and doesn’t get in your way. The Xbox Game Bar (just press Win + G) is the easiest place to begin. It’s already on your PC, and it’s perfect for recording a single app without any fuss.
If you want something a bit more capable but still incredibly simple, check out Loom. It has a super clean interface and makes sharing your videos effortless, which is great for quick how-to guides or video messages for your team.
The goal for any beginner should be to just start creating. Pick a simple tool to get comfortable and build some momentum. You can always graduate to more powerful software like OBS Studio or Tutorial AI once your projects get more ambitious.
How Can I Record My Screen for Free Without a Watermark?
Nothing ruins a good video like a big, ugly watermark plastered across it. The good news is, you don’t have to pay to get a clean recording.
OBS Studio is the undisputed king of free recording software. It’s open-source, packed with professional features, and has zero watermarks or time limits. It does have a bit of a learning curve, but what you get for free is truly incredible.
For a much simpler route, the Xbox Game Bar is again a fantastic choice. It’s 100% free, built into Windows, and gives you a perfectly clean, watermark-free video of whatever app you’re recording.
What Are the Go-To Settings for a High-Quality Recording?
Getting that crisp, professional look is all about a few core settings. Your specific hardware might change things slightly, but these are the industry standards you should aim for.
- Resolution: Stick with 1920x1080 (1080p). This is the sweet spot for HD video that looks great without creating massive files.
- Frame Rate (FPS): For most tutorials and presentations, 30 FPS is all you need for smooth motion. If you’re recording something fast-paced like gaming, bump it up to 60 FPS to capture every detail.
- Bitrate: This controls the video’s data. For a 1080p recording at 30 FPS, a bitrate between 4,000 and 6,000 Kbps is perfect. For 60 FPS, you’ll want to aim for 6,000 to 9,000 Kbps.
- Audio Sample Rate: Always set your microphone to 48 kHz. This ensures your audio is high-quality and stays perfectly in sync with your video.
Nailing these settings before you record is the secret to a polished video that doesn’t require a ton of fixing later.
Ready to skip the tedious manual editing and create polished, on-brand videos in a fraction of the time? With Tutorial AI, you just record your screen, and our AI automatically cleans up your video, trims mistakes, and can even generate a lifelike voiceover. Turn your raw recordings into studio-quality tutorials, instantly.