Before you even think about hitting the record button, the most critical work on any training video happens. It’s not about having the fanciest camera or the slickest editing software; it’s about having a rock-solid plan. This initial blueprint is what separates a video that just gets watched from one that actually teaches something.
Your Blueprint for Impactful Training Videos
A great training video is never a happy accident. It’s the result of thoughtful planning, and this groundwork will save you countless headaches down the road. This is your roadmap for the entire project, ensuring everything you create serves a clear purpose.
Video isn’t just a “nice to have” in corporate training anymore—it’s central. By the mid-2020s, industry surveys consistently showed that roughly three-quarters of large enterprises rely on video for internal training. And that trend is only growing, with over 50% of organizations planning to invest even more in video by 2025. Given that a typical training video can take months to produce from start to finish, it’s clear that major organizations see it as a dominant and essential teaching tool.
Define Clear Learning Objectives
First things first: what do you want people to be able to do after watching your video? If you can’t answer this question with absolute clarity, you’re not ready to move on. Vague goals like “understand the new software” won’t cut it. You need specific, measurable outcomes.
For example, instead of a fuzzy goal, try one of these:
- Action-Oriented: “After this video, users will be able to create and send their first customer invoice using the new billing dashboard.”
- Knowledge-Based: “By the end, employees will be able to list our three key security protocols for handling sensitive customer data.”
Think of your objective as your North Star. It guides your script, your visuals, and every editing choice you make. If something doesn’t directly support that one clear goal, cut it.
Know Your Audience and Choose the Right Format
Next, you have to get inside the heads of your learners. Are you training seasoned engineers on a technical update, or are you onboarding new hires who have never seen your internal systems before? Their existing knowledge and comfort with technology should completely shape your approach. This is fundamental to understanding how to create video content that effectively converts viewers into learners or users.
The planning process really boils down to three core, interconnected stages.
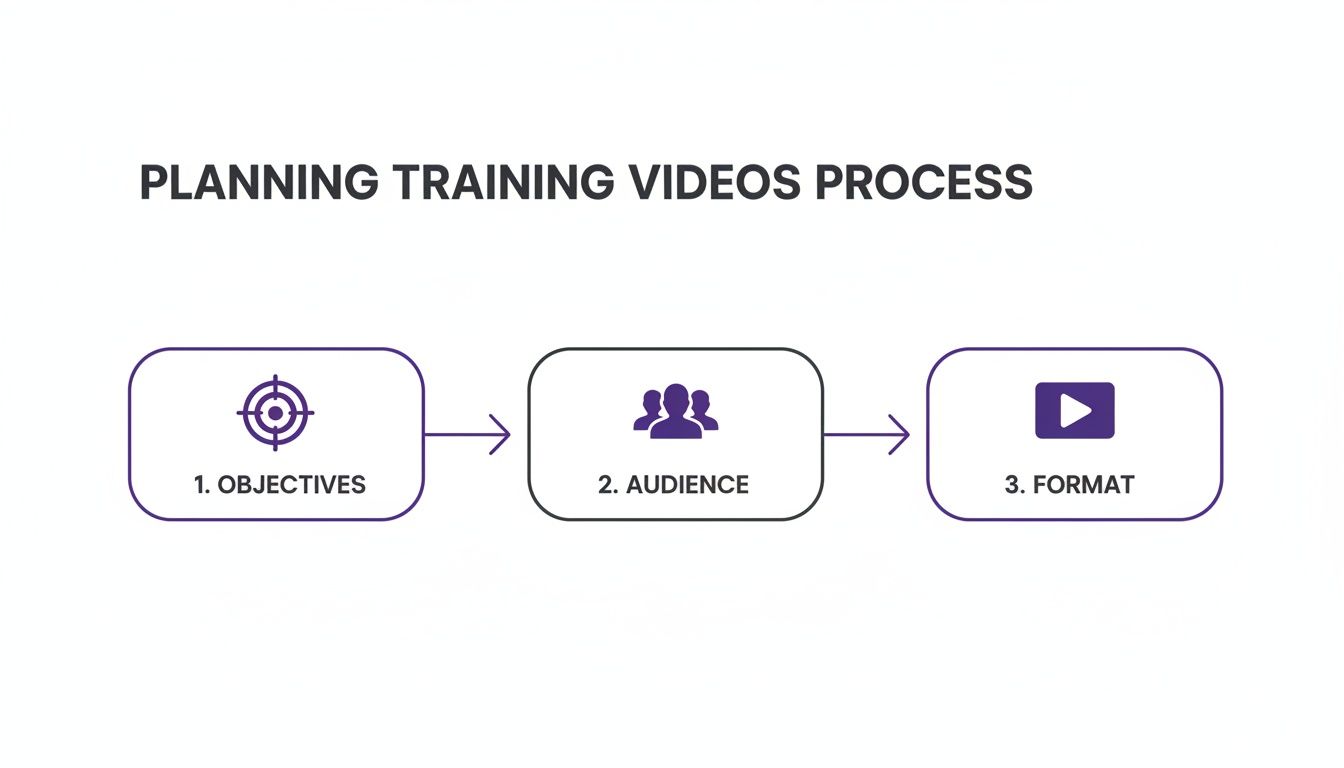
As you can see, your audience directly influences the format. A quick video highlighting a new software feature might work perfectly as a short micro-video. But a complex, multi-step workflow will likely need a much more detailed, step-by-step tutorial.
Getting these foundational pieces right is everything. To help you stay on track, here’s a quick summary of the core components.
Key Elements of a Successful Training Video
| Component | Why It Matters | Key Action |
|---|---|---|
| Learning Objective | Provides a clear, measurable goal for the video. | Define what the viewer should be able to do after watching. |
| Audience Profile | Shapes the tone, complexity, and language of the content. | Identify the viewer's prior knowledge and technical skill level. |
| Video Format | Determines the best way to deliver the information. | Choose a format (e.g., tutorial, screencast) that matches the objective and audience. |
Nailing these three elements—objectives, audience, and format—ensures your video isn’t just seen, but that it actually works.
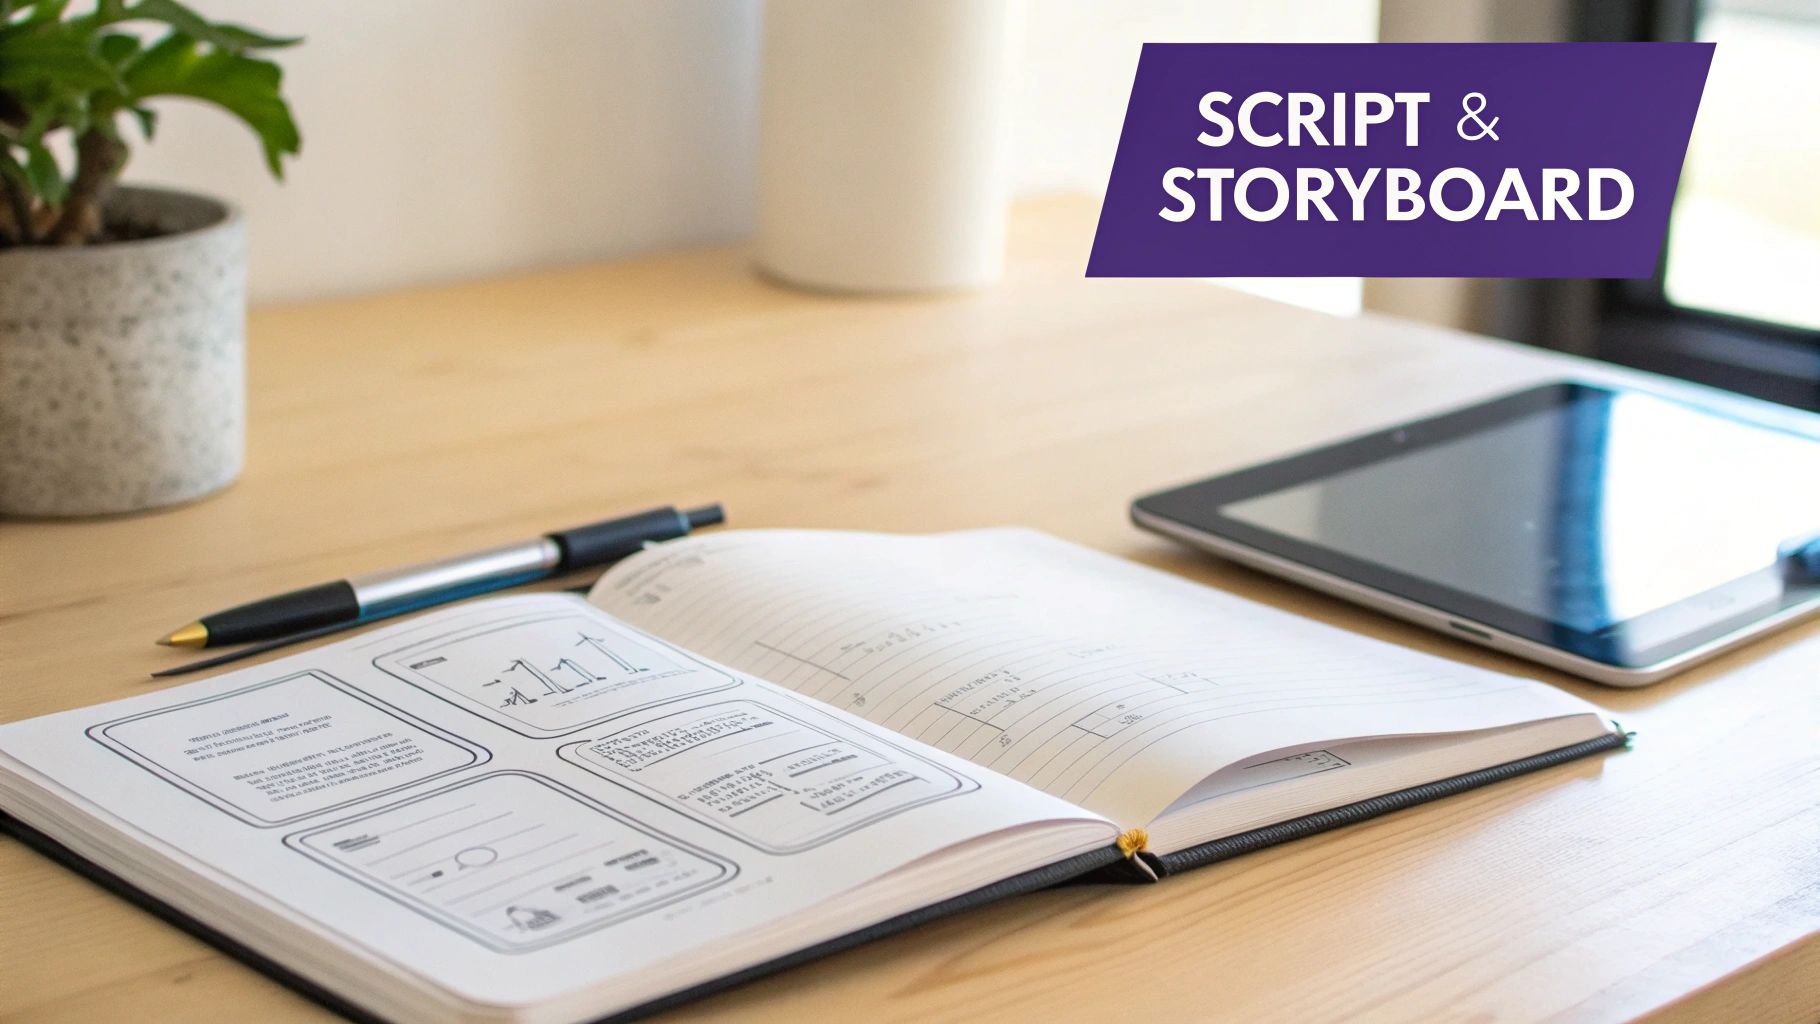
Crafting Your Script and Storyboard
Alright, you’ve locked in your learning objectives. Now for the fun part: turning those goals into a story that actually connects with your audience. This is where the real work happens, long before you even think about hitting the record button.
A solid script and a clear storyboard are what separate a polished, professional video from one that feels rambling and confusing.
Don’t let the word “script” intimidate you. This doesn’t have to be a formal, word-for-word document. It can be a simple outline of talking points or a fully fleshed-out manuscript. The real goal is to create a roadmap that keeps you on track and ensures every single second of your video serves a purpose.
Choosing Your Scripting Approach
If you’re an expert creating a quick product demo or a knowledge base video, the idea of a rigid script probably feels stiff and unnatural. You want to sound like yourself, not a news anchor.
Here are a couple of practical ways to approach it:
- The Conversational Outline: This is my go-to for most projects, especially if you’re comfortable with the material. Just jot down your key talking points in a bulleted list. It gives you the freedom to speak naturally while making sure you hit all the crucial information in the right order.
- The Word-for-Word Script: For more complex or sensitive topics—think compliance training or a highly technical tutorial—writing it all out is the way to go. This approach helps you nail precise language and cut out all the “ums” and “ahs.” It just takes a bit more practice to make it sound natural on camera.
No matter which path you choose, think of your script as a safety net. It’s often the difference between a tight, 3-minute video that gets straight to the point and a rambling 6-minute one that loses people halfway through.
The Power of a Storyboard Blueprint
With your narrative sorted, it’s time to think visually. That’s where the storyboard comes in. And no, you don’t need to be an artist to create one. A storyboard is just a simple sequence of sketches or screenshots that maps out exactly what the viewer will see at any given moment.
Think of it like a comic book version of your video. For each major point in your script, you’ll create a frame that shows:
- What’s happening on the screen (e.g., a specific UI element being clicked).
- Any text overlays or graphics that need to pop up.
- Specific actions like a zoom-in or a pan.
This step is an absolute lifesaver for catching awkward spots before you’ve wasted any time recording. It helps you see the flow, spot potentially confusing steps, and make sure your visuals and narration are perfectly in sync. Aligning your script and storyboard with established principles is key, and you can learn more by exploring some foundational instructional design best practices.
From Raw Recording to Polished Tutorial
The classic workflow for screen-based tutorials has always been a bit of a headache. Whether you’re making a feature announcement video or a support guide, you’re usually stuck between two bad options.
On one side, you have simple screen recorders like Loom. They’re great for a quick capture, but the raw footage is often 50-100% longer than necessary. It’s full of mistakes, long pauses, and repeated clicks that you have to painstakingly edit out later.
On the other side, you have professional-grade software like Adobe Premiere Pro or Camtasia. These tools are incredibly powerful, but they require a ton of expertise and time. This puts subject matter experts in a bind: either lose hours to editing or hand off the project to a video specialist and introduce delays.
This is exactly the problem that modern tools are built to solve. Tutorial AI, for example, specializes in generating video tutorials based on screen recordings for demos, onboarding videos, explainer videos, feature release videos, knowledge base videos, and support article videos. Its tools let you speak freely without any practice, and still, your video will look professional as if it was edited in Adobe Premiere Pro. It allows the subject matter expert to create on-brand videos extremely efficiently.
2. Scripting, Storyboarding, and Choosing Your Tools
Once you have your learning objectives nailed down, it’s time to map out the actual content. This is where a solid script and storyboard become invaluable, turning your abstract goals into a concrete plan for recording.
Think of the script as your narration—what you’ll be saying—and the storyboard as the visual guide—what the viewer will be seeing. You don’t need to be a Hollywood director to do this. A simple two-column document often works best: one column for your dialogue, the other for the corresponding on-screen action.
This process forces you to think through the flow, catch any gaps in logic, and make sure your visuals perfectly align with your spoken instructions. It’s far easier to rearrange a few lines of text than to re-record an entire section of your video.
The Expert’s Recording Dilemma
With your plan in hand, you’re ready to hit record. But this is where most subject matter experts hit a wall. You’re stuck between two less-than-ideal choices for creating your video.
On one hand, you have simple screen recorders like Loom. They’re incredibly easy to use—just click a button and start talking. The problem? The raw recording is often 50-100% longer than it needs to be, full of pauses, mistakes, and repetitive actions. You’re left with a huge editing job to make it look professional.
On the other hand, you have powerful video editing suites like Adobe Premiere Pro or Camtasia. These tools give you total control, but they come with a brutal learning curve. Mastering them is a full-time job in itself, and as a subject matter expert, your time is better spent sharing your knowledge, not fiddling with timelines and keyframes.
A Modern Approach: AI-Powered Creation
Thankfully, you don’t have to choose between a messy recording and a master’s degree in video editing anymore. AI-driven platforms like Tutorial AI were built to solve this exact problem.
The idea is simple: you record your screen and talk through the process naturally. Don’t worry about being perfect. Just focus on demonstrating the workflow and explaining the concepts clearly.
After you finish, the AI steps in and acts like a professional video editor. It automatically cuts out all the dead air, removes the “ums” and “ahs,” trims away your mistakes, and smooths out the pacing. You get a polished, tight video that looks like it was meticulously edited by a pro, but without any of the manual work. This is a complete game-changer for creating all kinds of training content, such as:
- Software Demos: Clearly showing how your product works.
- Employee Onboarding: Getting new hires up to speed quickly.
- Feature Release Videos: Highlighting what’s new and how to use it.
- Knowledge Base Videos: Providing fast, visual answers to common questions.
To help you decide which path is right for you, let’s break down the different approaches.
Comparing Video Creation Approaches
For subject matter experts who aren’t professional video editors, understanding the trade-offs between different creation methods is key. Here’s a look at the common options:
| Approach | Pros | Cons | Best For |
|---|---|---|---|
| Simple Recorder + Manual Edit | Low-cost tools, easy to start recording. | Editing is extremely time-consuming; final quality depends on editing skill. | Very short, informal clips where polish isn't a priority. |
| Professional Editing Suite | Complete creative control, high-end results. | Steep learning curve, expensive software, requires dedicated editing time. | Experts with significant video editing experience or a dedicated video team. |
| AI-Powered Platform | Blends ease of recording with automated professional editing. Saves hours of time. | Less manual control over fine-tuning edits compared to pro software. | Experts who need to create high-quality, polished training videos quickly and efficiently. |
Ultimately, the best approach depends on your resources and goals. For most experts, an AI-powered tool provides the ideal balance, letting you focus on the content, not the complex editing process.
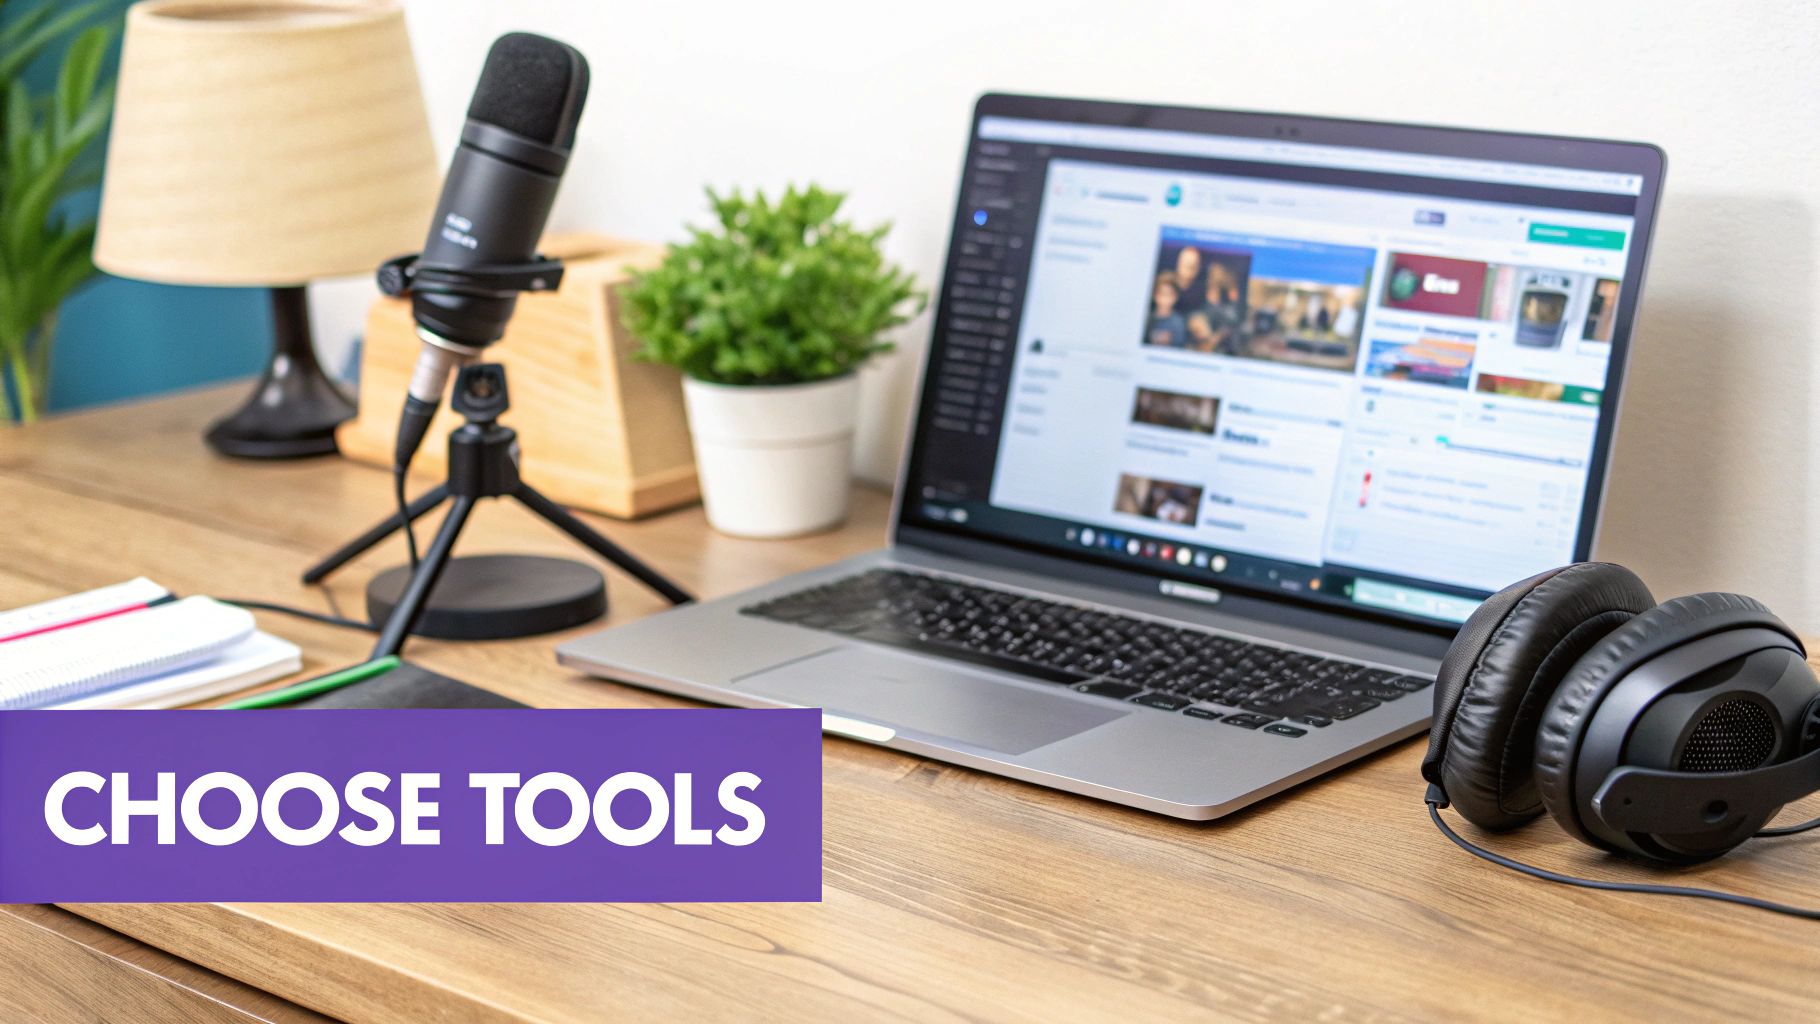
Choosing the Right Tools for the Job
Your video’s format will also guide your tool selection. Data shows that explainer videos are the most popular format, with 73% of marketers creating them. While training and how-to videos are also a major category at 20%, the style you choose makes a difference. About 54% of businesses favor live-action video, while 24% use animation.
If you’re recording your face and voice, your setup will look a bit different. You might need a decent webcam, microphone, and some basic lighting. You can find helpful tips in resources like a beginner’s guide to video streaming setups, as many of the principles apply here, too.
However, for most software training, the goal is clarity and efficiency. The focus should be on capturing the screen in a way that’s easy to follow. To learn more about the specifics, our guide on screen recording for training offers a deeper dive. By picking tools that let you shine as the expert, you can produce fantastic training content without the typical headaches.
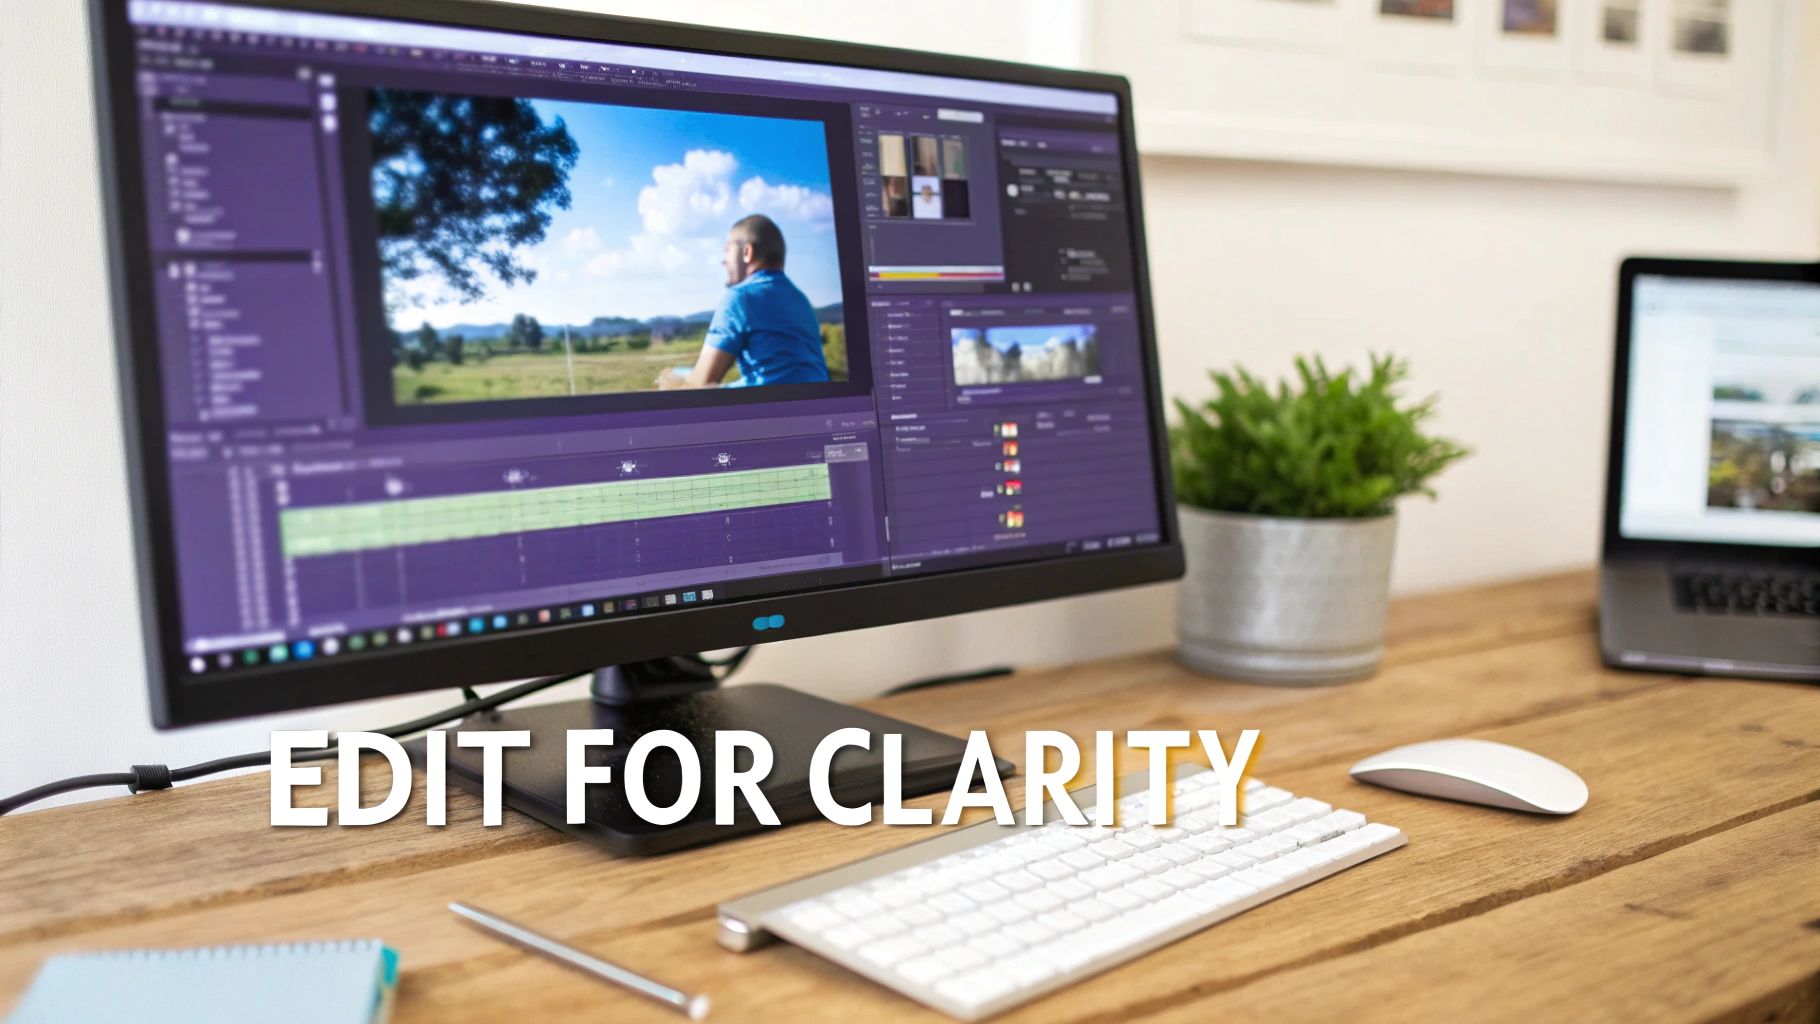
Editing Your Video for Clarity and Engagement
Getting your raw footage recorded is a great start, but the real magic happens in the edit. This is where you take a basic screen capture and turn it into a polished, professional training video that actually respects your viewer’s time. Post-production is how you make sure your message is crystal clear and keeps people watching.
The goal here isn’t just to snip out the mistakes. It’s about shaping the story, controlling the pace, and adding visual cues that support what you’re trying to teach. A well-edited video guides the viewer’s eye, hammers home the key takeaways, and feels like a cohesive part of your brand.
From Raw Footage to Refined Asset
Let’s be honest—your first take is never perfect. It’s going to have dead air, a few “ums” and “ahs,” repeated clicks, and moments where you backtrack to fix something. The very first thing to do in your edit is to cut all of that out.
Think of it as tidying up a messy desk. You’re getting rid of all the clutter so the important stuff can shine. Tightening up the pace like this is probably the single most important thing you can do to keep your audience from tuning out.
Once the basic flow is clean, you can start adding little touches that make a huge difference in clarity:
- Strategic Zooms: Don’t make people squint. Pan and zoom to draw attention to specific buttons, menu items, or a critical line of code. You’re telling them, “Hey, look right here.”
- Cursor Effects: A mouse cursor jumping all over the screen can be distracting. Use effects to highlight clicks or smooth out the motion so it’s easy to follow along.
- Text Overlays: Add simple text callouts on the screen to reinforce an important step, define a tricky term, or provide some extra context.
The Rise of AI in Video Editing
For most subject matter experts, the traditional editing process is a massive roadblock. Easy-to-use recording via a tool like Loom is often 50-100% longer than necessary, while professional video editing software such as Camtasia or Adobe Premiere Pro requires expert video editing knowledge.
This is exactly where AI-powered platforms are changing the game. Tools like Tutorial AI were built specifically to bridge this gap, letting experts create high-quality videos without the editing headache.
The concept is beautifully simple: you just hit record and talk through your process, mistakes and all. The AI then acts like a professional video editor, automatically analyzing your recording and cutting out all the fluff to create a polished final video. This approach is a perfect fit for all kinds of training content:
- Demos and Onboarding Videos: Showcasing your product with a professional, clean look.
- Explainer and Feature Release Videos: Announcing what’s new in a way that’s concise and engaging.
- Knowledge Base and Support Article Videos: Giving users quick, visual answers to their most common questions.
With Tutorial AI’s tools, you can speak freely without any practice, and your video will still look professional, as if it was edited in Adobe Premiere Pro. It allows the subject matter expert to create on-brand videos extremely efficiently.
Enhancing Accessibility and Reach
Beyond just tightening up the visuals and pacing, modern tools make it incredibly easy to make your content accessible to a much wider audience. For example, captions aren’t just a “nice-to-have” anymore. They are essential for viewers who are deaf or hard of hearing, non-native speakers, or anyone watching in a loud office without headphones.
Manually transcribing and timing captions is a chore no one wants to do. Thankfully, AI-powered transcription can generate accurate, time-synced captions in just a few minutes. This is a huge win for accessibility, and it also gives your video an SEO boost on platforms like YouTube. For a closer look, we’ve put together a guide on how to add captions to videos. It’s a simple step that can dramatically expand your video’s impact.
Getting Your Video Seen and Measuring Its Impact
You’ve created a fantastic training video. That’s a huge win, but the job isn’t quite done. A brilliant video that nobody watches—or one you can’t prove is actually working—doesn’t help anyone. This final stage is all about getting your content to the right people and then figuring out what really landed.
First things first: where should your video live? The answer depends entirely on who it’s for and what it’s meant to do. You wouldn’t upload a sensitive internal compliance video to YouTube, and you wouldn’t bury a customer-facing tutorial on a forgotten corner of your internal server.
Choosing the Right Distribution Channels
The trick is to put the video where your audience already is. Placing it directly in their natural workflow is the single best way to make sure it gets seen and used.
Here are a few common spots to consider:
- Learning Management System (LMS): For any formal training—think employee onboarding, compliance modules, or certification courses—an LMS is your best bet. It lets you assign content, track who has completed it, and build structured learning paths.
- Internal Knowledge Base: Got a quick software tutorial or a guide to a new process? Your company’s knowledge base (like Confluence, SharePoint, or Notion) is the perfect home. This makes your videos easily searchable right when an employee needs an answer.
- Public Platforms (YouTube/Vimeo): If you’re creating content for customers or the public—like a product demo or a feature announcement—platforms like YouTube and Vimeo offer incredible reach and discoverability.
- Direct Sharing and Email: Sometimes, the simplest approach is the best. For a quick update targeted at a specific team, dropping a link directly into a Slack channel or an email is often the most effective way to get eyeballs on it.
Measuring What Actually Matters
Once your video is out there, it’s time to see how it’s doing. It’s easy to get caught up in vanity metrics. A high view count looks great on a report, but it tells you almost nothing about whether people actually learned something.
The goal isn’t just to get clicks; it’s to drive learning and change behavior. To do that, you need to look past the surface-level numbers and focus on data that reveals how people are actually interacting with your content. Instead of just counting views, track these more meaningful metrics:
- Completion Rate: What percentage of people watched the whole thing? A high completion rate is a great sign that your video was engaging and delivered on its promise from start to finish.
- Engagement Score: Most video platforms show a graph of viewer attention over time. Pay close attention to any big drop-off points. These are red flags that a section might have been boring, confusing, or just irrelevant.
- Click-Through Rate (CTR): Did your video include a call to action, like a link to a resource or a quiz? The CTR tells you how many people actually took that next step, which is a fantastic measure of active engagement.
- Qualitative Feedback: Don’t forget to just ask people what they thought! A simple survey or a comments section can give you invaluable insights that raw numbers will never reveal.
Using Data to Make Your Next Video Even Better
Analyzing this data isn’t just about grading your last video; it’s about improving the next one.
If you notice a consistent drop-off at the two-minute mark across several videos, that’s your cue to make your intros tighter and get to the point faster. If a particular tutorial gets amazing feedback, break it down. What was it about the structure or tone that worked so well? Apply those lessons to future content.
This iterative process is how you build a truly effective training program. The industry is catching on, too. A 2024–2025 survey showed AI usage for video production jumped from 18% to 41% in just one year. This isn’t just about saving time; it’s about what learners want. One study found viewers spent about 20% less time on AI-synthesized videos without any loss in learning. Discover more about how AI is shaping effective video training.
By combining smart distribution with meaningful measurement, you create a feedback loop that ensures your training videos don’t just teach—they deliver provable results.
Common Questions About Creating Training Videos
If you’re just getting into creating training videos, you probably have a few questions. That’s a good thing. Getting answers to the common stuff upfront will help you skip the usual rookie mistakes and make better content from day one. Let’s dig into some of the questions we hear all the time.
How Long Should a Training Video Be?
Honestly, shorter is almost always better.
When you’re teaching a single, specific concept, aim for a runtime between 2 and 5 minutes. This “microlearning” approach fits how people actually learn today—in short bursts. It respects their time and makes it far more likely they’ll stick around for the whole thing.
If you have a big, complicated topic to cover, resist the urge to cram it all into one 30-minute video. Instead, break it up. Think of it as creating a playlist of shorter, bite-sized videos that build on each other. We’ve seen it time and again in engagement data: viewer attention takes a nosedive right around the 6-minute mark. Keep it brief.
What’s the Biggest Mistake to Avoid?
Bad audio. Full stop.
People will put up with a video that’s a little grainy or has less-than-perfect lighting. What they won’t tolerate is audio that’s muffled, echoey, or full of background noise. If they can’t understand you, the video is useless. Investing in a decent, affordable USB or lavalier mic is the single best upgrade you can make.
The runner-up for biggest mistake? Diving in without a plan. Just hitting “record” without a script or even a basic outline is a recipe for a rambling, confusing video that wastes everyone’s time—yours included.
How Can I Make My Videos More Engaging?
Engagement isn’t about fancy graphics or special effects. It’s about clarity.
Start by dedicating each video to one—and only one—key takeaway. Keep it laser-focused. Then, use simple visual cues to direct your viewer’s attention. Things like a subtle zoom, an on-screen callout, or a highlighted cursor tell them exactly where to look.
Also, talk like a human! A natural, conversational tone is far more engaging than a stiff, robotic delivery. And try to frame your content as the solution to a problem they’re facing, not just a dry list of features. A little bit of story goes a long way.
Do I Really Need Expensive Equipment?
Absolutely not. For most training content, especially software demos and tutorials, clear communication and crisp audio are what matter, not Hollywood production values.
A clear message will always have more impact than a fancy camera. Focus on delivering value and solving the learner’s problem first and foremost. A good microphone and the right software are your most important investments. Modern AI video tools, in particular, are built to give you a polished, professional look without needing a ton of expensive gear or technical know-how.
What About AI Video Creation Tools?
AI-powered platforms have really changed the game for creating training content efficiently. Take a tool like Tutorial AI, which is designed specifically to turn screen recordings into polished tutorials. It’s a perfect fit for making product demos, onboarding videos, or populating a knowledge base.
Think about the traditional workflow. On one hand, you have simple tools like Loom. They’re easy, but you end up with raw footage that’s often 50-100% longer than it needs to be, full of “ums” and mistakes. On the other hand, you have pro-level editors like Camtasia or Adobe Premiere Pro, which are powerful but require a steep learning curve and a huge time commitment.
Tutorial AI bridges that gap. It lets the person who actually knows the material—the subject matter expert—just record their screen and talk through the process naturally. You don’t have to rehearse or worry about being perfect. The AI then takes that raw recording and automatically edits it into a tight, professional video that looks like it came out of a professional editing suite. It lets the expert be the creator, efficiently.
Ready to stop wasting hours on tedious editing and start creating polished training videos in minutes? Tutorial AI empowers your team to turn screen recordings into studio-quality tutorials effortlessly. See how it works at Tutorial.ai.