You’ve finished the recording. The script is solid, the audio sounds good, the cursor movements are clear, and then your editor asks the question that stops a surprising number of uploads cold.
What format video for youtube?
That sounds simple until you open the export panel and see a small avalanche of choices: MP4, MOV, H.264, AAC, VBR, frame rate, bitrate, progressive, interlaced. Most creators don’t get stuck because the video is bad. They get stuck because export settings feel like a different language.
The good news is that you don’t need to become a compression engineer to make smart choices. You just need a reliable mental model. Think of YouTube upload settings like packing a product for shipping. If the box, padding, and labeling are right, it arrives cleanly and gets handled quickly. If they’re wrong, the platform can still accept it, but the trip gets messier.
Why Your Video Format Is YouTube’s First Impression
A lot of creators treat export settings as an afterthought. That’s backwards. Your export is the first version of your video that YouTube sees, and it shapes how smoothly the platform can process what you made.
That matters even more if you’re investing in substantial educational content. In Q1 2024, long-form videos averaged 1,500 views per video, compared with 650 for Shorts, according to Statista’s comparison of YouTube video formats by average views. If you create demos, onboarding explainers, support walkthroughs, or training videos, you’re often playing the long-form game. Quality loss on a long video hurts more because viewers spend more time noticing it.
What goes wrong when exports are sloppy
Most upload problems aren’t dramatic failures. They’re subtle quality compromises.
You might see text in a screen recording look soft. Cursor motion can feel slightly choppy. Audio may stay acceptable, while the visuals take on that smeared, over-compressed look people often describe as “muddy.” Sometimes the file just processes slowly, leaving you waiting and wondering if something broke.
Practical rule: A good export doesn’t magically improve the video. It protects the quality you already created.
That’s the right way to think about it. Export settings are defensive. They keep YouTube from doing more damage than necessary when it prepares your file for streaming.
Why tutorial videos are less forgiving
Screen recordings reveal bad settings faster than talking-head footage does. A face in a softly lit room can survive heavier compression. Tiny UI labels, menus, code windows, dashboards, and cursor highlights often can’t.
If you teach software, what viewers need most is legibility. They need to read the button label, see the active field, and follow the motion without strain. That’s why generic “good enough” presets often disappoint tutorial creators.
A cleaner answer to what format video for youtube starts with one principle: give YouTube the kind of file it already wants, and give it enough visual information to preserve fine interface detail.
Understanding Containers Codecs and Audio
Before picking settings, it helps to separate three terms people often mash together: container, codec, and audio codec.
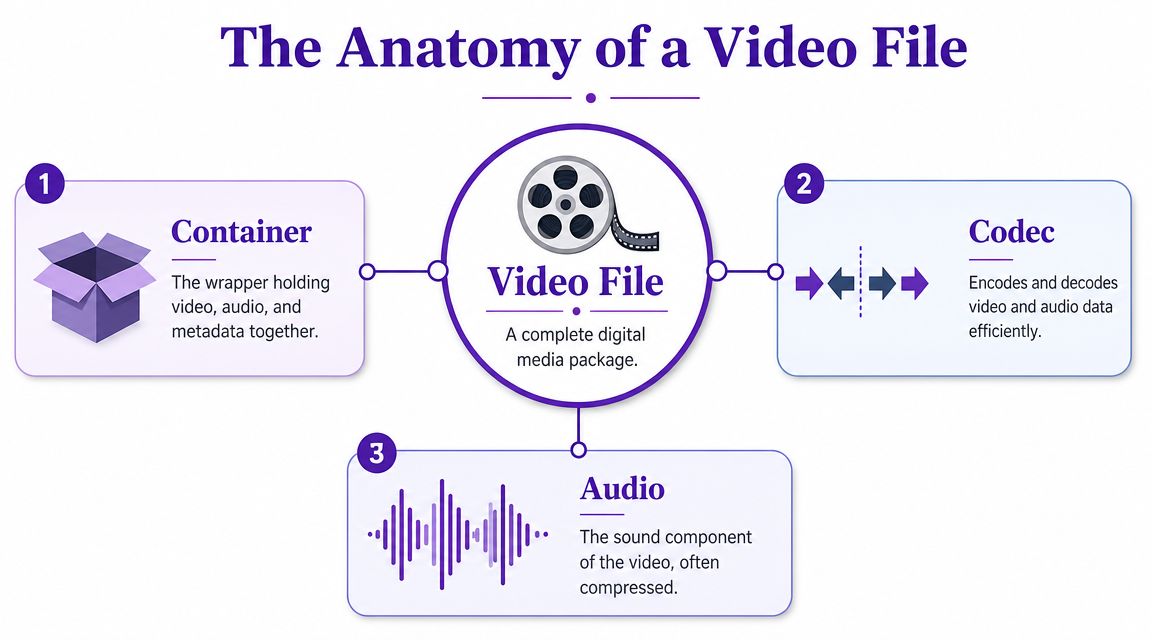
The container is the box
The container is the file type. It’s the wrapper that holds video, audio, and metadata together. Common examples include MP4 and MOV.
If that still feels abstract, think of a container as the shipping box. It doesn’t decide the quality of the thing inside, but it affects compatibility and handling. For YouTube, the safest, most efficient box is MP4.
YouTube officially recommends MP4 with H.264 video codec for uploads in its YouTube upload encoding settings documentation. That recommendation exists for a practical reason. YouTube knows how to process that combination efficiently across devices and playback environments.
The codec is the compression language
The codec is how the video gets compressed and stored. Raw video files are massive. A codec shrinks them into a size that can be uploaded.
For YouTube, the preferred video codec is H.264. You may also see it called AVC. You don’t need to memorize the acronym. Just know it’s the most widely accepted answer to the format question for standard uploads.
If you want a plain-English explainer on the difference between file type and compression, this guide on what a video codec is clears it up well.
Here’s a simple way to remember it:
- MP4 is the package
- H.264 is the method used to compress the pictures
- AAC is the method used to compress the sound
Audio matters more than people think
Many creators obsess over video settings and leave audio on whatever the default happens to be. Usually that works, but if you want a dependable export, choose AAC or AAC-LC audio inside the MP4 file.
That gives you a clean, standard combination that YouTube handles well.
A YouTube upload works best when the file arrives already organized in the format the platform prefers, instead of forcing extra interpretation during processing.
That’s the whole idea. You’re not trying to outsmart YouTube. You’re trying to cooperate with it.
Essential Specs Resolution Frame Rate and Bitrate
Once your container and codecs are settled, three settings shape the actual viewing experience: resolution, frame rate, and bitrate. These are the knobs that determine whether your tutorial looks crisp and calm or soft and jumpy.
Resolution is the canvas size
Resolution describes the pixel dimensions of the video, such as 1920×1080 for 1080p or 3840×2160 for 4K.
The simplest rule is to export at the highest resolution you recorded and edited well. Don’t upscale weak source footage just to chase a bigger number. But if you recorded a sharp 4K screen capture, exporting in 4K gives YouTube a stronger master to work from.
That can be especially useful for software tutorials where small interface details matter. Menus, sidebars, and code panes usually survive compression better when the source is cleaner.
If you’re planning your setup before recording, a buyer’s guide to best 4K streaming cameras can also help if your workflow mixes screen capture with presenter footage.
Frame rate is motion smoothness
Frame rate, or FPS, is how many images appear each second. For many videos, 24, 25, or 30 fps is fine. But tutorials often include cursor movement, scrolling, dropdown animations, and quick UI changes. That’s where 50 or 60 fps can look much smoother.
The main rule is simple: match the export to the footage you recorded. If you captured your screen at a higher frame rate, exporting lower can make motion feel less natural.
For software walkthroughs, higher frame rates usually help in two places:
- Cursor tracking stays easier to follow
- Fast interface changes look cleaner during motion
Bitrate is the detail budget
Bitrate tells the file how much data it can spend each second to describe the image. That’s why it’s often the most confusing setting. More bitrate usually means more visual detail, but only up to a point.
For YouTube uploads, Postfast’s guide to YouTube dimensions and bitrate lists these practical targets for SDR video:
| YouTube Recommended Upload Settings (2026) | Standard FPS (24/25/30) | High FPS (48/50/60) |
|---|---|---|
| 1080p | 8 to 12 Mbps | 12 to 18 Mbps |
| 1440p | 16 Mbps | Qualitatively higher than standard FPS |
| 2160p (4K) | 35 to 45 Mbps | 53 to 68 Mbps |
For many creators, that table is enough. But tutorial content has a twist. Screen recordings aren’t like ordinary live-action footage. They contain hard edges, text, small icons, and flat-color UI elements that reveal compression damage quickly.
Why screen recordings often need a careful bitrate choice
A soft interview shot can still feel acceptable after heavy compression. A blurred settings panel cannot. That’s why tutorial and documentation teams often care more about bitrate discipline than lifestyle creators do.
A useful qualitative rule is this:
- If the video is UI-heavy, lean toward the stronger end of the recommended range.
- If the video is mostly camera footage, the lower end may still look fine.
- If the video has fast cursor motion or zooms, pair a suitable bitrate with a matching frame rate instead of only increasing bitrate.
Producer’s shortcut: Don’t export at the maximum your editor allows. Export at the level that preserves readability without creating a bloated file YouTube will just recompress anyway.
A practical preset mindset
If you want a reliable answer to what format video for youtube for tutorial work, this preset logic works well:
- Start with MP4
- Choose H.264 video and AAC audio
- Keep your native resolution
- Match your recorded frame rate
- Use the recommended bitrate range for that resolution and frame rate
- Bias upward within the range when text clarity matters
That’s the difference between guessing and exporting with intent.
Enhancing Your Video with Subtitles and Captions
A technically clean upload still misses something important if it has weak captions. For tutorials, captions aren’t a bonus. They’re part of the product.
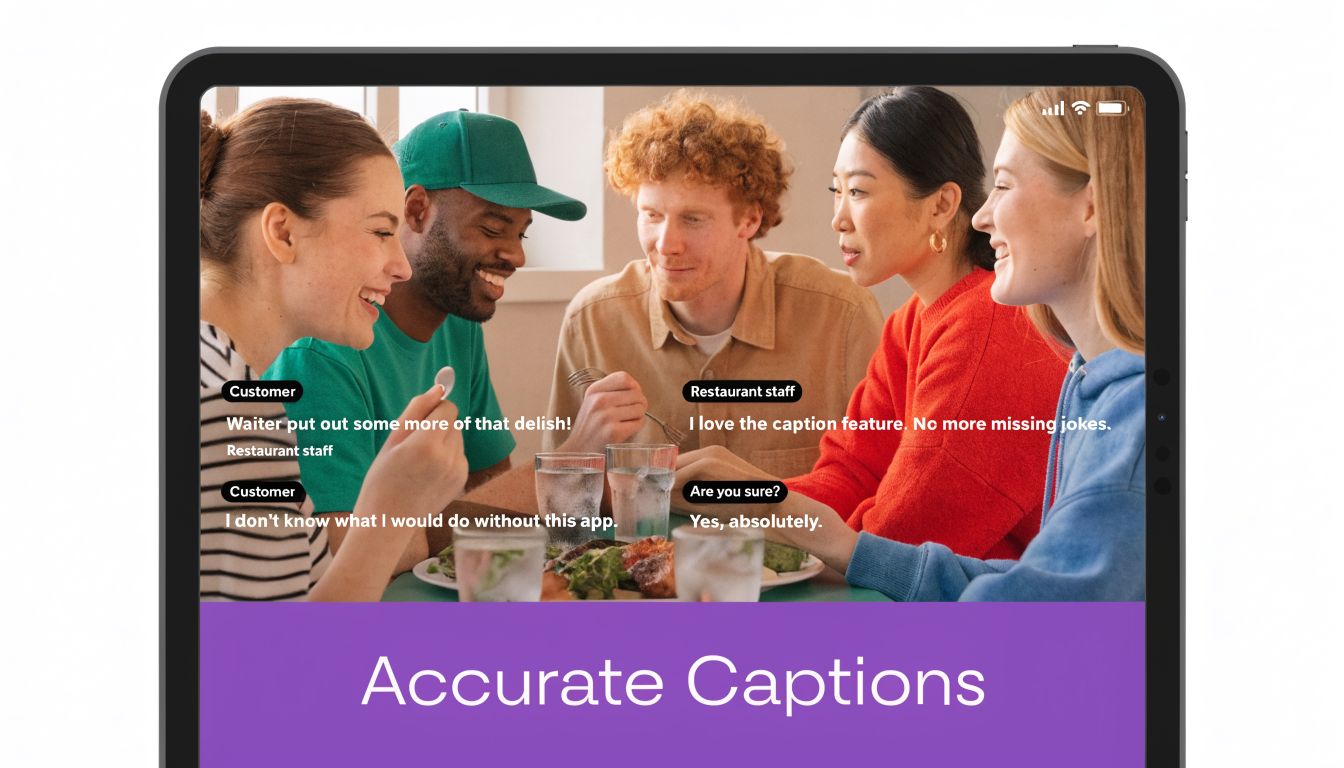
Captions help people follow along
In training content, viewers often pause, skim, replay, and jump to the exact instruction they need. Accurate captions make that easier. They also help viewers who are deaf or hard of hearing, people watching in low-volume settings, and anyone who wants reinforcement while learning a new workflow.
If you’re adding them yourself, a guide on how to add captions to videos is a useful place to start.
Captions and visual clarity work together
There’s an easy mistake to make here. Some creators assume captions can compensate for soft video. They can’t. If the interface itself is blurry, captions don’t solve the core problem.
That’s why bitrate still matters for documentation-style content. As noted in Uppbeat’s discussion of video formats for creators, there’s a real need for more specific guidance for screen-recorded tutorials, including 8 to 12 Mbps for 1080p UI-heavy content versus 4 to 6 Mbps for standard video. That distinction lines up with what many tutorial producers discover in practice: text-heavy videos need more care.
A small workflow upgrade that pays off
A strong publishing workflow usually looks like this:
- Export a readable master first: sharp text, stable motion, clean audio
- Add accurate captions: don’t rely blindly on auto-generated text
- Review key terms: product names, menu labels, acronyms, and feature names often get misheard
- Reuse transcripts elsewhere: support articles, LinkedIn clips, or even social versions
If you also repurpose educational content for short-form channels, this guide on how to boost your Instagram reach and views is a helpful companion for adapting the same material to a different platform style.
Good captions don’t rescue a poor upload, but they do make a strong upload more useful, searchable, and inclusive.
Avoiding Common YouTube Upload and Processing Errors
Some export mistakes are so common that they’re worth treating like a pre-flight checklist.
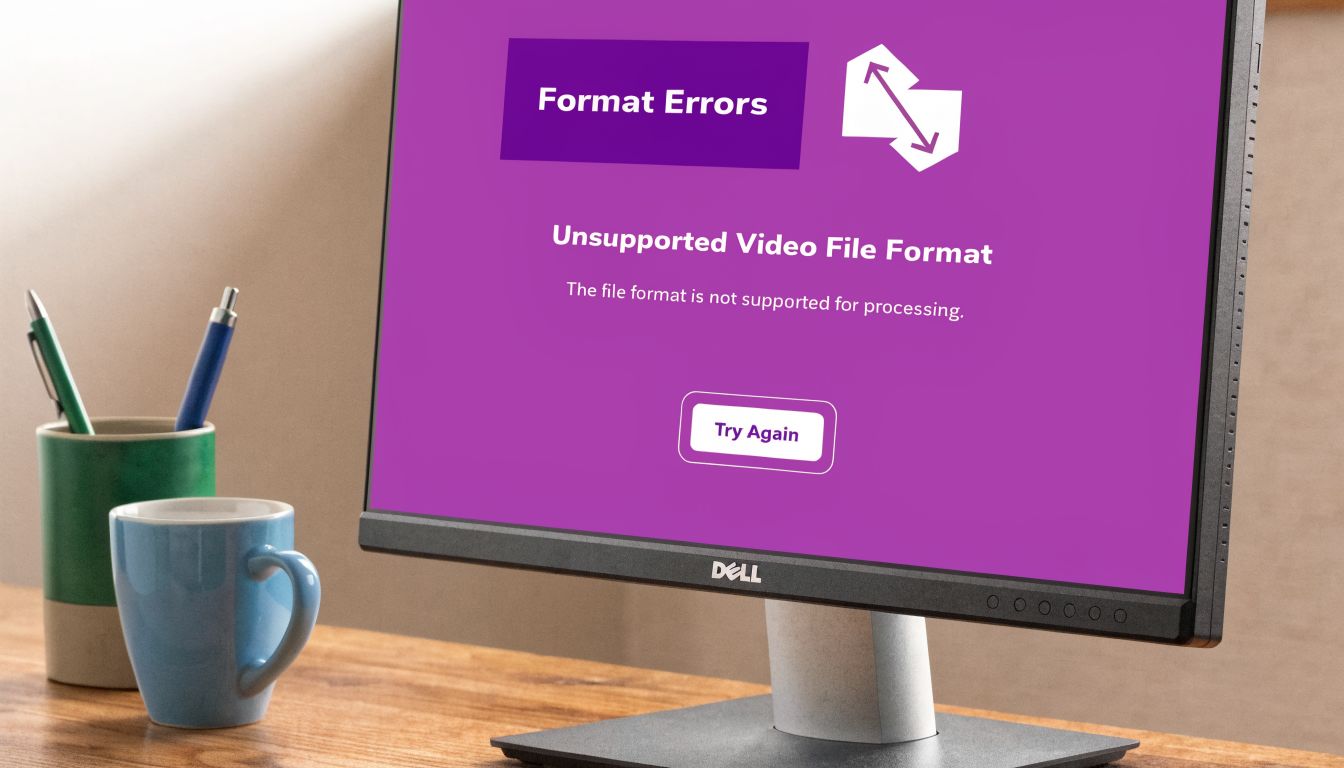
Error one is choosing a file YouTube has to wrestle with
Yes, YouTube accepts many formats. That doesn’t mean they’re equally smart choices. A creator might upload AVI, WMV, or MOV because that’s what their software exported by default. The platform can often ingest those files, but compatibility and processing aren’t as straightforward as they are with a standard MP4 workflow.
If you want the least drama, export to MP4.
Error two is uploading interlaced video
Interlaced footage comes from older video standards. Instead of each frame being shown progressively, the image is split in a way that can create jagged motion artifacts. YouTube’s recommendation is progressive scan, not interlaced, in its official upload guidance.
If your motion looks combed or jagged during playback, check your export settings and deinterlace before uploading.
Error three is stretching the image by accident
This usually comes from the wrong pixel aspect ratio. In plain language, your video may have the right resolution on paper but still display oddly if the pixels aren’t set properly.
Look for Square Pixels (1:1) in your editor. That helps avoid squashed faces, stretched interfaces, or black-bar weirdness that wasn’t in the original edit.
A good publishing walkthrough can also help if you’re unsure where these checks belong in your process. This guide on how to post a YouTube video covers the upload side clearly.
Error four is assuming more bitrate is always better
This is one of the most persistent myths in video production. Creators see softness after upload and assume the answer is to crank bitrate as high as possible. Usually that just creates a much larger file and longer upload time, while YouTube still recompresses it.
The better move is to stay within sensible ranges for your resolution and frame rate, then test with your actual content. Tutorial footage benefits from thoughtful settings, not brute force.
Here’s a quick visual explainer if you want to see how format issues affect uploads in practice.
Creating Perfect Tutorials with AI Not Expertise
Tutorial production has had an annoying trade-off for years. You either record quickly with a simple screen recorder and live with all the pauses, restarts, and filler, or you open a full editor like Camtasia or Adobe Premiere Pro and accept a steeper editing workload.
That gap is where many subject matter experts get stuck. They know the product. They know how to explain the workflow. But they don’t want to spend their week learning timeline editing, audio cleanup, pacing, cuts, zooms, and caption syncing just to publish one decent support video.
The old choice isn’t great
A lightweight recorder is easy, but the result is often longer than it needs to be because the raw take includes hesitation, rephrasing, dead air, and meandering explanations. Professional editors can fix that, but the fix costs time and skill.
For demos, onboarding videos, feature release walkthroughs, knowledge base content, and support article videos, that trade-off is especially painful. The person with the knowledge often isn’t the person with advanced editing expertise.
Why this gets harder in multilingual publishing
The challenge grows when the same tutorial needs to exist in multiple languages. Existing guidance doesn’t really explain how to optimize frame rate choices for simultaneous multilingual publication, which matters for workflows that rely on automated re-timing because different languages have different speech rates, as noted in YouTube help documentation related to supported upload workflows.
That’s a practical production issue, not just a technical curiosity. If one language runs longer than another, the relationship between narration timing, captions, and visual pacing becomes harder to manage.
The best modern tutorial workflow lets the expert focus on the explanation, while software handles the cleanup, timing, and polish.
That’s why AI-assisted editing has become so useful for training and documentation teams. It changes the job from “perform perfectly and edit like a pro” to “explain clearly once, then refine efficiently.”
Your Checklist for Flawless YouTube Uploads
If you remember only one thing, remember the recipe. You don’t need to master every export menu. You need a repeatable default that protects quality.
Your default export recipe
- Container: MP4
- Video codec: H.264
- Audio codec: AAC or AAC-LC
- Scan type: Progressive
- Pixel aspect ratio: Square Pixels (1:1)
- Resolution: Match your source
- Frame rate: Match your recording
- Bitrate: Use a sensible range for your resolution and lean higher when the video contains dense UI text
A quick final check before you upload
Run through these questions:
Will viewers need to read small interface text?
If yes, don’t underspec the bitrate.Does the motion feel natural?
Cursor movement and scrolling reveal frame rate problems quickly.Did you export to MP4 with H.264?
This is still the safest answer for most YouTube creators.Are your captions accurate?
Product names and feature labels deserve a manual review.Did your editor sneak in odd defaults?
Check progressive scan and square pixels before publishing.
The simplest answer to the format question
If someone asks you what format video for youtube, the plain-English answer is this:
Use an MP4 file with H.264 video and AAC audio, keep the resolution and frame rate true to the source, and choose a bitrate that preserves clarity without inflating the file for no reason.
That’s the dependable baseline. From there, tutorial creators mainly adjust for one thing: readable screens.
You’ve already done the hard part by making something worth watching. The export should support that work, not undermine it.
If you create demos, onboarding videos, explainer videos, feature release walkthroughs, knowledge base videos, or support article videos, Tutorial AI gives you a faster path from raw screen recording to polished final video. Simple recorders often leave videos far longer than necessary, while tools like Camtasia or Adobe Premiere Pro demand real editing expertise. Tutorial AI lets subject matter experts speak naturally without rehearsal, then turns that recording into a professional, on-brand tutorial with polished narration, captions, timing, and screen-focused edits, without traditional timeline work.