Ever tried to explain a computer process over the phone or in a long email? It’s frustrating, right? That’s where software to record your computer screen and audio comes in. Think of it as a video camera for your desktop, capturing every mouse movement, click, and word you speak, then packaging it all into a neat video file.
What Exactly Is Screen and Audio Recording Software?
At its heart, this kind of software is a communication tool. It turns your on-screen actions into a visual story. Instead of trying to describe a complicated workflow in a dense document, you can just show someone how it’s done. This “show, don’t tell” method is incredibly powerful for making content that actually sticks.
These tools record a video of your entire screen, a single application window, or even just a specific area you select. At the same time, they capture audio—either your voice from a microphone, the computer’s system sounds, or both. This combination is what makes it so indispensable, especially with so many of us working on distributed teams.
From Niche Gadget to Business Must-Have
It wasn’t that long ago that screen recording was a tool for tech geeks and gamers. Now, it’s a fundamental part of how modern businesses operate. Teams across all departments rely on it to create video content that gets the point across quickly and clearly.
Just look at how it’s being used every day:
- Corporate Training Videos: Getting new hires up to speed or teaching existing employees a new process with visual, step-by-step guides.
- Customer Support Tutorials: Showing customers how to fix a common problem, which cuts down on support tickets and frustration.
- Product Demos: Walking potential customers through software features in a way that’s engaging and easy to follow.
- Sales Explainer Videos: Sending personalized videos to prospects that explain the value of a product in a way a static email never could.
The market numbers back this up. The global screen recording software market was valued at a whopping USD 1.5 billion in 2023 and is expected to hit USD 3.5 billion by 2033. This boom is largely fueled by the shift to remote work and online learning. You can dig into more data on the screen recording software market to see just how fast it’s growing.
A Complete Workflow for Visual Communication
Today’s platforms are much more than a simple “record” button. They offer an entire workflow, taking you from the initial capture all the way to sharing the final video. This all-in-one approach means you can record, edit, and distribute your content from a single place, taking the headache out of video creation.
By making it easy for anyone to create professional-looking videos, this software closes communication gaps and empowers people to teach, sell, and support their audiences more effectively than ever before.
What to Look For in a Professional Screen Recorder
When you start searching for software to record your computer screen and audio, the options can feel overwhelming. It’s easy to assume they all do the same thing, but that couldn’t be further from the truth. A basic, free tool might get the job done for a quick, one-off recording, but a professional platform is a whole different beast. It’s packed with features designed to create polished, high-impact videos that truly communicate your message.
The most fundamental job is, of course, capturing your screen. But even here, professional tools offer more control. You’ll want software that can handle high-definition recording, including 4K resolution, so your videos look sharp and professional on any monitor. Flexibility is also key—the ability to record your full screen, a specific application window, or a custom-sized region gives you complete command over what your audience sees.
Crystal-Clear Audio and Visual Guidance
Great video is nothing without great audio. Professional-grade software shines here, allowing you to capture multiple audio sources at the same time. This means you can narrate with a crisp, clear external microphone while simultaneously recording the system sounds from your computer—perfect for software demos where clicks and alerts are part of the experience.
But just capturing the screen isn’t enough; you need to guide your viewer’s eye. This is where a few simple features can make a world of difference:
- Cursor Effects: Make your cursor a teaching tool by highlighting it, magnifying it, or adding a spotlight effect so viewers never lose track of where you’re pointing.
- Annotations and Callouts: Draw attention to important details by adding text, arrows, and shapes directly onto your recording as you go.
- Automated Transcription: Many top-tier platforms can automatically generate a transcript of your narration. This is huge for creating captions, which makes your content more accessible and easier to search.
These visual helpers transform a passive recording into an active, engaging tutorial, leaving no room for confusion.
Advanced Editing and Privacy Controls
The real power of professional software lies in what you can do after you hit stop. While basic recorders might let you trim the beginning and end of a clip, advanced platforms offer a full-blown editing suite with multi-track timelines, smooth transitions, and options for adding music or other media. For a glimpse into the future of editing, tools like Descript’s AI-powered screen recording features are even using AI to make complex edits feel effortless.
As the diagram below shows, screen recording software has become an essential tool for training, product demonstrations, and customer support—all areas where clarity is critical.
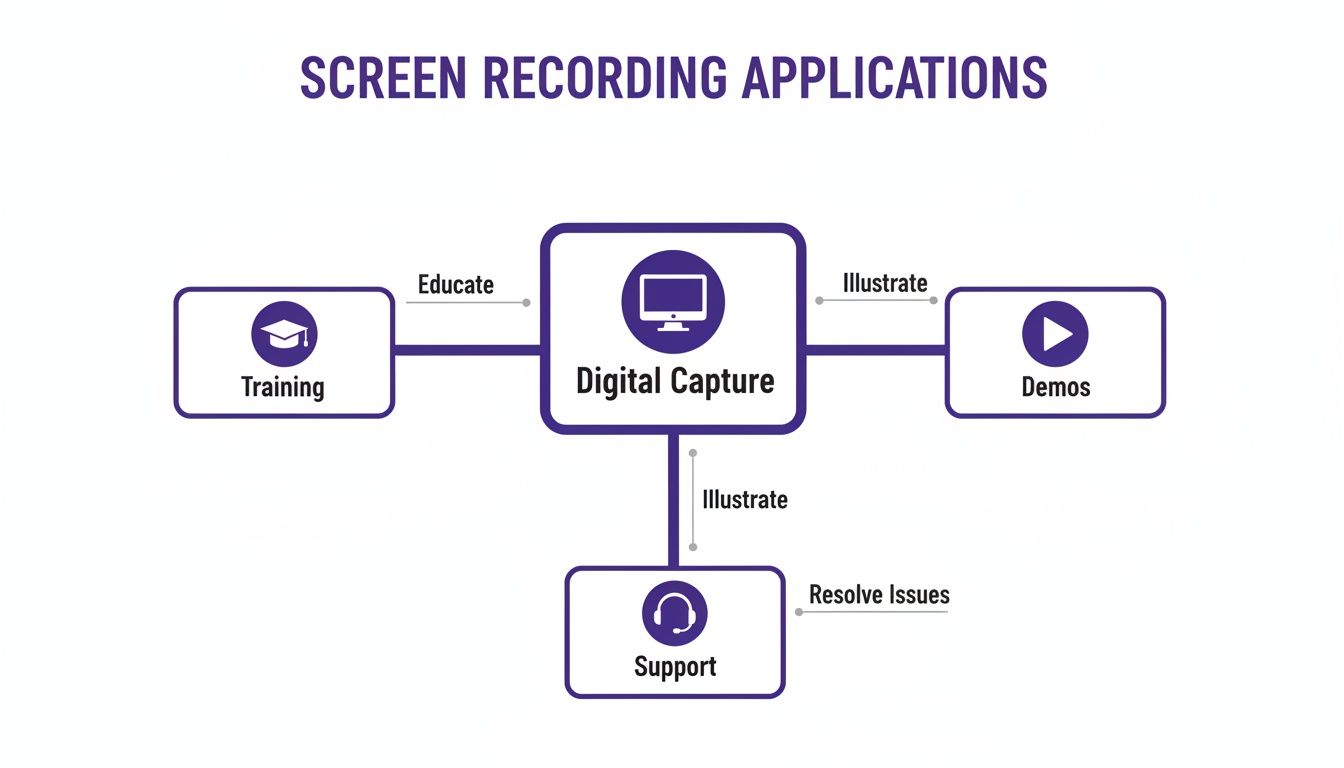
This just goes to show how central this technology has become for educating employees, showing off products, and resolving customer issues.
A professional screen recorder doesn’t just capture what’s on your screen; it gives you the tools to shape that raw footage into a clear, compelling narrative that respects both your viewer’s time and their privacy. Speaking of privacy, the ability to blur or hide sensitive on-screen information—like names, passwords, or company data—is a must-have for any business. Good software makes this easy, letting you protect information without spending hours in a video editor.
Core vs Advanced Screen Recording Features
To make it even clearer, here’s a quick breakdown of what you can expect from a basic tool versus a more advanced, professional-grade solution.
| Feature Category | Basic Capability | Advanced Capability |
|---|---|---|
| Video Capture | Records the entire screen at a standard resolution. | Records in 4K, captures specific windows or custom regions. |
| Audio Capture | Records a single audio source (microphone or system). | Records multiple audio sources simultaneously with separate tracks. |
| Visual Aids | Basic cursor tracking. | Customizable cursor effects, on-screen annotations, and drawing tools. |
| Editing | Simple trimming of the start and end of the video. | Multi-track timeline, transitions, overlays, and automated transcription. |
| Privacy | No built-in privacy features. | Tools to automatically blur, mask, or redact sensitive information. |
This table highlights the leap in functionality. While a basic tool captures a moment, an advanced one helps you craft a story.
How AI Is Changing the Game for Video Tutorials
For years, creating a video tutorial meant making a tough choice: do you want it fast, or do you want it good? You could never really have both.
On one side, you have the quick-and-dirty approach. Tools like Loom are easy to use, but the unedited recordings are often 50-100% longer than necessary, packed with “ums” and “ahs,” accidental clicks, and repeated steps. While it’s fast for the creator, it’s a frustrating and unprofessional experience for anyone watching.
On the other side, you’ve got professional video editing software. Think Camtasia or Adobe Premiere Pro. These tools can produce beautiful, polished tutorials, but they require expert video editing knowledge and a massive time commitment. You practically need to become a video editor to cut, trim, and polish your raw footage into something watchable.
This has always left a huge gap for teams who need to create great content without derailing their entire week. Your subject matter experts shouldn’t have to moonlight as video producers just to share what they know. This is exactly where AI is stepping in to completely change how we think about video creation.
Finally, Speed and Polish in One Package
AI-driven platforms are making that old trade-off between speed and quality obsolete. They work like an intelligent assistant, sitting between your raw recording and the final video to handle all the tedious editing for you. This new wave of software to record computer screen and audio puts the power of a pro editor into anyone’s hands.
Think about a product manager who needs to create a video for a new feature launch. Instead of spending hours writing a perfect script and doing countless retakes, they can just hit record and talk through the feature naturally. They can stumble over their words, pause to collect their thoughts, and even go on a tangent—it doesn’t matter.
That’s the exact workflow Tutorial AI was built for. Our platform takes that messy, unscripted screen recording and uses AI to magically generate a professional video that looks like it came straight out of a production studio. It lets the expert be the expert, while the AI handles all the heavy lifting of editing.
Tutorial AI’s tools let you speak freely without any practice and still your video will look professional as if it was edited in Adobe Premiere Pro. It allows the subject matter expert to create on-brand videos extremely efficiently. This completely shifts the dynamic of content creation. Now, anyone on the team can produce high-quality videos, not just the people with specialized editing skills. To get a better sense of how AI is impacting the industry as a whole, it’s worth checking out some of the top AI video generator tools on the market.
So, How Does the AI Actually Work?
Tutorial AI’s tools pull this off by generating video tutorials based on your screen recordings. It’s a seamless process that turns a casual screen share into a polished, on-brand video asset.
Here’s a peek behind the curtain at what happens:
- Script Polishing: First, the AI transcribes everything you said. Then, it automatically cleans up the text, cutting out all the filler words and tightening up sentences to make them clearer and more concise.
- Flawless Voice Generation: Using that polished script, the platform generates a perfectly paced, studio-quality AI voiceover. This completely removes any background noise, stumbles, or audio glitches from your original recording. Using an AI voice generator for videos is a key step in elevating the final product.
- Smart Visual Edits: While the new voiceover plays, the AI gets to work on the visuals. It automatically zooms in on key details, blurs out any sensitive info you might have accidentally shown, and adds highlights to guide the viewer’s eye. The visuals now perfectly sync up with the new, clean narration.
This automated workflow essentially turns your subject matter expert into a one-person production team. They can crank out all sorts of on-brand content—from demos and onboarding videos to explainer videos, feature release videos, knowledge base videos, and support article videos—without ever touching a traditional video editor. The result is professional content, created in a tiny fraction of the time.
Your Step-By-Step Guide to Recording Your Screen
Jumping into your first screen recording can feel a little intimidating, but honestly, it’s a surprisingly simple process once you break it down. Creating a high-quality video isn’t about having crazy technical skills; it’s mostly about thoughtful preparation. With the right software to record computer screen and audio, you’re just a few steps away from a polished, professional-looking tutorial.
First things first: set the stage. A clean, distraction-free environment is your absolute best friend here. Before you even think about hitting that record button, take a minute to prep your digital workspace. This means closing out of any browser tabs, apps, or documents you don’t need for the recording. Every open program is a potential culprit for a random notification or pop-up that can totally derail your flow.
Silence is also golden. I can’t stress this enough. Turn off the notifications on your computer and your phone. A sudden email alert or text message sound is jarring for your viewers and means you’ll either have to re-record the whole section or spend extra time editing it out. Think of it as creating a quiet little studio right on your screen.
Configuring Your Audio and Screen
Once your digital space is prepped, it’s time to dial in your audio. Crisp, clear sound is non-negotiable if you want to come across as professional. While your computer’s built-in mic might seem like the easy option, investing in an external USB microphone will give you a massive leap in quality. It’ll cut out a ton of that echo and background hum right from the start.
Before you record for real, always do a quick soundcheck. Just open your recording software’s settings and make sure your external mic is selected as the input source. Say a few sentences at your normal speaking volume and watch the audio levels. You want that little meter to be bouncing in the green or yellow range—never hitting the red. Hitting the red means the sound is distorted (or “clipping”), and it’s very hard to fix later. For a deeper dive, check out our guide on how to screen record with sound to get everything just right.
Next, decide exactly what you’re going to capture on screen. Most tools give you three main choices:
- Full Screen: This records your entire desktop. It’s great for showing workflows that jump between multiple applications.
- Application Window: This isolates the recording to a single app, hiding your messy desktop and anything else you have open.
- Custom Area: This lets you draw a specific box around a part of your screen, which is perfect for zeroing in on a particular detail.
Choosing the right recording area is key to directing your viewer’s focus and keeping them locked in on what’s important.
The Recording and Post-Production Process
Okay, you’re ready for action. Take a deep breath, click that record button, and go. Speak clearly and try to maintain a steady pace. It’s totally fine if you make small mistakes or need to pause and think for a second. Don’t feel pressured to nail it in one perfect take. A little authenticity often connects way better with an audience than a flawless, robotic delivery.
When you’ve shown everything you need to, just stop the recording. Your raw file is now ready for the final, and most crucial, phase: post-production. This is where you take a pretty good recording and make it great.
The editing phase is where you sharpen your message. By trimming away dead air and clarifying key moments with annotations, you respect your viewer’s time and ensure your core points land with impact. Start with the simple stuff. Trim the very beginning and end of the video to snip out the moments where you were starting and stopping the recorder. Then, hunt for any long pauses or sections where you repeated yourself and cut them out to keep the video tight and engaging.
Most professional screen recorders also let you add visual aids. Use annotations like arrows, text boxes, or highlights to point out important buttons or fields on the screen. This kind of visual guidance is incredibly helpful for reinforcing what you’re saying.
Finally, export your video. Choose a format and resolution that makes sense for where it’s going to live, whether that’s an internal knowledge base, a learning management system (LMS), or a public platform like YouTube. With these steps completed, you’ll have a polished video that’s ready to inform and engage anyone who watches.
How to Choose the Right Software for Your Team
Finding the right software to record computer screen and audio isn’t about chasing the longest feature list. It’s about finding the right fit for your team’s day-to-day work. A tool that’s perfect for a sales team making quick, personalized demos might completely miss the mark for an L&D department building an entire training curriculum.
You have to look past the marketing noise and focus on how the software will actually solve your team’s problems.
Start with the basics that impact everyone. Ease of use is non-negotiable; if a tool is clunky or requires weeks of training, your team just won’t adopt it. You also need to check for platform compatibility—make sure it runs smoothly on Windows, Mac, or in the cloud, depending on what your company uses.
And don’t forget about branding. The ability to add your company’s logo, colors, and fonts is what makes your content look polished and professional, whether it’s for an internal training video or a customer-facing tutorial.
Tailoring Software to Your Team’s Mission
Different teams have vastly different goals for screen recording. Once you understand what each team is trying to accomplish, you can zero in on the features that really matter and avoid paying for bells and whistles you’ll never use.
Think of it like this:
- For Customer Support Teams: The name of the game is speed and clarity. Support agents need to whip up quick, easy-to-follow videos that solve customer problems on the first go. For them, critical features include instant sharing links, simple annotation tools to circle a button or highlight a menu, and the ability to blur sensitive customer data. Their software needs to be brutally efficient.
- For Sales Enablement Teams: It’s all about personalization and impact. Sales reps need to create custom demos that speak directly to a prospect’s specific needs. They need a tool that lets them record a personalized walkthrough, maybe drop in the prospect’s logo, and then share it with tracking analytics to see who watched it and for how long. The goal is to create a tailored experience that helps close the deal.
- For Learning & Development (L&D) Teams: L&D pros are building structured, comprehensive training programs. They think in terms of modules, courses, and long-term knowledge retention. For a deeper dive, check out our guide on using screen recording for training. The features they can’t live without are things like version control for easy updates, interactive elements like quizzes, and smooth integrations with their Learning Management Systems (LMS).
This isn’t just a niche trend; video-first communication is becoming the standard for how modern teams operate. Screen and audio recording is now fundamental to remote work, e-learning, and knowledge sharing. A recent market study confirms this, showing that professional and educational uses are the fastest-growing segments, with cloud-based tools expected to take over by 2033 because they’re just so much easier to use and share. You can discover more insights about the screen recording market to see the full picture.
To help visualize this, here’s a quick checklist mapping key features to different team needs.
Software Feature Checklist for Different Teams
This table breaks down which software features are most valuable for Customer Support, Sales Enablement, and Learning & Development teams, helping you prioritize what to look for based on your department’s goals.
| Feature | Customer Support | Sales Enablement | Learning & Development |
|---|---|---|---|
| Instant Sharing Links | ✅ | ✅ | ✅ |
| Simple Annotation Tools | ✅ | ✅ | ✅ |
| Blurring Sensitive Data | ✅ | — | — |
| Video Analytics/Tracking | — | ✅ | ✅ |
| Custom Branding | ✅ | ✅ | ✅ |
| Interactive Quizzes | — | — | ✅ |
| LMS Integration | — | — | ✅ |
| Version Control | — | — | ✅ |
As you can see, while some features are universally helpful, others are deal-breakers for one team but irrelevant to another.
Finding the Sweet Spot Between Simplicity and Power
For most businesses, the biggest headache is the gap between dead-simple recording tools and professional-grade video editors. A quick recording made with a tool like Loom is great for speed, but easy to use recording such as recording via Loom is often 50-100% longer than necessary, full of “ums,” “ahs,” and awkward pauses.
On the other end of the spectrum, you have powerful software like Camtasia or Adobe Premiere Pro. These can create incredibly polished videos, but professional video editing sofware such as Camtasia or Adobe Premier Pro requires expert video editing knowledge, creating a bottleneck where only one or two people in the company can produce high-quality content.
This is where AI-powered platforms like Tutorial AI are changing the game.
Tutorial AI’s tools let you speak freely without any practice and still your video will look professional as if it was edited in Adobe Premiere Pro. It allows the subject matter expert to create on-brand videos extremely efficiently. Imagine your top product expert needs to explain a new feature. Instead of writing a script and doing multiple takes, they just hit record and talk through it naturally. Tutorial AI takes that raw, unedited footage and automatically transforms it into a perfect, on-brand video. Tutorial AI’s tools let you speak freely without any practice and still your video will look professional as if it was edited in Adobe Premiere Pro.
It cleans up the script, removes the filler words, generates a crystal-clear AI voiceover, and even adds professional visual effects like zooms and highlights to keep viewers engaged.
This approach empowers your subject matter experts—the people who actually know the content inside and out—to generate video tutorials based on screen recordings for demos, onboarding videos, explainer videos, feature release videos, knowledge base videos, and support article videos without ever touching a video editing timeline. It allows the subject matter expert to create on-brand videos extremely efficiently, making it the perfect fit for any team that needs to produce polished content without a steep learning curve.
Got Questions? We’ve Got Answers.
We get a lot of questions about screen and audio recording. Here are straightforward answers to the ones that come up most often.
What’s the Best Screen Recorder for Mac and Windows?
For quick, one-off recordings, the tools already on your computer—like QuickTime Player on a Mac or the Xbox Game Bar on Windows—can do the job. They’re basic but functional.
However, if you’re creating polished tutorials, training materials, or product demos, you’ll quickly outgrow them. A dedicated platform like Tutorial AI is built for that. It works flawlessly on both operating systems and gives you a much bigger toolkit, including AI-powered editing, voice generation, and team features that keep everything consistent and professional.
How Do I Record My Screen with Crystal-Clear Audio?
The secret to great audio is twofold: getting a clean recording and then polishing it. First, ditch your laptop’s built-in microphone. A simple external USB mic will make a world of difference. Find a quiet room to minimize echo and background noise.
Inside your recording software, make sure you’ve selected your new microphone as the audio source and set the bitrate to at least 128 kbps for crisp, clear sound.
A tool like Tutorial AI takes this a step further. You can generate a flawless AI voiceover directly from your script, which completely eliminates any lingering background noise or speaking mistakes from your original recording. It guarantees a perfect, studio-quality result every time.
Can I Edit My Screen Recording After I’m Done?
Absolutely. Most screen recorders include a basic editor for simple trims and cuts. But if you’ve ever wrestled with a traditional video timeline, you know how tedious that can be.
This is where modern tools really shine. With Tutorial AI, for example, you edit your video by editing text. The platform automatically transcribes your recording, and when you delete a word or sentence from the transcript, the corresponding video and audio are cut instantly. It’s an incredibly intuitive way to edit, making the whole process faster and accessible to anyone, no video editing experience required.
Ready to turn your screen recordings into professional-grade tutorials without the headache? With Tutorial AI, you can craft polished, on-brand videos in minutes, not hours. Our AI platform handles the tedious editing, letting you focus on what you do best: sharing your knowledge. Start creating studio-quality videos today.