Getting a clean, cropped screenshot on a Mac is easy once you know the built-in shortcuts. Forget opening a heavy app for a simple trim. The fastest way? Press Shift-Command-4, grab your image, and immediately click the thumbnail preview that pops up in the corner of your screen. This drops you right into an editing window where you can crop and save in seconds.
Your First Crop: The Instant Screenshot Method
When you’re trying to capture something on your screen, speed is everything. You don’t want to break your focus by digging through applications just to trim the edges of an image. Thankfully, macOS has a couple of excellent, built-in tools designed for exactly this kind of quick, on-the-fly editing.
These native methods are perfect for grabbing a snippet of an article, sharing a visual with a colleague on Slack, or creating clean images for a presentation. There’s really no need for third-party software for these fundamental tasks.
The Two Fastest Cropping Workflows
The most efficient ways to crop a screenshot come down to one simple choice: do you want to crop before you capture or right after?
- Pre-Cropping (Before Capture): This is my go-to for precision. Use the Shift-Command-5 shortcut to bring up the Screenshot toolbar and select "Capture Selected Portion." You can then draw a perfect box around exactly what you need, so the final image is already cropped from the start. No extra steps needed.
- Instant Cropping (After Capture): This is for when you grab a larger area and decide to tighten it up afterward. After taking the shot, just click the thumbnail preview. You’ll get a lightweight editor where you can drag the corner handles to frame your content, add quick annotations, and save. It's an all-in-one action that takes just a moment.
This decision tree breaks down how to choose between the two fastest methods on your Mac.
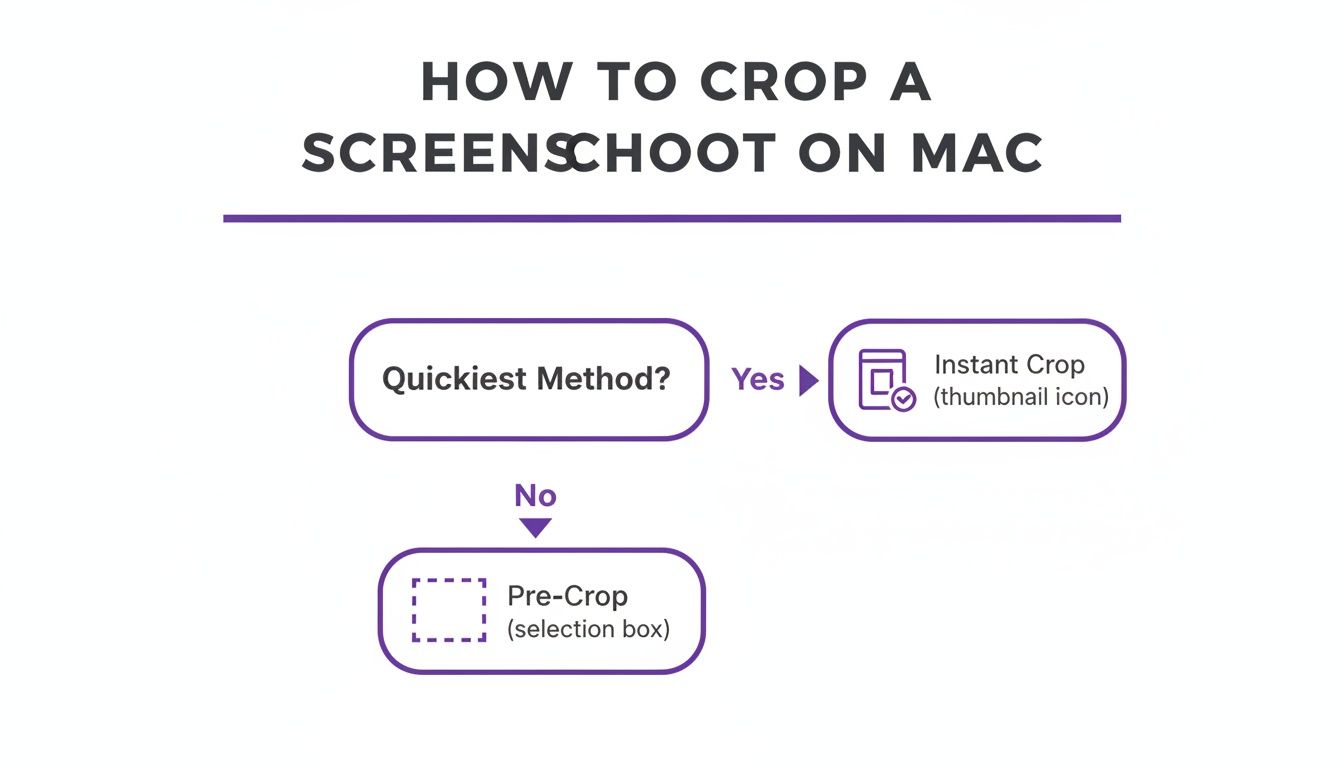
As the graphic shows, your choice depends on whether you prefer to set your boundaries beforehand or edit on the fly. And if your projects involve more than just static images, you might also want to learn how to screen record with sound.
Mac Screenshot Cropping Methods at a Glance
While the instant methods are great for speed, macOS offers a few different built-in tools for cropping. This table gives you a quick rundown to help you choose the right one for the job.
| Method | Best For | Speed | Additional Features |
|---|---|---|---|
| Screenshot App | Quick, on-the-fly crops and annotations. | Fastest | Screen recording, timer, save location options. |
| Preview | More precise edits on existing images. | Fast | Color adjustments, text, shapes, resizing. |
| Photos App | Cropping images already in your photo library. | Medium | Full photo editing suite, filters, organization. |
Each tool has its place. The Screenshot app is for immediate needs, Preview offers more control for standalone images, and Photos is best when you're already working within your library.
Using Preview for Pixel-Perfect Cropping
When the quick crop just won't cut it, and you need a bit more precision, your Mac's built-in Preview app is the answer. I find myself using it all the time when I need to get things just right—like trimming screenshots to a specific size for a tutorial or a knowledge base article where consistency is key. Just double-click any screenshot on your desktop, and it pops right open in Preview.
Don't let its simple look fool you; Preview is surprisingly powerful. Projections show that by 2026, over 85% of Mac users will rely on built-in tools like this for quick image edits. For anyone creating support documentation, this native workflow is a game-changer. I’ve seen teams cut their editing time from two minutes per image down to just 30 seconds. You can find more data on these trends at ScreenSnap Pro.
Gaining Control with the Markup Toolbar
To get started, you'll need to bring up the Markup toolbar. The easiest way is to hit the keyboard shortcut Shift-Command-A, but you can also click the little marker-in-a-circle icon near the top-right of the window.
This reveals a new set of tools. The one you want for cropping is "Rectangular Selection," which looks like a box made of a dotted line. Once you click it, your cursor turns into a crosshair.
Now, just click and drag to draw a box around the part of the image you want to keep. As you drag, you’ll notice Preview shows the exact pixel dimensions of your selection right next to your cursor. This is a fantastic feature for creating a series of images that are all the same size.
Pro Tip: I use these two tricks all the time. Hold down the Shift key while dragging to lock your selection into a perfect square or maintain the original aspect ratio. If you want to draw the selection box from the center outward, hold down the Option key instead.
Once you’ve framed your shot perfectly, hit Command-K (or navigate to Tools > Crop in the menu bar). The image will instantly trim down to your selection. Just save your work with Command-S, and you're all set.
This method is brilliant for static images. If you’re often creating visual instructions, you might also find value in our guide on quick cropping in Canva for other projects.
Using the Photos App for an Organized Workflow
Most of us think of the Photos app as just a home for vacation snapshots and family pictures. But if you’re building a big collection of visuals for tutorials, client work, or a personal knowledge base, you might be overlooking one of the best organizational tools you already have. It’s a surprisingly powerful way to keep all your visual assets in one place, perfectly synced across your Mac, iPhone, and iPad.
Getting started is as simple as dragging your screenshots from the Desktop right into the Photos app. Once they're imported, double-click any image and hit the Edit button in the top-right corner. This is where you unlock a full suite of editing tools that go way beyond a simple crop, making it a fantastic hub for content creators.
Cropping and Beyond in Photos
Inside the editor, click over to the Crop tab. You can freely drag the corner handles to frame your shot perfectly, but Photos has a few more tricks up its sleeve. For example, the "Auto" button often does a fantastic job of suggesting an ideal crop and even straightening the image with a single click.
Beyond the basics, you get a handful of more advanced controls right in the same panel:
- Aspect Ratio: You can lock your crop to a specific aspect ratio like Square, 16:9, or 4:3. This is a huge time-saver for creating consistent-looking images for a blog or tutorial series.
- Straighten Tool: The small dial lets you fine-tune the angle. It’s perfect for fixing screenshots that were taken of a physical screen at a slight angle.
- Flip & Rotate: Quickly mirror your image or rotate it in 90-degree increments without having to jump to another tool.
The best part of this system is how it centralizes everything. Every single edit you make is non-destructive, so you can always revert back to the original screenshot. Plus, since everything syncs via iCloud, your cropped and edited images are instantly ready to use on your iPhone or iPad.
Using Photos turns cropping a screenshot from a one-off task into part of a much bigger, more organized content workflow. For anyone who deals with lots of visual guides or documentation, it's an incredibly efficient way to work.
Streamlining Edits with Third-Party Screenshot Apps
Let's be honest: the built-in screenshot tools on a Mac are great for quick grabs. But if your daily work involves creating tutorials, documenting software bugs, or sending visual feedback, you’ll quickly find their limits. That's when you start feeling the friction of a multi-step process: capture, open in Preview, crop, annotate, save, and then finally share.
This is where third-party apps completely change the game. They aren't just about taking a picture of your screen; they're about creating a seamless workflow. Imagine needing to document a long, scrolling webpage. With a dedicated app, you can capture the entire page in one shot, then immediately crop to the important part, add arrows, and blur out sensitive info—all without ever leaving the app. It's a single, fluid motion.
Upgrading Your Workflow with Advanced Tools
It’s no surprise that these advanced tools are gaining traction. We're seeing a huge shift, with projections showing that professional screenshot apps could capture 45% of the market share among Mac power users by 2026. In fact, their adoption has skyrocketed by 300% since 2019, and for good reason—they can cut post-capture editing time by an average of 60%.
What kind of features make such a difference? Here are the ones I find indispensable:
- Scrolling Capture: This is a lifesaver. It lets you grab an entire webpage or a long document in a single, continuous screenshot.
- Instant Annotation: The ability to add text, arrows, shapes, and blur effects right after you capture is the biggest time-saver. No more opening another app.
- OCR (Optical Character Recognition): Have you ever needed to copy text from an image? OCR pulls it for you, so you don't have to retype a thing.
- Cloud Integration: Many apps can automatically upload your screenshot and copy a shareable link to your clipboard. It’s perfect for collaborating with a team.
As you start to streamline your editing process, you’ll find other utilities can be a huge help. For instance, free AI-powered image resizer tools are fantastic for quickly getting your cropped screenshots ready for a blog, email, or social media post.
Many of these time-saving features are surprisingly accessible, and you can find them even when looking for the best free screen capture software available without needing to spend a dime.
Automating Edits with Batch Cropping Commands
Let's be honest: manually cropping dozens of screenshots for a training manual or tutorial is a soul-crushing task. If you’ve ever stared at a folder of images that all need the exact same trim, you know the pain. Instead of grinding through them one by one in Preview, you can automate the entire job right from your Mac’s built-in Terminal.
This is where a powerful, free tool called ImageMagick comes in. It’s a command-line utility that lets you instruct your Mac to perform the same edit on a whole folder of images instantly. It might sound a bit technical, but it’s a game-changer. In fact, interest in batch cropping screenshots on Mac has shot up by 150% since 2021 as more people look for ways to work smarter. For a deeper dive, check out this great walkthrough from developer Christian Heilmann.
Using a Simple Script for Batch Cropping
Once you have ImageMagick installed (a quick process using Homebrew, the go-to package manager for macOS), you’re ready to work some magic. Let's say you have 100+ screenshots that all need to be cropped to a consistent size. Just navigate to your image folder in Terminal and run a one-line command.
It looks something like this:
for filename in *.png; do convert $filename -crop 1842x918+123+234 "cropped/$filename"; done
This command is your personal editing assistant. It tells your Mac to find every PNG file, crop each one to the exact dimension (1842x918), and save the newly cropped version into a subfolder called "cropped." For a Learning & Development team trying to standardize hundreds of images, this turns a tedious 20-minute manual job into a 10-second automated task.
One of my favorite tricks with this method is using it to get rid of the default drop shadow macOS adds to window screenshots. By tweaking the crop dimensions just a little, you can trim off the shadow entirely. The result is a much cleaner image with a smaller file size—perfect for any web-based knowledge base or guide.
When a Screenshot Isn't Enough: AI-Powered Video Tutorials
Knowing how to crop a screenshot is a fundamental skill, but sometimes a static image just doesn't cut it. When you need to demonstrate a process—walking a new customer through your app or showing a colleague how to perform a task—a video is far more effective. But that’s where things usually get complicated.

There’s a massive gap between quick screen recordings and truly professional tutorials. On one side, you have simple tools that are great for casual, off-the-cuff videos. The problem? Those raw recordings are often 50-100% longer than necessary, filled with awkward pauses, "ums" and "ahs," and wandering mouse movements. They get the job done, but they don't exactly scream professionalism.
On the other side, you have powerful video editing suites like Adobe Premiere Pro or Camtasia. These can create incredible, polished videos, but they come with a steep learning curve and demand a huge time investment. Most subject matter experts simply don't have the time or specialized skills to become video editors.
A Smarter Way to Create Tutorials with AI
This is where a new breed of AI tools comes in, completely changing how instructional videos are made. The idea is simple: you just hit record and talk through your process naturally. No script, no practice runs, no pressure to be perfect. You just capture your screen and your expertise.
After you finish, the AI takes over. It analyzes your raw footage and automatically edits it into a clean, concise tutorial that looks like it was created by a pro. This finally gives experts a way to create high-quality, on-brand videos without the editing nightmare.
Think of it as having a personal video editor on standby. The AI automatically crops the video to follow the action, adds smooth zooms to highlight key details, and even emphasizes your cursor. It cuts out all the rambling and mistakes, leaving you with a tight, focused tutorial.
This AI-driven approach is perfect for creating all kinds of content that would be impossible with just a static screenshot:
- Software Onboarding: Guide new users through your product’s features.
- Explainer Videos: Break down complex workflows into simple, digestible steps.
- Feature Announcements: Quickly show off what's new in your latest update.
- Support & Knowledge Base Videos: Demonstrate solutions to common problems visually.
If you’re interested in bringing AI into your editing workflow, an application like Lunabloom AI's App offers another way to explore advanced features beyond basic cropping. By handing off the most tedious parts of video creation to AI, these tools make it possible for anyone to produce professional demos and tutorials in a matter of minutes, not hours.
Common Cropping Questions Answered
Even after you've got the basics down, a few specific questions always seem to come up. Here are some quick answers to the things people ask most often about cropping screenshots on a Mac.
How Can I Change Where My Mac Saves Screenshots?
Tired of your Desktop getting cluttered with screenshots? You can change that for good.
Just bring up the Screenshot toolbar with Shift-Command-5. Look for the "Options" menu on the right. Under the "Save to" section, you can pick a different default location like your Documents folder or even choose "Other Location" to create a dedicated "Screenshots" folder. It's a one-time change your Mac will remember from now on.
Can I Undo a Crop in the Preview App?
Absolutely. If you’ve just cropped an image in Preview and haven't closed it yet, you can instantly undo it. Simply hit Command-Z or navigate to Edit > Undo from the menu bar.
What if you already saved and closed it? You're not out of luck. Preview has a fantastic feature called File > Revert To, which lets you restore a previously saved version of the image before you made the crop. It’s a real lifesaver.
How Do I Take a Screenshot of Just One Window?
Capturing a single window without grabbing your messy desktop in the background is easy. Use the shortcut Shift-Command-4, but don't click and drag. Instead, press the Spacebar.
Your cursor will turn into a little camera icon. Now, just hover over the window you want to capture—it will highlight in blue—and click. Your Mac will snap a perfect, clean screenshot of just that window, complete with a subtle, professional-looking drop shadow.
While getting your screenshot edits just right is a huge plus, there's a limit to what static images can do. Creating video tutorials often means wrestling with a different beast entirely. Easy-to-use recording tools like Loom often produce videos that are 50-100% longer than necessary, while professional editing software like Camtasia or Adobe Premiere Pro requires expert knowledge.
That's where a tool like Tutorial AI comes in. Its tools generate polished video tutorials from your screen recordings. You can speak freely without any practice, and your video will still look as professional as if it was edited in Adobe Premiere Pro. It allows the subject matter expert to create on-brand videos for demos, onboarding, feature releases, and knowledge base articles extremely efficiently. You can learn more over at https://www.tutorial.ai.